*Updated 2/25/20
Workspace ONE Sensors is an awesome new feature (released in WS1 console version 1904) that enables an admin to put together any Powershell script and use that as inventory data to build reports and even do automation with WS1 Intelligence. WS1 console version 1910 add 64 bit support so you can now choose to run the sensor in 32 bit, 64 bit, or “auto”. However, in order for this to work on clients they also need to have the 1910 version of Intelligent Hub installed. So you if you have a mixed agent environment still, you may still need to run 64bit sensors from 32bit context. itis important because without doing this process, sensors will run in 32bit mode always and potentially give you incorrect data back. The main culprit for this is querying HLKM registry keys. If you are querying WMI or checking for running services, these don’t do any 32bit redirection and should be fine. redirection. Here’s an example of how 32bit redirection impacts things:
Recently, I needed to query a few registry keys to find out the email address or UPN of the user that is enrolled on the device. First, I needed to find the GUID of my enrollment and then use that to query a different key. Like this:
$guid = (Get-ItemProperty -Path "HKLM:SOFTWARE\Microsoft\Provisioning\OMADM\Accounts\*" -ErrorAction SilentlyContinue).PSChildname
$upn = (Get-ItemProperty -Path "HKLM:\SOFTWARE\Microsoft\Enrollments\$GUID" -ErrorAction SilentlyContinue).upn
return $upn
However, when I try this in 32bit powershell (which is done by launching it from C:\Windows\SysWOW64\WindowsPowerShell\v1.0\powershell_ise.exe) as well as turning off the “-ErrorAction SilentlyContinue” parameter so you can see the error, it can’t find the key:
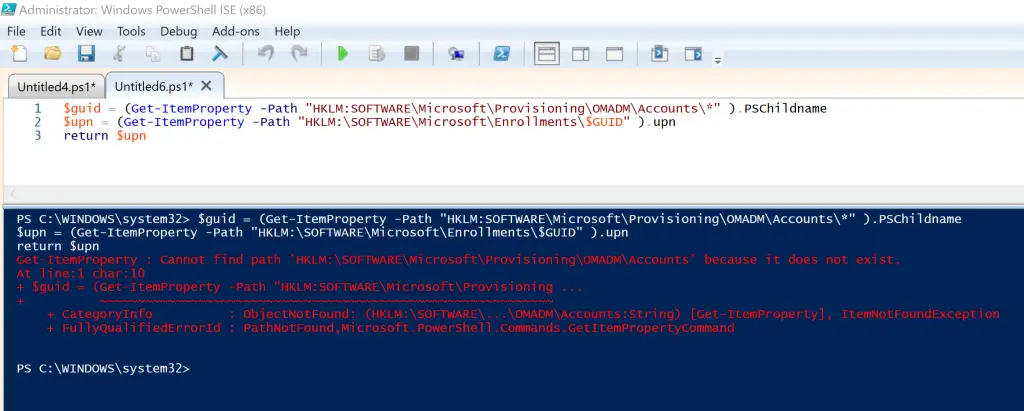
This is because Windows automatically redirects the request of HKLM\Software\Microsoft\Provisioning… to HKLM\SOFTWARE\WOW6432Node\Microsoft\Provisioning. But in this location, the keys I need don’t exist. This can be extremely frustrating if you don’t realize this is happening.
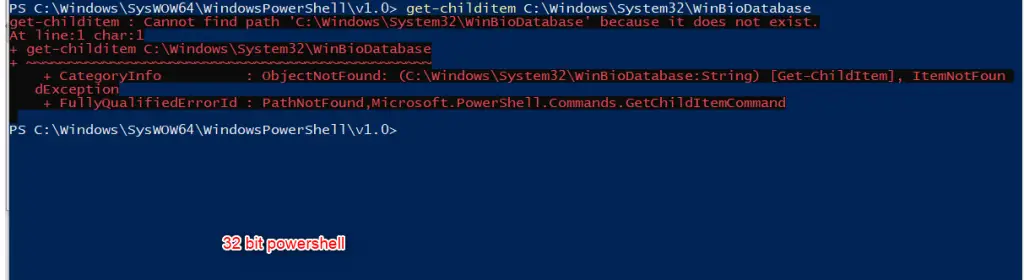
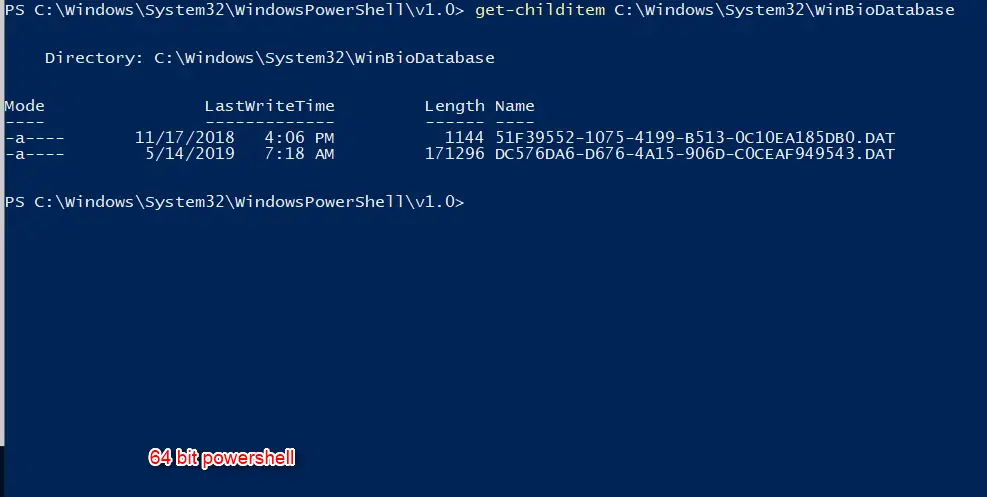
Some other examples are a bit simpler, like doing a get-childitem on a filepath:
Get-Childitem C:\Windows\System32\WinBioDatabase
How to Fix
For some things, like the get-childitem example above, you simply call $env:windir\sysnative like this: get-childitem $env:windir\sysnative\WinBioDatabase. However, if you need to query registry keys the process is a little bit more complicated. You will need to pass the 64bit powershell executable a here-string like this:
@'
$guid = (Get-ItemProperty -Path "HKLM:SOFTWARE\Microsoft\Provisioning\OMADM\Accounts\*" ).PSChildname
$upn = (Get-ItemProperty -Path "HKLM:\SOFTWARE\Microsoft\Enrollments\$GUID" ).upn
return $upn
'@ | &"$env:windir\Sysnative\WindowsPowerShell\v1.0\powershell.exe" -NoProfile -Command -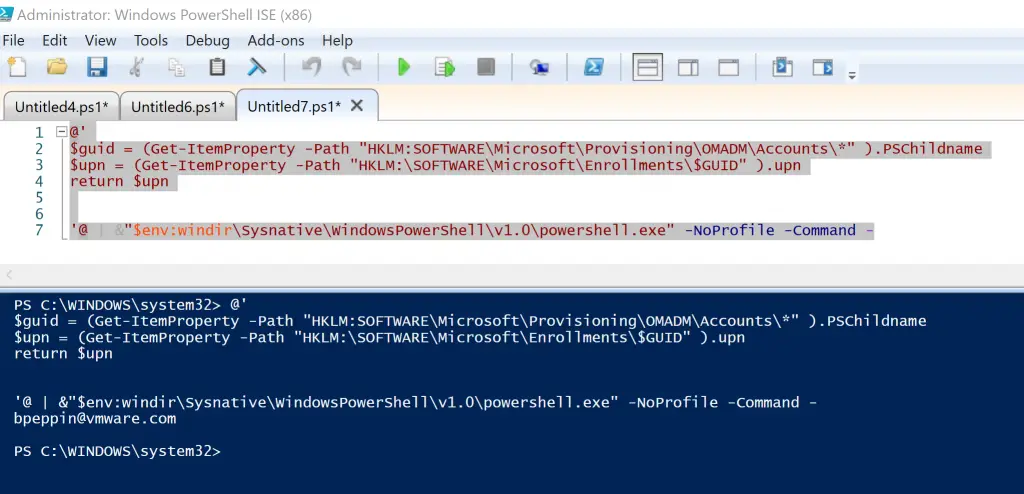
Sometimes this isn’t enough as more complicated scripts don’t seem to run well as a here-string. I’ve found that if I have different loops inside, it just won’t run properly like this. So to work around it, you can set your whole script as a variable and then encoded it as base64string. Then pass this to 64 bit powershell with the -EncodedCommand parameter.
$checksid = {

    New-PSDrive HKU Registry HKEY_USERS | out-null
    $SID = (get-childitem HKU: | Where-Object { $_.Name -like "*S-1-12-1*" -or $_.Name -like "*S-1-5-21*" -And $_.Name -notlike "*_classes" }).Name
    $SID = $SID.Split('\')[1]
    Remove-PSDrive HKU


    $GUID = (Get-Item -Path "HKLM:SOFTWARE\Microsoft\Provisioning\OMADM\Accounts\*" -ErrorAction SilentlyContinue).PSChildname
    if ($GUID -eq $null)
    {

	    return "No_MDM_GUID"
    }
    foreach ($row in $GUID)
    {

	    $path2 = "HKLM:\SOFTWARE\Microsoft\Enrollments\$row"
	    $upn = (Get-ItemProperty -Path $PATH2 -ErrorAction SilentlyContinue).UPN
	    $enrollmentState = (Get-ItemProperty -Path $PATH2 -ErrorAction SilentlyContinue).EnrollmentState
	    $providerID = (Get-ItemProperty -Path $PATH2 -ErrorAction SilentlyContinue).ProviderID

	    if ($providerID -eq "AirWatchMDM")
	    {
		    [string]$EnrollmentSID = (Get-ChildItem HKLM:\SOFTWARE\Microsoft\EnterpriseResourceManager\Tracked\$row| Where-Object { $_.Name -notlike "*device" }).PSChildName

		    If ($SID -eq $EnrollmentSID -and $enrollmentState -eq 1)
		    {
			    return "SID_Match"

		    }
		    else
		    {

			    Return "SID_Mismatch"
		    }

	    }
    }
}
$encoded = [convert]::ToBase64String([Text.Encoding]::Unicode.GetBytes($checksid))
&"$env:windir\Sysnative\WindowsPowerShell\v1.0\powershell.exe" -NoProfile -EncodedCommand $encoded
Some other tips
- How to check which version your script or session is running in:
$Arch = (Get-Process -Id $PID).StartInfo.EnvironmentVariables["PROCESSOR_ARCHITECTURE"];
if ($Arch -eq 'x86')
{
	Write-host 'Running 32-bit PowerShell'
}
elseif ($Arch -eq 'amd64')
{
	Write-host 'Running 64-bit PowerShell'
}
2. To manually run the exes of each version of powershell:
32 Bit powershell path
C:\Windows\SysWOW64\WindowsPowerShell\v1.0
64 bit powershell path
C:\Windows\System32\WindowsPowerShell\v1.0
Create Sensor
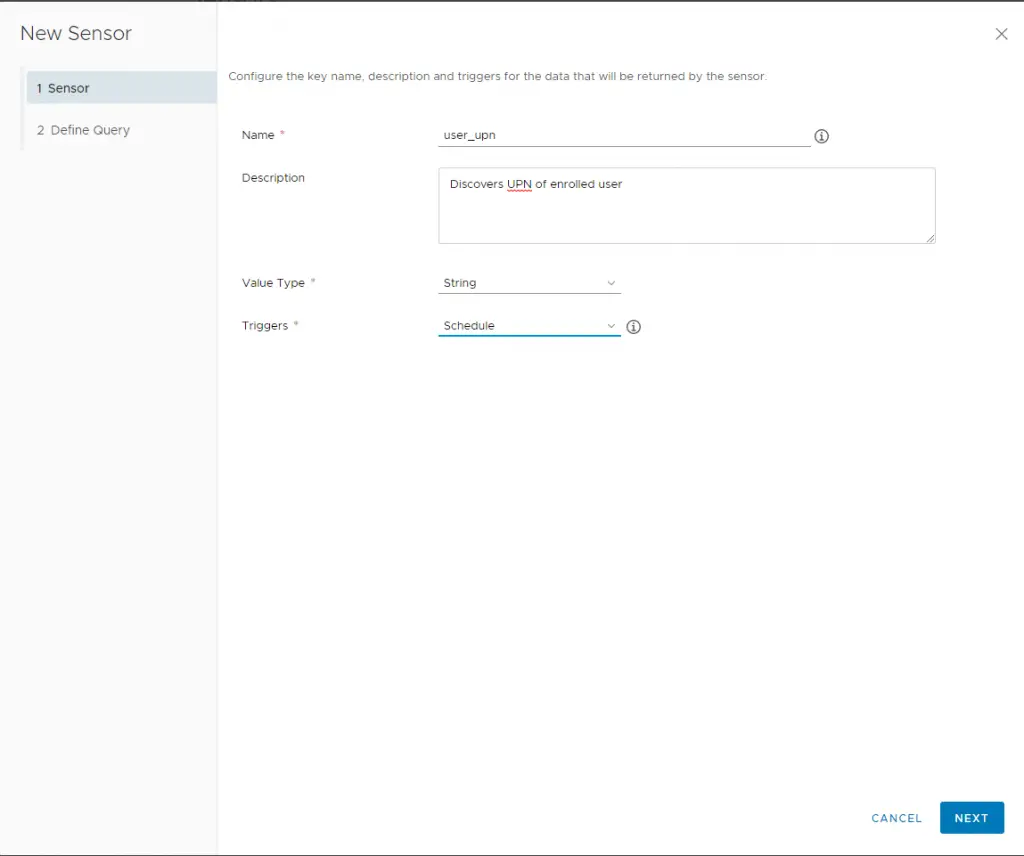
Now let’s create our sensor and deploy to our device.
In the WS1 UEM console, navigate to Devices > Provisioning > Custom Attributes > Sensors
Click Add > Windows
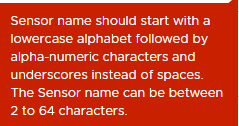
For name ensure you start with a lowercase letter and then use underscores for spaces.
Also set your trigger (on an event or per your sampling schedule). Next.
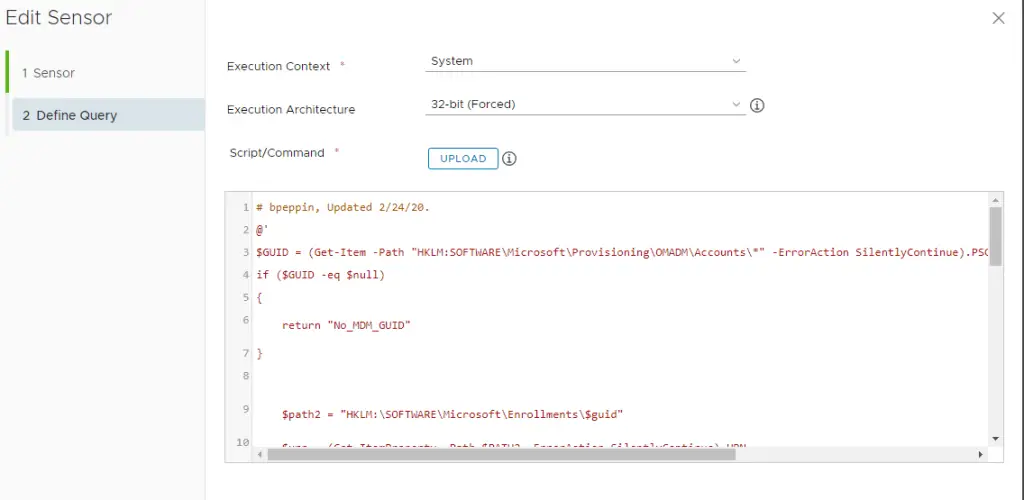
Paste the powershell script. You can also select “upload” and it will automatically paste your script in the window. Also, because we are doing this redirection to 64 bit we have to force the agent to always run this in 32bit context. If you don’t do this, you will get an error.
Execution context: System
Execution Architecture: 32-bit (Forced)
Click Finish. Now we need to assign this to our devices.
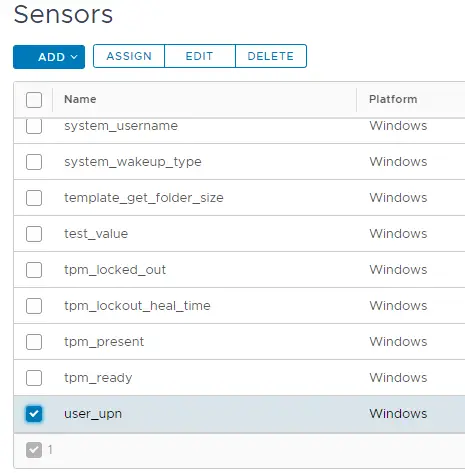
Find your sensor in the list (will be alphabatized). Check the box and click “Assign”.
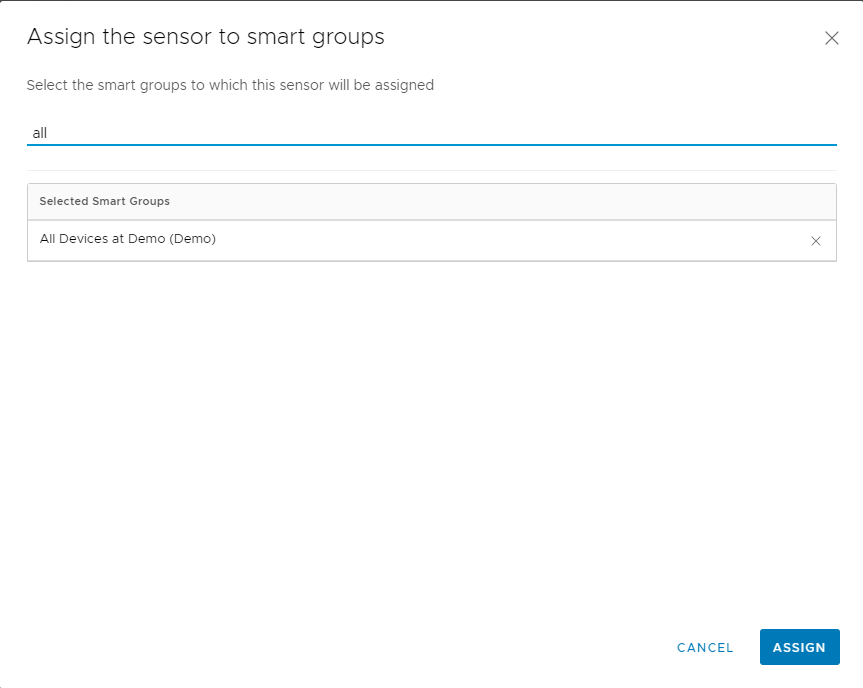
Search for your smart group. Select it and then click Assign.
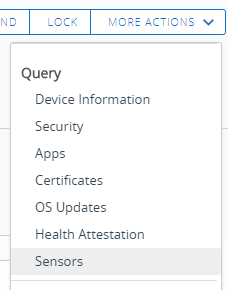
To force the sensor to run right away, go to the device details page and click Query > More Actions > Sensors.
Go to the Troubleshooting tab > Event log. You will see these events:
“Assign Device Sensor Requested” — This sends it down to device
“Device sensor sample received” — this means the sensor data was successfully received. You can click on the Event Data to see which sensors returned back successfully.
If you get errors, you will see a “Sample Received with Errors” message. Then you can go into Event data and see any errors from running the sensor.
That’s it! For more sensor examples as well as where you can contribute additional sensors, go to our github page.
Great information. I do have a question. How does this affect performance when you run say 20 sensors back to back. It seems to me that spinning up an initial PS window to be followed by a second PS environment for each sensor could take a noticeable amount of time. On some machines, it already takes more than a second to run each sensor.
Yes each sensor runs at the same time if they are set to “schedule”. So when the agent schedule is trigger or you manually query “sensors” from the console, they all run at the same time. In terms of performance it really depends on the client and what you are doing. Try to keep them as small and fast as possible.