There are a number of ways to deploy a PowerShell script with Workspace ONE. Each method has its strengths and weaknesses and should be used accordingly. Let’s dig into Workspace ONE PowerShell.
Method 1 – Product Provisioning
Pros:
- A very simple way to deploy a basic script with some files
- No “detection criteria” to worry about – simply fire it off. It will succeed/fail based on the exit code of the script.
- Can deploy multiple files without having to zip
- Works in parallel to Software Distribution
- I’ve found it to work best for scripts that do configuration during the initial enrollment
Cons:
- Difficult to do version control
- This is fairly legacy tech and isn’t really being further developed by R&D
- The PowerShell executor the Workspace ONE agent uses to execute PowerShell can act weird at times. It’s also 32bit PowerShell.
Steps
- First, navigate to Devices –> Staging & Provisioning –> Components –> Files/Actions.
Then click the “Add Files/Actions” button at the top.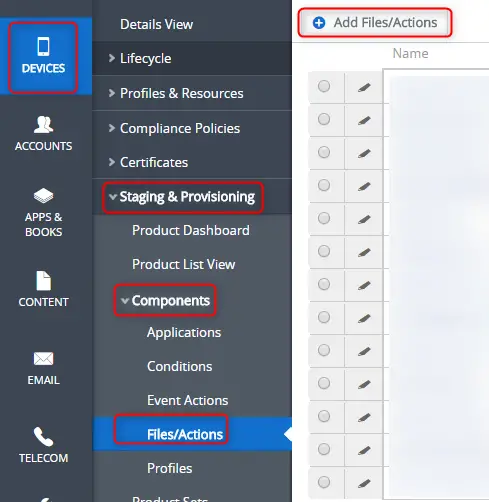
- Select “Windows”, then “Windows Desktop”.
- Fill out the Name and Description. Verify you have the correct Organization Group (OG) in the “Managed by” field.
In my example, I have a script to disable UAC.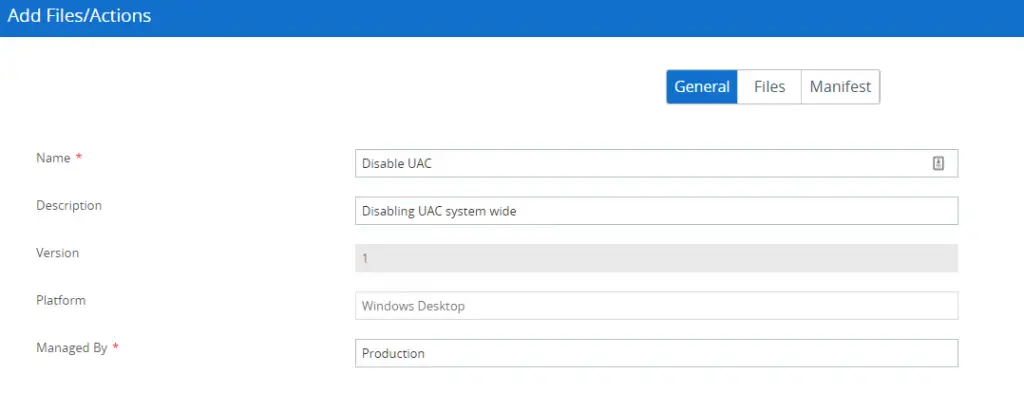
- Click the “Files” tab and the top and then “Add Files”.
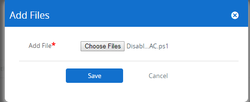
- Browse for your PowerShell script.
- Fill out the download path where you want the script to be downloaded to on the client.
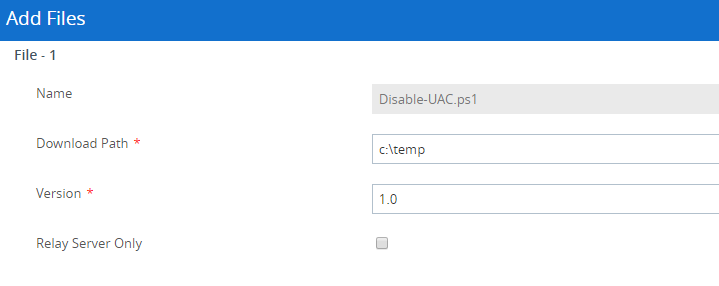
- Click Save.
- Now click on the “Manifest” tab and click “Add Action” to configure the actual command to run the script.
.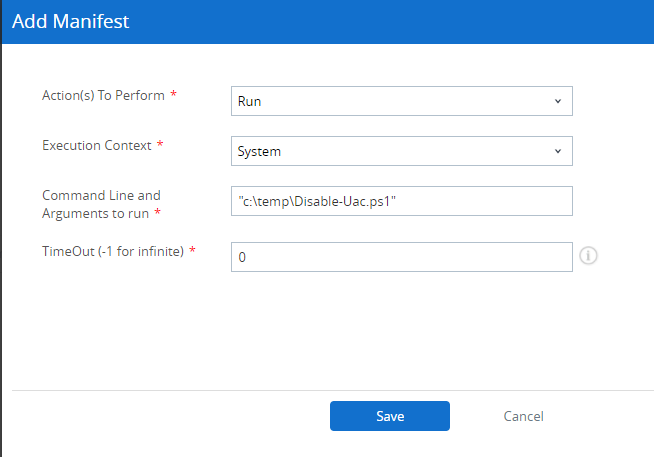
Complete the following:- Action(s) to Perform: Run
- Execution Context: System
- Command Line and Arguments to run: Enter full path to PowerShell script configured in previous step. No need to add any “powershell -executionbypass” commands in front of the file as the Product Provisioning engine automatically runs in bypass mode.
- TimeOut: Configure as needed.
- Add optional “Uninstall Manifest”
- Once you added the necessary files and manifests, click Save.
- Now, we need to create a “Product” that will be associated with this Files/Action item.
- Go up to “Product List View” and click on “Add Product”.
- Select “Windows” and then “Windows Desktop”.
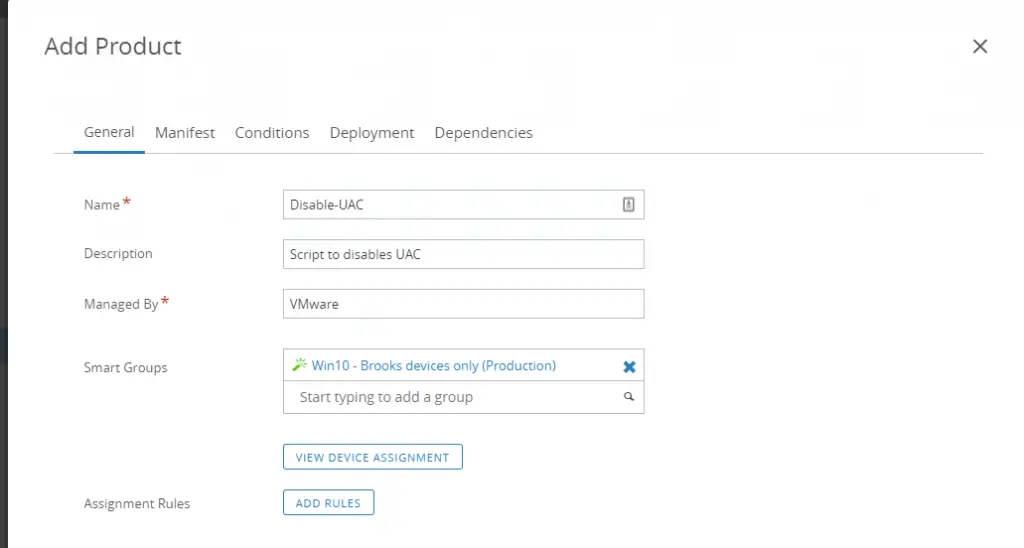
- Fill the “General Tab” with the appropriate information. Select or create a smart group in the “Assigned Groups” area.
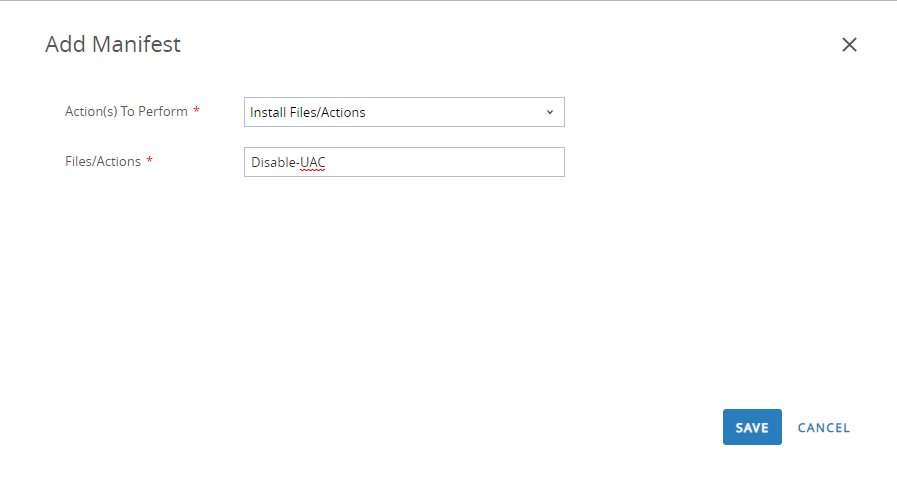
- Click on “Manifest” tab, and then “Add”.
- Under “Actions to Perform” select “Install Files / Actions”
- Under “Files/Actions” select your previous created item. Mine is called “Disable-UAC”.
- You can configure additional download or install conditions in the “Conditions” tab. You can modify the deployment schedule in the “Deployment” tab. And you can also add any dependencies in the “Dependencies” tab. For now, I”m leaving all three of these default.
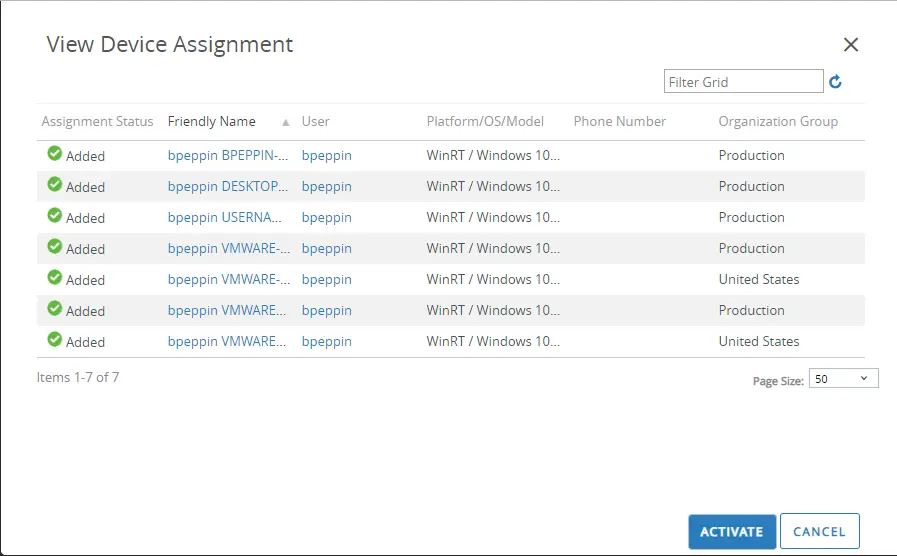
- Once ready, click “Activate” to view final device assignment list. If everything looks good click “Activate” again to send down the script.
Method 2 – Apps & Books (Software Distribution)
Pros:
- Gives you full Lifecycle control over apps and scripts. You can add new versions, remove old ones, report on install status, etc.
- Can be published to the Workspace ONE Hub Catalog
- A lot more control over the commands to run and install criteria
- Can be used to export as PPKG as part of Factory Provisioning
Cons:
- Takes a little bit longer to set up as there are more fields required (not too bad once you get used to it)
- If you have apps set to auto-deploy, updating a new version will also automatically deploy to those same smart groups
- Adding a new version requires you to fill out all of the fields again which can get annoying
This method is probably most commonly used in conjunction with doing a software install, but doing a standalone script works fine too. I’ll show you how to use the same “Disable-UAC” script used in the first example.
- Create a folder with your script and corresponding files in it
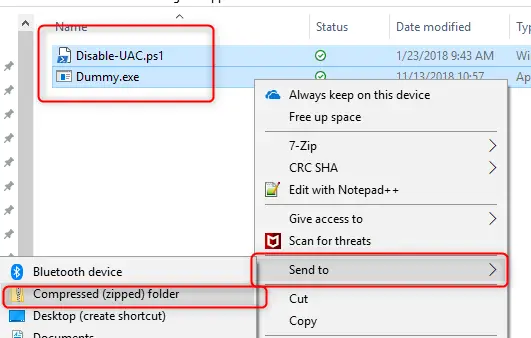
- The Software Distribution engine (SFD) expects an msi or exe file inside of the zip file. If you are only deploying a script you will either need to include a small EXE or MSI that won’t be used or simply create a text file and call it “dummy.exe”.

- Select both of these files, right-click then Send To –> Compressed (zipped) Folder. NOTE: Don’t go up a level and do this on the parent folder as it will make an additional and necessary sub-folder inside your zip file.
- In the Workspace ONE console, browse to Apps & Books –> Applications –> Native. Then click “Add Application”
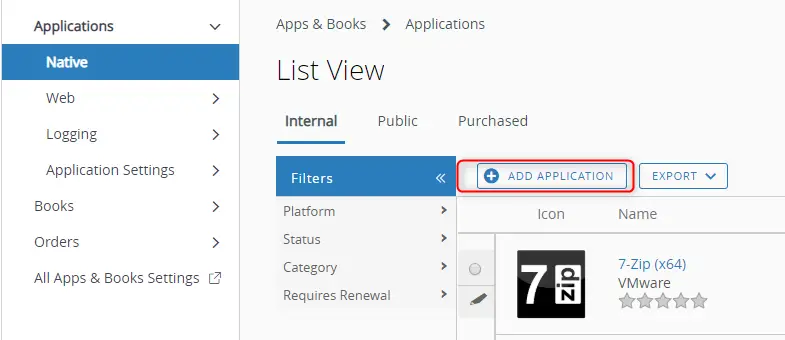
- Click on the “Upload” button and select your zip file.
- Click “Save” to upload.
- Select correct Organizational Group and then click “Continue”.
- On the “Details” tab, fill out the necessary fields. I generally fill out these ones:
– Name (update the name)
– Supported Processor Architecture (64bit)
– Change log (add info and put my username so other admins know who uploaded)
– Put in a Description detailing what this does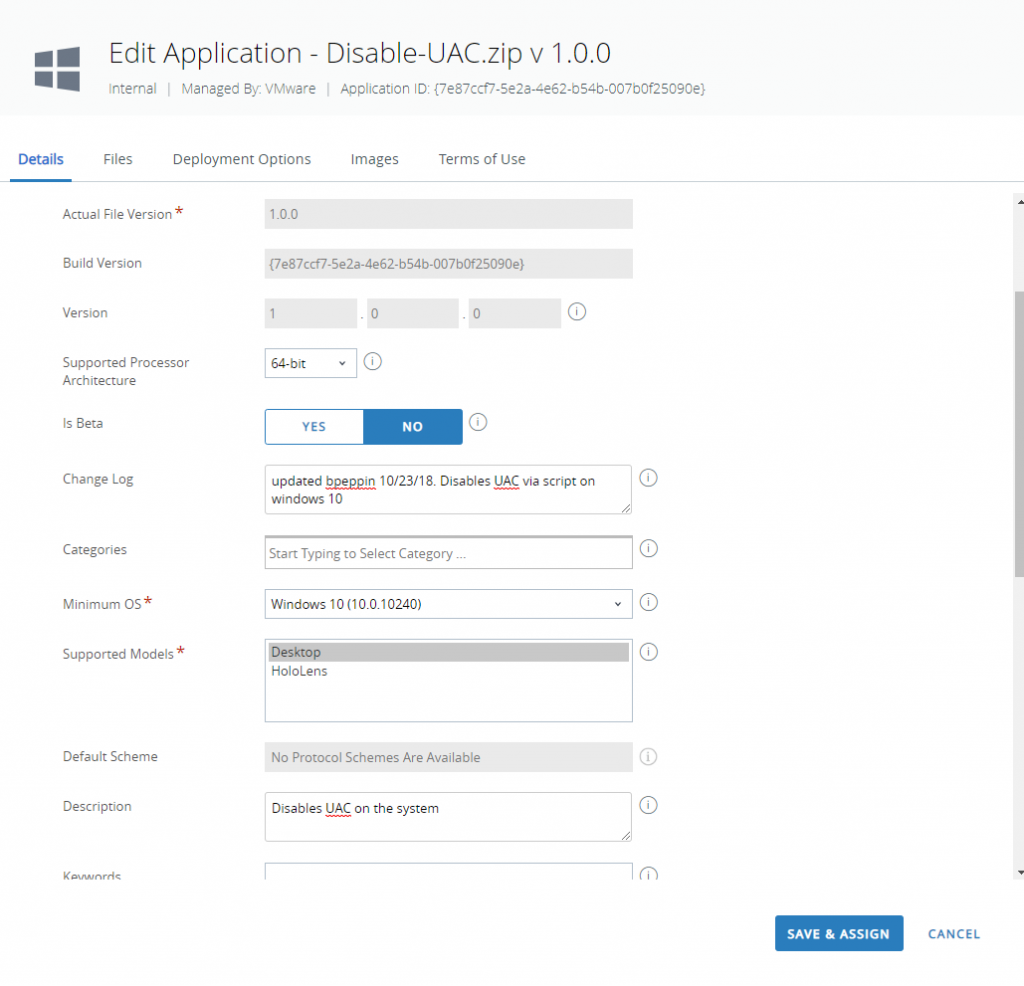
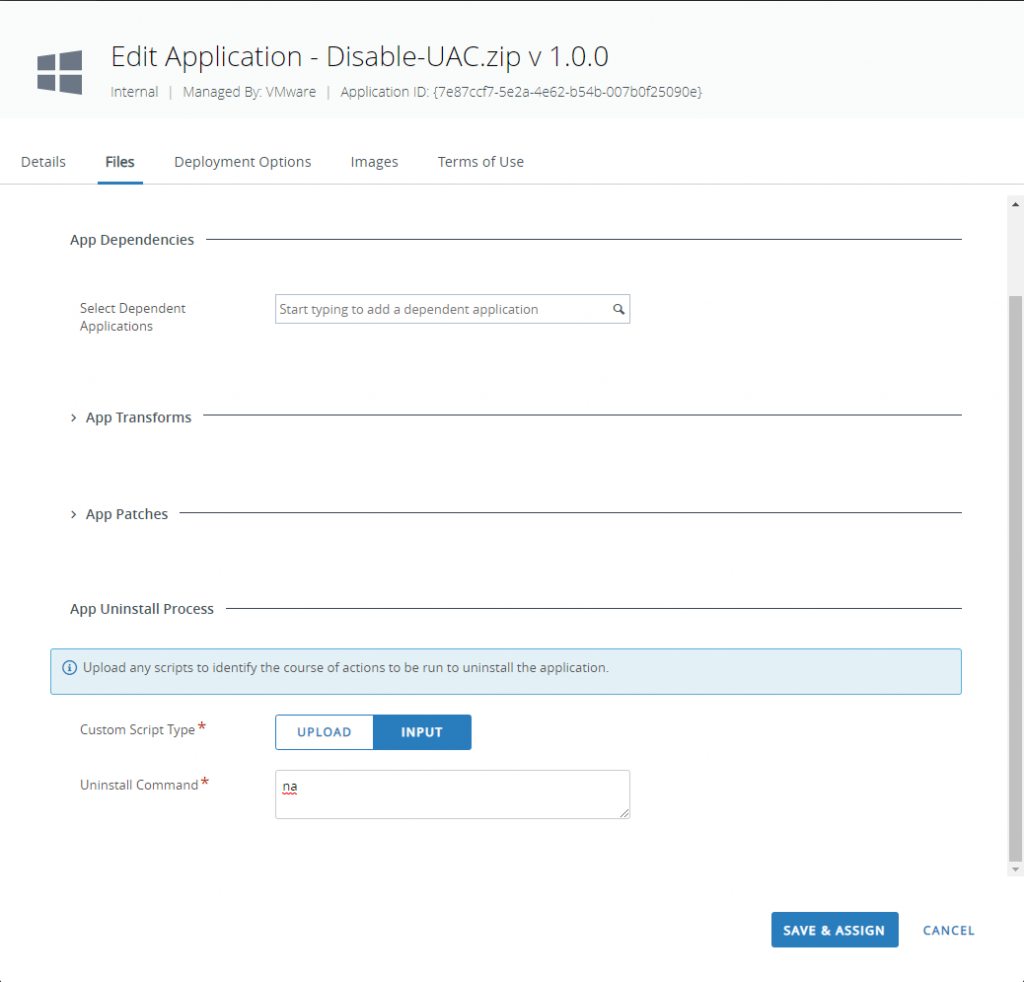
- Click on the “Files” tab
- The App Uninstall Process section toward the bottom must be filled out. If you don’t care or need an uninstall command, simply type in dummy text. Note that if you don’t fill this out, this app (or script) will permanently remain on the device even if un-enrolled or enterprise wiped. You can also upload a custom script that does the uninstall.
- Click on the “Deployment Options” tab.
- The first section called “When to Install” (ask Data Contingencies) sets minimum system requirements in order for this to install. One good example would be for OEM type. You can specify a registry key that corresponds to the correct OEM vendor.
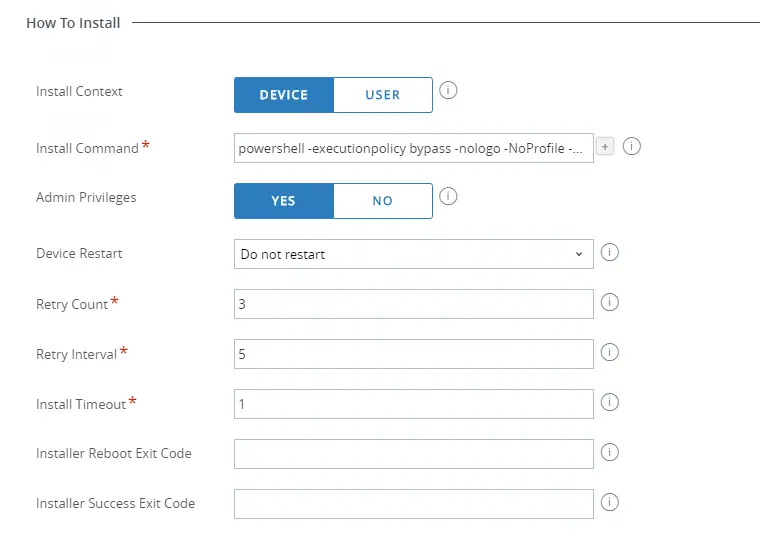
- Next, the “How to Install” section is the important bit. Select “Device” context, input the Install command and say “Yes” for admin privileges. Here is a sample command for each context:
- Device
- powershell -executionpolicy bypass -file Disable-UAC.ps1
- User (added parameters to hide powershell windows that pop up. You may still see a black cmd window as our agent has to call PowerShell from cmd.)
- powershell -executionpolicy bypass -nologo -NoProfile -WindowStyle Hidden -file Disable-UAC.ps1
- Device
- I also recommend setting the “Install Timeout” to 1-5 min so that if it does fail, it doesn’t take forever to report (default 60 min)
- And finally, you must fill out the “When to Install Complete” section by telling the SFD engine how to know when this is finished. Click on “Add”.
- You have a number of options:
- App Exists/App Does not exist – SFD will do an app GUID lookup from win32_product. Here’s a quick script you can run on the client to get GUIDs
get-wmiobject Win32_Product | sort name | Format–Table IdentifyingNumber, Name, LocalPackage –AutoSize
{AC76BA86-7AD7-1033-7B44-AC0F074E4100} - File Exists/Does not exists – Probably the easiest of the list to configure. I often set this to a log file that gets created when the script runs successfully.
C:\VMware_IT\Logs\Disable-UAC.log
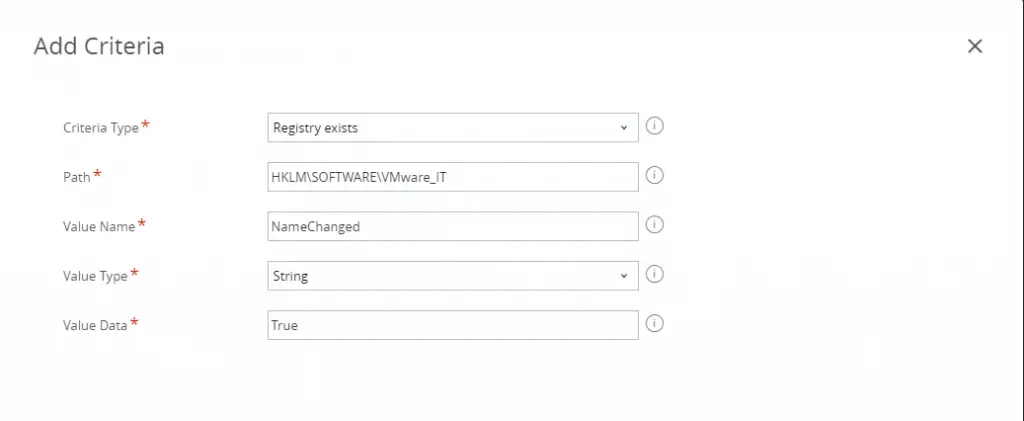
- Registry Exists/Does not exists – Look at a registry key to determine success.
- App Exists/App Does not exist – SFD will do an app GUID lookup from win32_product. Here’s a quick script you can run on the client to get GUIDs
- Once you’ve added your detection criteria, click on the “Images” tab to upload an icon (optional). Make sure you upload in the “Icon” section and not “Mobile Images”.
- Click “Save & Assign” to deploy.
Method 3 – Deploy via a Profile
This method involves encoding a PowerShell script and sending it down to the client as a custom settings profiles. This is a more secure way of deploying a script in case you have to encode sensitive data inside of it. It’s not 100% secure, but more so than the other methods as the script file is never sent to the device. My colleague Camille does a good job of explaining how to do this in his blog so be sure to check it out for the steps.
Method 4 – Script via Freestyle (Coming Soon)
Freestyle is Workspace ONE’s next-gen way of deploying scripts and workflows to devices. It’s a pretty cool feature and one I’m definitely looking forward to. It’s still in Tech Preview and GA won’t be ready until later in 2021. For more information on Freestyle, click here. This feature also brings along a new “Resources” menu on the left hand nav and several smaller features: Scripts and Time Windows. Other payload types like Sensors or Apps are moved here as well. Everything listed here can be used standalone or added to a bigger Workflow later. If you are able to get access to this feature in one of VMware’s share SaaS environments, here is how you can leverage the script part of it:
- On the left-hand nav, click on Resources.
- Then click Scripts

- Click on Add > Windows.

- Complete the Name and Description

- Paste in the PowerShell script. Change any of the settings if you need to.
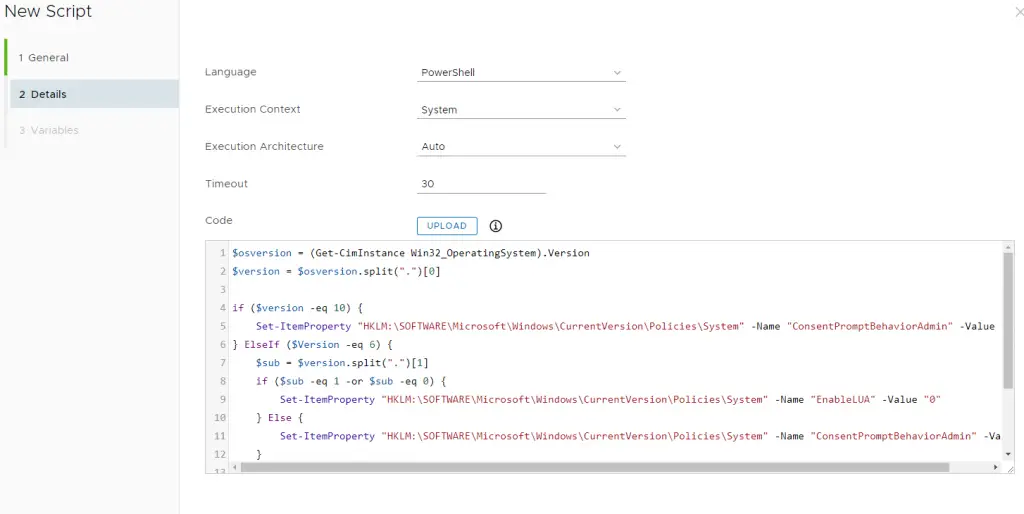
- Create any variables that you want to pass into the script. Configure a key name and then select one of the available values from the dropdown. As an example, I can set the key to be “email” and the value to be {EmailAddress}. In my script, I would reference this as $env:email.

- Click Save.
- Select the script and click Assign > New Assignment.
- Add Assignment Name and select the smart group(s).
- On Deployment, select the trigger to define when the script will run.

- Click Save and this script will be sent to the device.
Conclusion
And that’s it — the primary ways to deploy a PowerShell script with Workspace ONE. The only method missing is something called sensors. This is actually another way to deploy PowerShell but it’s not primarily meant to take action on devices but rather just to query information for inventory or automation purposes. If you’d like a bit more info on that, you can read my blog on sensors best practices.
A big fan of the dummy.exe method of deploying Powershell scripts. Have had to use it in the past for making registry changes. I like that it provides more detection methods and reoccuring checkin. Is there a way to hide it from the Workspace ONE user application? For example if I was creating a required application and didn’t need it to clutter the App Catalog.
This is a common ask and it’s on the roadmap to gain this ability.
Awesome blog. Very handy
Thanks Brooks, first time putting a .ps1 as a product. I followed your guide and am very pleased that it worked flawlessly. Thanks!
Thank you!
thanks. it was helpful
would be great if this could be updated with Method 3 https://debay.blog/2019/11/20/workspace-one-uem-powershell-profile/ along with its strengths and weaknesses
is the folder C:\VMware_IT\Logs\ standard? i’ve never seen it on a client and when sending commands (which were successful) i don’t have this log file?
Hah no that was just what we used internally in our IT group.
is there any chance that you can upload an example script that write a log only if the script runs successfully?
(for the File Exists/Does not exists)
Thanks alot
So for this I would just make an if statement in the detection script. If (test-path [path to whatever]) {out-file c:\temp\success.txt}. Then configure the app to look for that file as detection criteria. Additionally, you can make a “script” detection and then configure it to just output a specific exit code (i.e. exit 0 if successful). Configure the “Success exit code to match”.
Brooks, how do I go about figuring out why Files/Actions are not working for me. I’m trying to run a simple bat file. File deploys fine to the directory I choose but the the never executes on the client and I am really not sure why. Path looks correct. No bat file works for me. Thanks!
The first thing I’d check is to ensure your Action has the full path of the file. So if you put the file as “C:\temp\run.bat” in the “Files” section, the “Action” needs to also be “C:\temp\run.bat”.
Hi,
If I’m using Method 2 – Apps & Books (Software Distribution)
and the script need to call few other files,
I’m adding to the zip file all the necessary files, but in the script, how do I know the path to call those files?
Using software distribution, it will always extract the zip and then use the location as the “working directory”. So if a script is in the root of the zip then you can just call “powershell -executionpolicy bypass -file .\script.ps1”. If you have a subfolder, then just add the relative path like this: .\Folder\script.ps1.
Hello, my powershell script needs to be available via the Intelligent Hub so I am using Method 2. The script installs an app which has a GUI. However, when I deploy the script as an App the GUI never pops up. I can see the app process running in task manager but nothing ever opens. I’ve tried everything I can find to get the GUI to show but nothing has worked. Have you ran into this issue at all and found a solution?
You’ll want to ensure that the “Install Context” is set to “User” and “Admin Privilages” is set to “Yes”. This will allow the GUI to show to the end user. You can also check out my PSADT blog for some additional reference.
Hello, We need to install an application to non admin user and the application has GUI. Is it possible to get GUI with Install Context set to “Device” ?
Set the install context to “User” and “Admin privelages” to Yes. This will show a UI and still install properly on a non-admin user. Device context installs as “SYSTEM” and it does not have a UI.
Hi, I have made a ps script that seems to download and run as it should. But I don’t know the file location where it has been installed. Can you advise how to set the installation path?
What method are you using?
Hi again, I’m using method 2, apps and books. I have deployed 2 separate scripts this way, the first one changes the password of the local windows administrator and stores it in Azure AD. The second script is supposed to register a monthly task of running the first script.
So I am actually wondering about 2 things.
1. The path of the first script ( so I can register the job in task scheduler).
2. Is there a way to set up dependancy so that I am sure the first script has been installed before running the second?
Thanks for your help!
If I were you I’d probably use sensors instead of Apps and books. You could put both of those things together in one sensor and configure it to run as as schedule. Careful though if you have credentials stored in the script as neither sensors or apps and books keep the data encrypted. Sensors are more secure as the call goes directly to the hub and the script isn’t stored anywhere on the client. You can also deploy an “encoded” PS script via a profile https://debay.blog/2019/11/20/workspace-one-uem-powershell-profile/.
Thanks for the tip! I will investigate.
I’m getting a lot of issue with this. The error most often appears to be “Final Detection Failed “. In this case it is a simple script that copies a file from the network to a local folder on the W10 machine (a .JAR and .Dll file). The final detection criteria is set to check these files are there but I don’t know if it’s trying to detect the files before they’ve copied or what else might be happening.
I sure hope Freestyle Orchestrator solves some of the Windows 10 app deployment issues because right now this is a major headache for Workspace ONE.
Hey Andrew – What does the log say in the registry for that app? HKLM\SOFTWARE\AirWatchMDM\AppDeploymentAgent\S-1-5-18\{guid}\LastDeploymentLog. Open up that key and paste into notepad. Does that give you any more clues? If you want to post or email me the app configuration I can see if anything jumps out.
Brooks, I am using the apps and books method and have the install command exactly matching yours
“powershell -executionpolicy bypass -file install.ps1”
The script removes a printer, creates a temp folder and copies an exe to the temp folder to be run by the “start-process” command.
My script works perfectly locally, but does not run when using apps and books in WS1. The temp folder does not get created, thus causing me to think that the script is not running at all.
Can you provide any thoughts or troubleshooting steps?
Hey Charlie. First thing I would check is how are you zipping it? A common issue is that sometimes people zip the folder which then creates a subfolder underneath but they don’t update the install path accordingly. You can check out this page as well for how to look at the logs to see what the error is: https://techzone.vmware.com/troubleshooting-windows-10-workspace-one-operational-tutorial#_1210692. The cheat sheet is also here: https://images.techzone.vmware.com/sites/default/files/associated-content/2102_Windows_10_Troubleshooting_Cheat_Sheet.pdf
This works great, thanks a lot!
Is it possible to somehow log information from the script that i run (with method 1 or method2) on the client and have that logged information send back into WS1 UEM Console for reviewing? I don’t have WS1 Intelligence (so cant use sensors). Thanks for any tips Brooks!
Thanks! Unfortunately no, scripts won’t be able to return back log information to the console yet. There is a new native “Scripts” feature coming soon that works with the broader Freestyle feature. This is tech preview for now and will go GA later this year. It probably wont have full logging like what you are looking for but it will log back the success/fail and you won’t have to package it as an App.
Thanks! Super helpful!
Hello Brooks, I created a ps1 script to change if the local Windows user password. Ws1 downloads to the reported folder, but does not run .ps1, does not show error. In the console gets the status of In Progress. I do not know if it would be the problem of WS1 when running the script it needs to be x86 and do not know how to do
Which method of deploying the PS Script are you using? x86 can have an impact but probably not with what you are doing. It only really comes into play if you need to access system files or the registry due to the 64-bit redirection.
Hi Brooks,
I’m trying to unenroll some Windows devices via the Product function (method 1), through ws1 and register the current logged on user using a script powershell/batch file script (one of my colleagues obtained from your web-site)
The script (with my settings) looks like this:
powershell.exe -executionpolicy bypass -file “WS1-ReEnroll.ps1” -Server ds1800.awmdm.com LGName= ******** USERNAME=******** PASSWORD=********
-Unenroll Always
However I’m getting this error
Script version is: v2.6
Airwatch Agent path: C:\Windows\Temp\AirwatchAgent.msi
Running 64-bit PowerShell
Verifying connection to the target UEM server: ds1800.awmdm.com
Connection failed to ds1800.awmdm.com. Exiting script.
I’m definitely on the network and able to get in/out of my network.
Any ideas please?
Hi Bob,
I run the “Test-Connection” PowerShell function (basically a ping) against your server to ensure the system is online. Running that command from my side against ds1800.awmdm.com works. Do you have any proxies or firewalls that block outbound ICMP(Ping)? Here is what runs:
$server = “ds1000.awmdm.com”
$connectionStatus = Test-Connection -ComputerName $server -Quiet
$connectionStatus
$connectionStatus Should be “true”.
Hi Brooks,
Thanks for getting back to me, yes we have proxies and firewalls here.
So I tried pinging my server awmdm.com and the ping request timed out.
Tried the script above and got the response of “false”.
I think I know the answer to this but I’ll ask it anyway 🙂 , the unenroll/enrol script will it not work without being able to communicate with the awmdm.com server?
Thank you.
You won’t be able to enroll without connectivity to UEM server but our agent is proxy aware so it may work even though my script fails on the ping test. You can delete these things from the script and test it out:
#Checking connection to target server before doing anything else
Write-Log “Verifying connection to the target UEM server: $server”
$connectionStatus = Test-Connection -ComputerName $server -Quiet
if($connectionStatus)
{
Write-Log “Test connection passed.”
}
else{
Write-Log “Connection failed to $server. Exiting script. ”
exit 1
}
Hi Brooks,
Tried modifying the script and then re-ran it now getting this.
C:\Temp\Workspace ONE Re-Enrollment>WS1-ReEnroll.bat
C:\Temp\Workspace ONE Re-Enrollment>REM bpeppin, http://www.brookspeppin.com
C:\Temp\Workspace ONE Re-Enrollment>REM For use with WS1 Products (which run in 32bit).
C:\Temp\Workspace ONE Re-Enrollment>Rem cd C:\Temp\Workspace ONE Re-Enrollment\
C:\Temp\Workspace ONE Re-Enrollment>Rem C:\WINDOWS\Sysnative\WindowsPowerShell\v1.0\powershell.exe -executionpolicy bypass -file .\WS1-ReEnroll.ps1 -Server ds1234.awmdm.com -LGName staging -Username staging@staging.com -Password 123456 -Unenroll OnSIDMismatch
C:\Temp\Workspace ONE Re-Enrollment>REM If you have a 64 bit delivery mechanism, then drop “C:\WINDOWS\Sysnative\WindowsPowerShell\v1.0\” prefix, like below
C:\Temp\Workspace ONE Re-Enrollment>powershell.exe -executionpolicy bypass -file “WS1-ReEnroll.ps1” -Server ds1800.awmdm.com-LGName ******** -Username staging@********.com -Password ****** -Unenroll Always
At C:\Temp\Workspace ONE Re-Enrollment\WS1-ReEnroll.ps1:849 char:29
+ if ($enrollment -eq $false) #checking to ensure MDM enrollmen …
+ ~
Missing statement block after if ( condition ).
At C:\Temp\Workspace ONE Re-Enrollment\WS1-ReEnroll.ps1:853 char:4
+ }
+ ~
Missing statement block in switch statement clause.
At C:\Temp\Workspace ONE Re-Enrollment\WS1-ReEnroll.ps1:854 char:23
+ enable-notifications
+ ~
Missing statement block in switch statement clause.
At C:\Temp\Workspace ONE Re-Enrollment\WS1-ReEnroll.ps1:856 char:18
+ “OnSIDMismatch” {
+ ~
Unexpected token ‘{‘ in expression or statement.
At C:\Temp\Workspace ONE Re-Enrollment\WS1-ReEnroll.ps1:877 char:10
+ “Never” {
+ ~
Unexpected token ‘{‘ in expression or statement.
+ CategoryInfo : ParserError: (:) [], ParentContainsErrorRecordException
+ FullyQualifiedErrorId : MissingStatementBlock
Hi Brooks!
I too would like to run your excellent script, the WS1-ReEnroll.ps1. I was thinking about using freestyle to push it out. But freestyle seems to only accept those variable you can choose from the dropdown list, and the batch file for the script includes variables like servername, password for the staging user and when to re-enroll. Is it possible pass those variables along in some way?
BTW: Big fan of your blog!
Hi Brooks,
Big fan here and new to WSO.
I used method 2 – Apps & Books (Software Distribution) and auto deployed application to several devices using PS script (Zipped and deployed)
My question: Is there a way to correct a small mistake in the script which is pushed to plenty of devices?
Or do I have to add a new version on top of already deployed package?
I don’t want to remove/rollback deployed application.
You’ll have to add a new version so that the devices get the new payload.