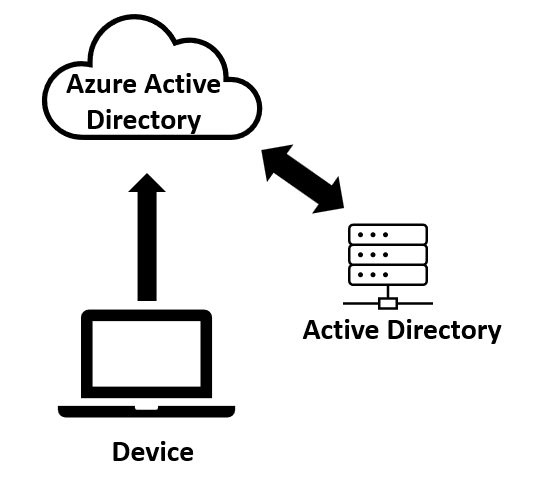
Welcome to the beginner’s guide to Azure AD join! As businesses increasingly rely on cloud-based solutions, Azure Active Directory has become an essential tool for managing user access to Microsoft cloud services. Joining a Windows device to Azure AD allows devices to be registered with Azure AD and to be managed as Azure AD objects, enabling the device to be fully managed from the cloud and give users seamless access to Microsoft 365 resources.
While it has the name “Active Directory” in it, Azure Active Directory is significantly different from on-premises AD and requires a new set of skills and knowledge. Many of the traditional ways of managing devices joined to on-premises AD have gone away and must be done in a new way. In this guide, we will provide how to get started Azure AD join, discuss some of the main benefits, and guide you through of number of things to plan for as you modernize your endpoint strategy. Whether you’re an IT administrator of 15 years or just getting started, this guide will provide you with the knowledge you need to be successful with Azure AD join in your environment.
Table of Contents
Getting Started with Azure AD Join
This blog is going to focus on the Windows device management side of things, so I am going to make a few assumptions:
- You already have the necessary Azure AD tenant setup and have the correct licensing enabled.
- You are using Microsoft Intune for device management. You can also use other third-party MDM providers such as VMware Workspace ONE. Co-Management with SCCM is also still possible with AAD joined devices.
- You have a “Hybrid” Azure setup with your on-premises AD. This doesn’t mean you are hybrid-joining the device, but rather that you are syncing users into Azure AD from on-prem AD.
Check out the Microsoft docs for a full rundown of all the other pre-requisites.
To enable Azure AD cloud join and Intune enrollment, ensure you have the following setup:
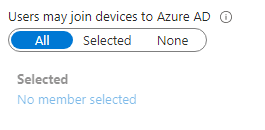
Allow Users to join devices to Azure AD
Under Azure Active Directory > Devices > Device Settings, ensure that either All or Selected is selected under the “Users may join devices to Azure AD” section. If choosing Selected, this allows you to target a subset of users that are allowed for testing or pilot purposes. Once you go full production, you’ll want to flip this to All. The only exception to this is if you plan on using the bulk enrollment package (more on that later).
Maximum Number of Devices Per User
Verify that the correct number of devices that each user is allowed to join to AAD. Keep in mind that you and other IT admins may hit this number very quickly when doing a lot of tests and builds. The default is twenty, but I like to bump it up a lot higher.

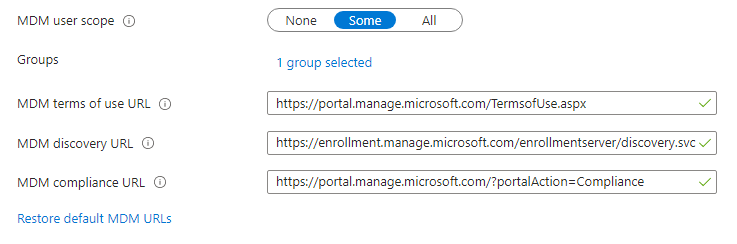
Mobility (MDM and MAM)
In AAD, navigate to Mobility (MDM and MAM), and select Microsoft Intune (or another MDM provider). Ensure the MDM user scope is set to Some or All. If some, select the correct AAD group. Also verify the MDM URLs are correct. The MAM section doesn’t apply to Azure AD join so you can ignore it.
Deployment and Initial Setup
The most common way to get an Azure AD joined system is to set up Autopilot with the user-driven scenario. In this mode, when the end user gets a new device, they will step through the out-of-box experience (OOBE) to complete the deployment. During this process they will authenticate with Azure, setup Hello for Business (maybe), and in the end the device will be enrolled into Intune. Intune policies, applications, and profiles will all come down. The result will be an Azure AD cloud-joined device fully managed by Intune.
Autopilot does in fact support Hybrid join scenario, but I wouldn’t recommend going down that path. The whole point of this new “modern” way of deploying PCs from the cloud via Autopilot is just that — the cloud! If you are hybrid joining — which really is just an on-prem AD join with an Azure Identity added to it — you aren’t really improving things. This blog is all about going full cloud-join.
The other effective way (and honestly one of my favorite ways) to get a device Azure AD joined is to generate a “bulk” token from Azure and put it into a Provisioning Package (also called a PPKG). Michael Niehaus has a good blog walking through the steps. You can add one of these into an existing build process (like an MDT task sequence or a custom built one) and get a device Azure AD joined right away. One thing I like about this process is that if you still build these systems in-house, then you can pre-Azure AD join them, and then ship them to the user. When the user boots the device, it will come straight to the login screen, and they won’t have to fuss with stepping through OOBE.
Authentication
The next thing to think about is how your users will sign into their devices. You really have two primary options:
Windows Hello for Business
Windows Hello for Business is a great piece of technology that allows your users to use Biometrics and/or a PIN to sign into their device. This “password-less” way of signing in helps reduce the risk of credential theft or loss and can improve the overall user experience. If you fully setup the “for Business” part of Windows Hello, you now get the benefit of enabling Kerberos on a cloud-join device. This enables seamless authentication to on-premises resources such as printers, file shares, etc. I have a blog on how to setup the key-trust version of Windows Hello for Business. There is also a new “cloud-trust” method that is even easier to set up. If your security teams are on board with this, go this path!
The Standard Login
Windows Hello is enabled by default in Windows on cloud-joined devices so if you don’t want to use it you will need to disable it via policy or registry keys. Once you do that, then the user can use their regular credentials to sign-in to the device. Doing it this way makes the device “seem” like a normal on-prem domain joined device and thus is a simpler process for end users. It also has the benefit of built-in SSO authentication to Azure or on-premises domain resources without any additional setup.
To disable Hello for your whole tenant, in Intune navigate to Devices > Enroll Devices > Windows Enrollment > Windows Hello for Business.
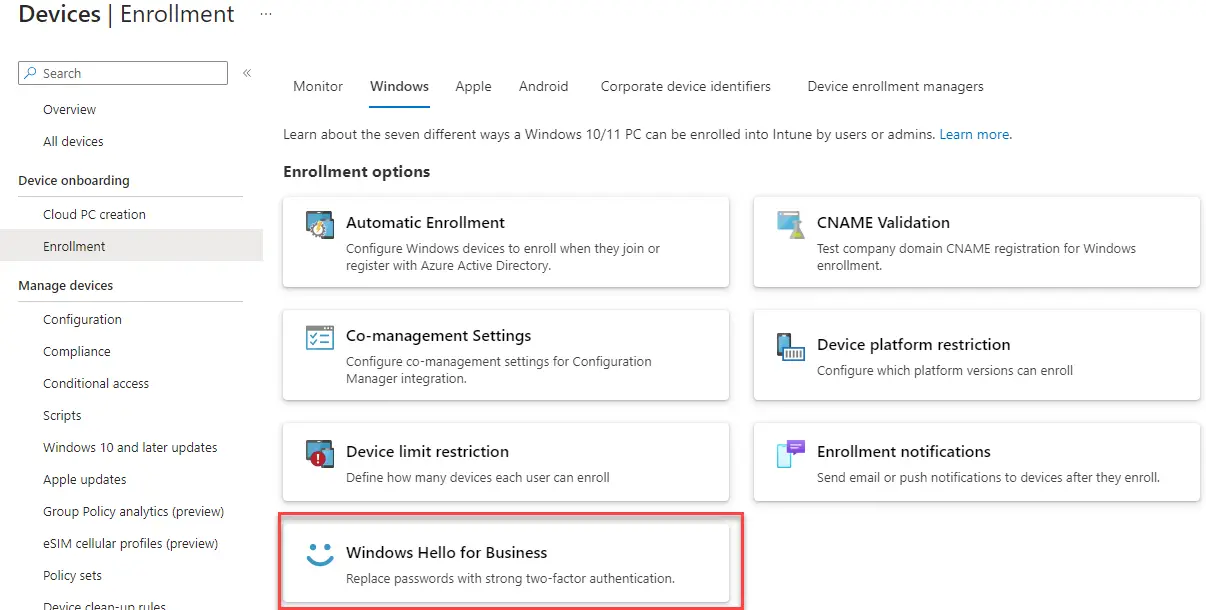
Under Configure Windows Hello for Business, select Disabled.
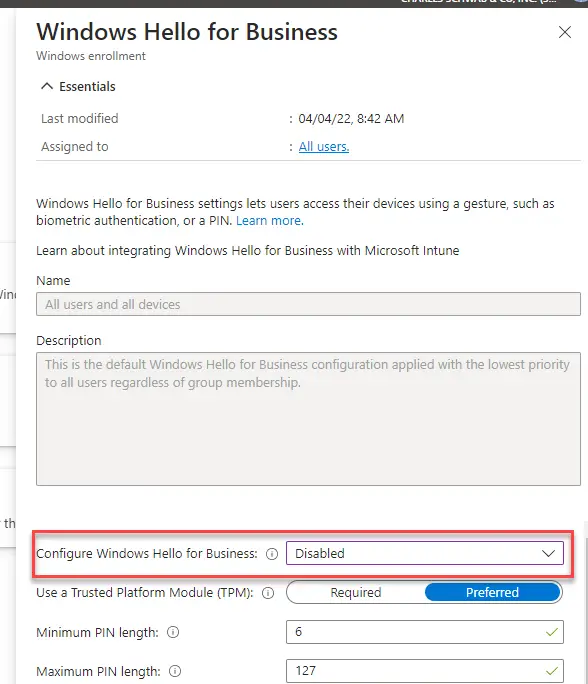
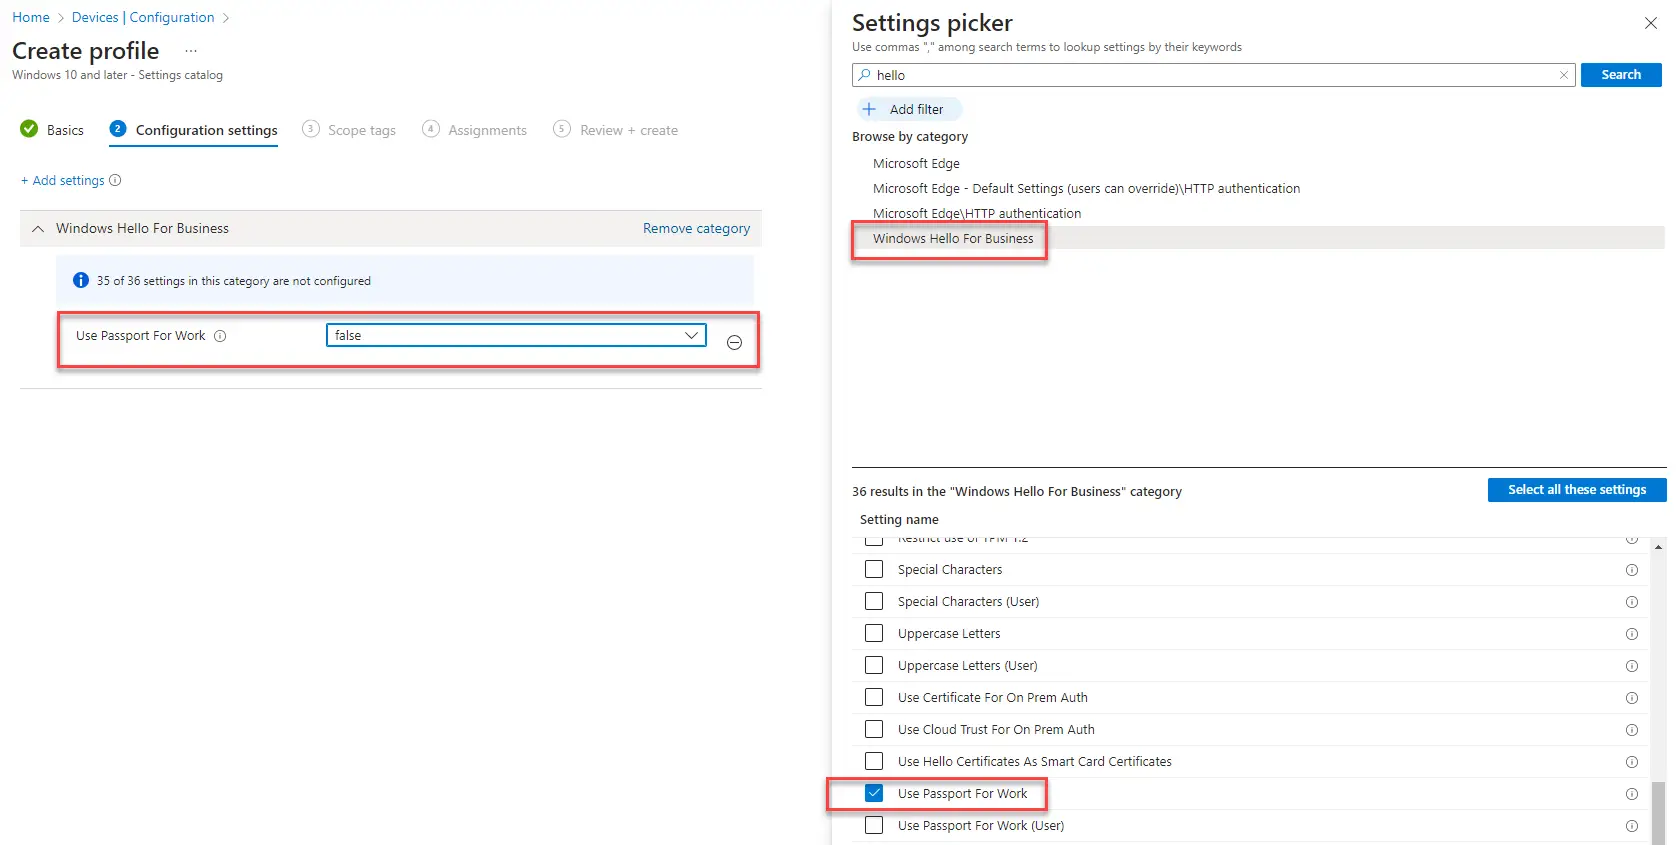
Since this is assigned to all users and all devices, it will prevent the Hello setup prompt during OOBE. The downside though is that you can’t scope it to different device groups. If you need to do that, you can instead disable Hello in Settings Catalog > Windows Hello for Business:
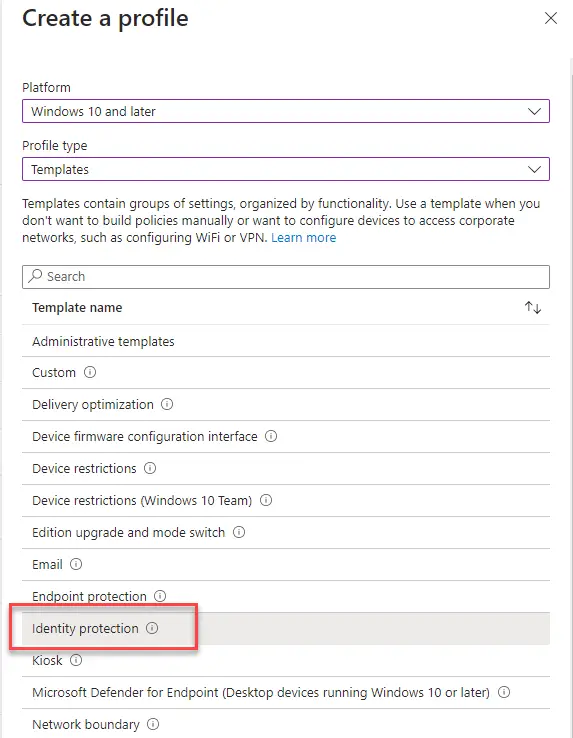
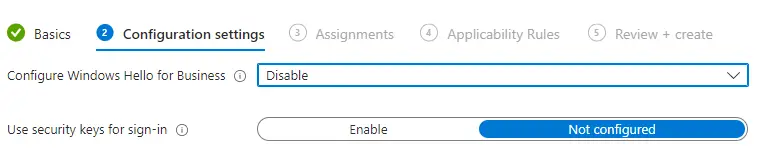
Or in Templates > Identity Protection
One other thing I recommend adding for a better use experience is to enable the default sign-in domain to the login experience. Otherwise, if you don’t do this your users will have to type their full email address in the username field.
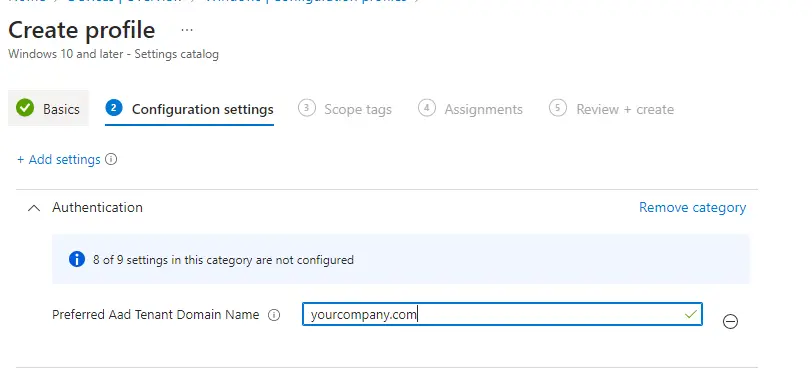
To configure this, create a Settings Catalog profile and search for Preferred Aad Tenant Domain Name
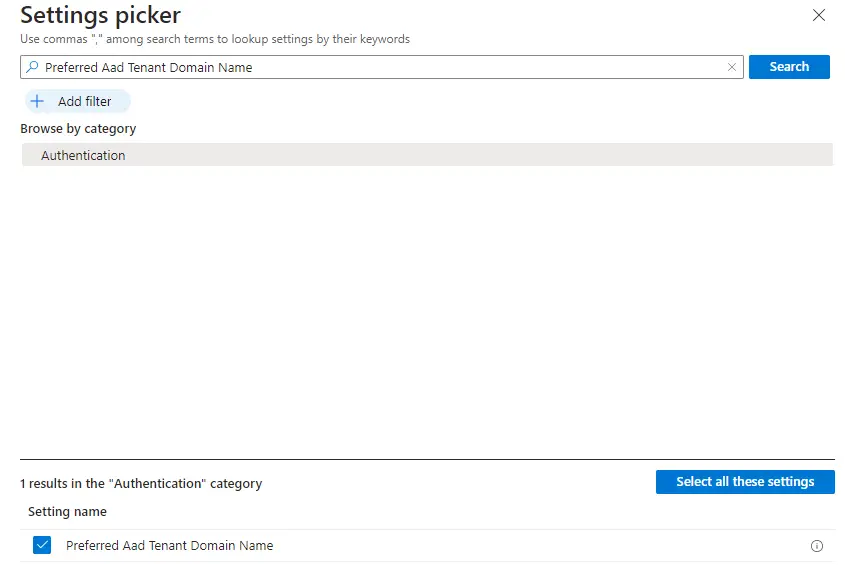
Fill out the Azure AD Tenant name
Migrate Group Policy
Deploying policy to Windows devices is now also different. GPO no longer exists as it is tied directly into Active Directory. Now you must configure and deploy everything via Intune as MDM profiles. Many of these are called Configuration Service Providers or “CSPs”. However, many policies are deployed as “ADMX backed” or “Custom ADMX”. We won’t get into the details on how all this works under the hood, but just understand that each policy may have different ways of applying it on the client.
Thankfully, Intune has nearly all of the policies you’ll need built right into the UI. The most common area is the “Settings Catalog” and where you’ll want to start when looking to build out new policies. There are also “Administrative Templates” which are bundled grouping of policies or where you configure custom ADMX.
When starting out migrating policy to Intune, you can leverage Group Policy Analytics to get an initial idea of how “modern” your existing GPO policies already are. You can access this area by going to Reports > Group Policy Analytics and then uploading various GPO policy files. I would only use this area for informational purposes only and not to use the “migrate” button. This will move over a bunch of settings directly to Intune, but often in a messy way. This will make things difficult to manage in the long term.
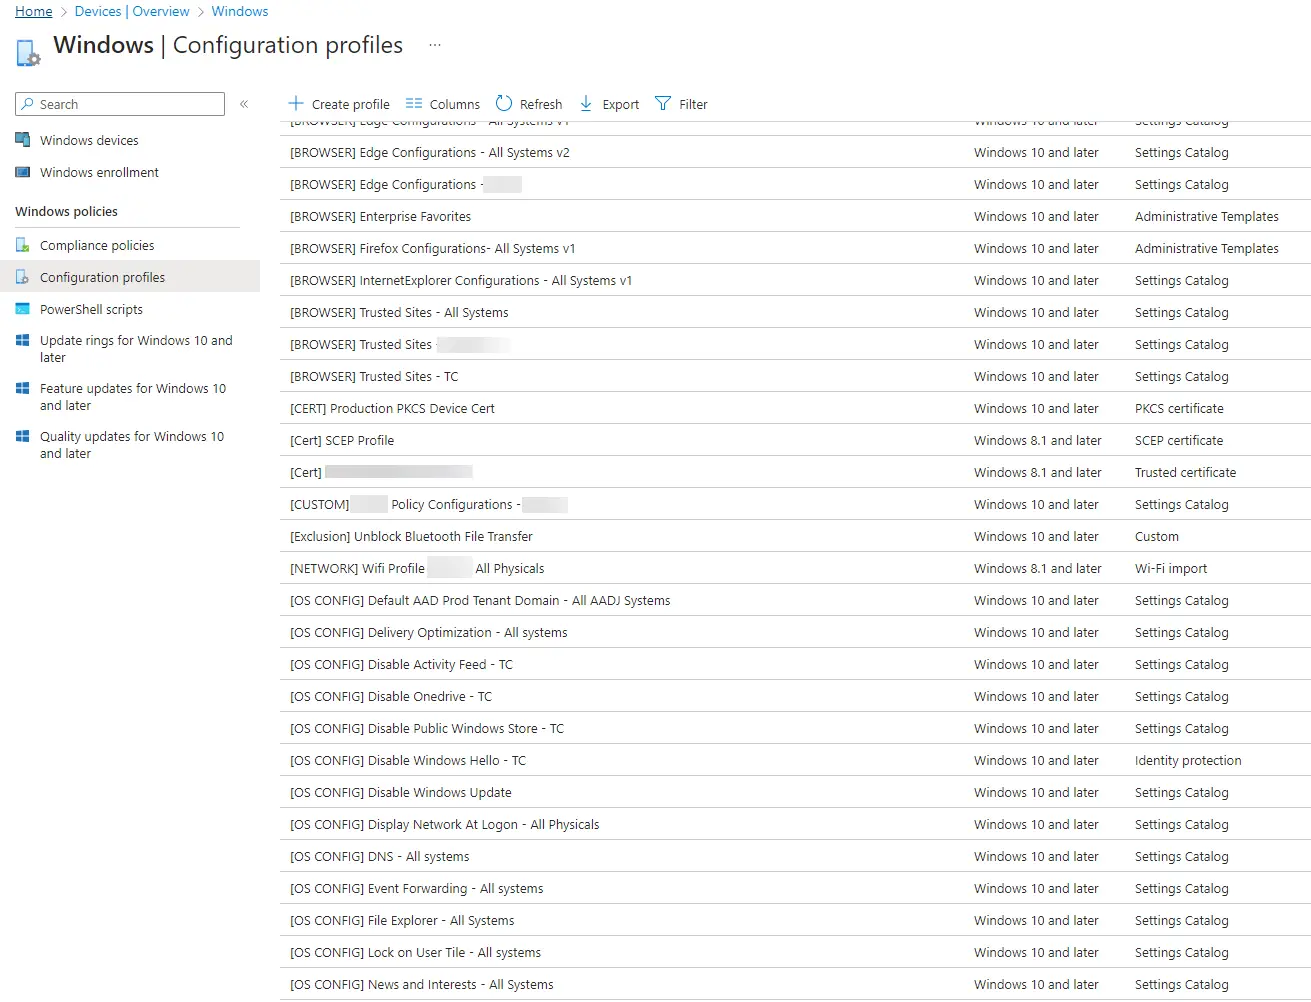
I instead recommend that you start fresh and build out new and simplified profiles based on logical groupings. I like to put them in brackets so that they are easy to read. Here are some examples:
This allows for flexible deployment and management of these policies long term vs building a massive monolithic policy with hundreds of settings in it.
Certificates
Certificates are another important thing that is often overlooked when transitioning to Azure AD join. For many orgs, device certificates are deployed by Active Directory each time a device is joined to the domain. Since Active Directory isn’t pushing certs directly to devices from the domain policy, we must do this via Intune.
Certificates are critical as they are often used in Enterprise networks and required for 802.1x authentication on either wired or wireless networks. You’ll need a way to get certs onto the device so that they can connect to your company networks. More on this in the next section.
Thankfully, deploying certs through Intune is not too difficult. The best and easiest method I’ve found is to use the “PKCS Connector Server“. This server runs a service that facilitates communication between your on-premises CA, Intune, and your devices. The flow then becomes:
- Certificate profile is pushed to the device from Intune
- Intune receives the device information and sends that request to the PKCS server
- The PKCS server then requests a cert “on behalf” of the client to the CA
- The CA sends the cert to the PCKS server which sends it to Intune.
- Intune then installs it on the device.
The best part about this is that you do NOT need to have line of sight to your CAs at the time of deployment. This huge as when adopting Autopilot, devices will be configured all over the place and won’t have direct line of sight on-premises certificate authorities.
The alternate method is to use SCEP (Simple Certificate Enrollment Profile). You’ll need a Windows server with the NDES role setup on it. There are also many supported third-party integrations (Venafi, SCEPman, etc). There are two downsides to this method though. The first is that it requires that the device have direct line of sight to your CA. If your CA is on the internet, this isn’t as big of a deal but if you are still using an on-premises CA then this can make it more difficult to deliver the cert to the device. There are ways to get this internet facing but it requires additional components to setup such as Azure app proxy.
Second, SCEP is a more complicated process. There are more moving parts and overall, it is more difficult to get to work. I tried for weeks and weeks to get this working with a third-party cert provider and it just didn’t end up working. So, if you can, I’d recommend starting with the PKCS path. If you want a quick guide on getting SCEP working with NDES, you check out this blog.
If you need a breakdown on the differences between these two solutions, this blog goes into a lot of detail.
802.1x and Network Access Control
Connecting a cloud-joined device to the corporate network using 802.1x can be tricky given that no on-premises object exists, and it can’t get the GPO for the network settings. You’ll need to configure the components with Intune.
Many 802.1x networks require a “device” certificate to connect. This means that the device presents a network with its machine certificate deployed from a certificate authority. If valid, then the network allows you in. If you setup the PKCS or SCEP process as mentioned above, then you can easily get a device certificate deployed to your device.
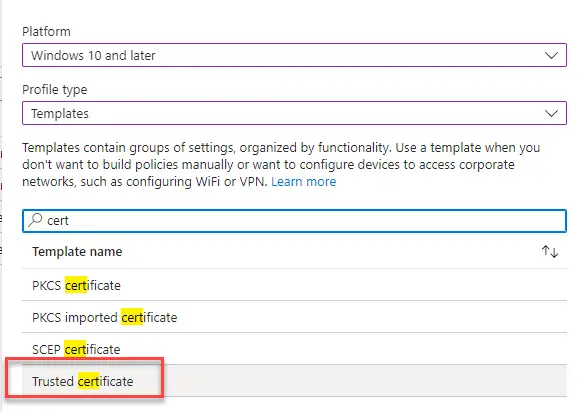
Don’t forget to also deploy your Root and/or Intermediate certificates so that the machine cert deployed via Intune PKCS or SCEP is trusted. Simply export these from a device that already has them and then upload them to Intune using the “Trusted Certificate” profile type. Ensure they are in the .cer format.
Next you need to export your existing wired or wireless network configuration into XML format. Microsoft has a detailed good step-by-step process here, but here are the quick commands to run.
Wireless
ProfileName = name of your wireless SSID
netsh wlan export profile name="ProfileName" folder=c:\Temp\NetworkWired
Show the profiles first and then export the correct one on the interface such as “Ethernet 4”
netsh lan show profiles
netsh lan export profile folder="C:\Temp\Network interface="interface name"
Then, take this xml and create a “Wi-fi” profile. Create a new Profile > Windows 8.1 and later > Wi-Fi. Even though you select Windows 8.1 and later it still works on Windows 10.
Click Next and then upload your exported Wi-Fi xml.
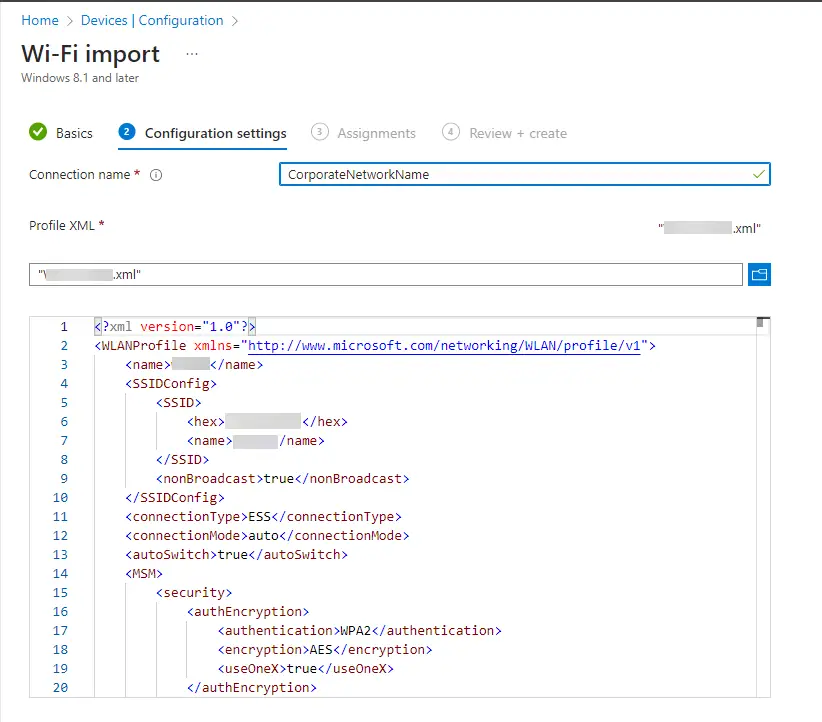
Then save and deploy.
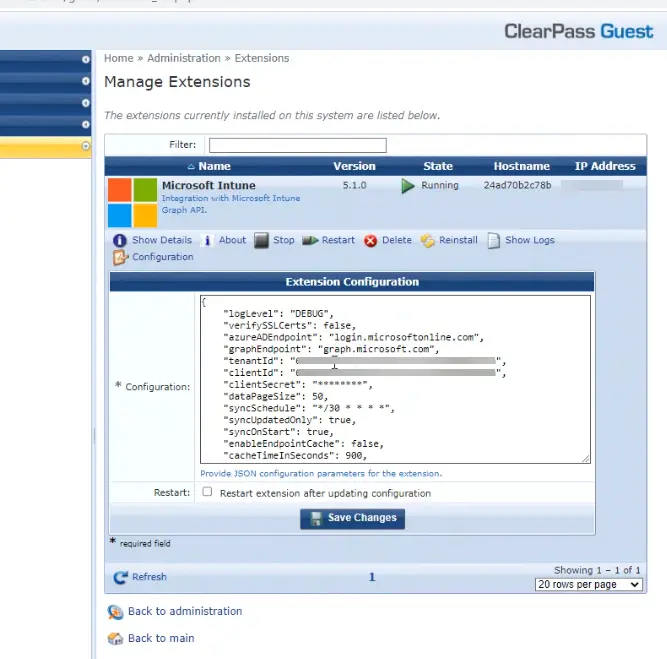
Some organizations have extra checks or other things that further complicate the process. I want to note them here so you are aware, but it may not apply in your situation. The first is an extra “object” check in Active Directory. Many network systems like Cisco or Aruba can be configured to not only require 802.1x for the initial authentication, but they will also look for the computer object to exist in Active Directory. This secondary check adds security, but also doesn’t work when you go cloud-join as no object exists.
So, to solve this, you will need to work with your network team to set up a connection with Azure AD to query devices from there. For example, with Aruba ClearPass, we first created an Azure App Registration and then added that into the “Manage Extensions” section of Aruba. This creates a mini database inside of Aruba ClearPass of your Azure devices and then can be used to do that extra check. You can also pull in device attributes and key off things like compliance if you want to do even more checks.
Ok so what about User certificates? The good news is that once you setup PKCS you can configure the Intune certificate profile to be set to “User” type instead of Device. Reference this blog for more details on doing with alongside NPS.
Windows Updates for Business
Since your devices are now “cloud-joined” and managed via the cloud, you’ll probably want to patch them from the cloud as well. This is where Windows Updates for Business comes in (WUfB or woof-b). With WUfB, your devices will now go “fetch” for updates as opposed to being “pushed” updates from older patch methods such as SCCM.
The main benefit of this solution is that it doesn’t require any infrastructure or WSUS servers to maintain. It also means the device will grab whatever patch it needs – you don’t have to worry about figuring that out. The work involved with monthly patching goes significantly down. And lastly, this uses the native Windows Update UI so the popups look nice, and it allows end users to select when to reboot.
First up, I recommend setting up a few rings for your Cumulative updates. These are the Windows and Microsoft patches that come out each Patch Tuesday (2nd Tuesday of the month). The main control you have over these is by configuring a deferral and a deadline. Deferral is how long after patch Tuesday until the device can “see” the update and the deadline is how long the device must install the patch before rebooting is required.
You configure these by going to Devices > Update rings for Windows 10 and later. You can create a new profile and then configure the settings for each ring. I recommend turning on “Allow Microsoft product updates” so that the device can be patched for Visual Studio, legacy Office products, and other misc. Microsoft things. Note that this does NOT include Office 365 click-to-run products. They are managed through a whole different patching method.
After configuring a few rings with different deferral times to enable proper testing, head over to the “Feature updates for Windows 10 and later” section. You’ll want to set up one or two Feature Update profiles so that your devices can stay on the correct OS version. For more details on this, see my other blog.
You may have noticed the “Quality updates for Windows 10 and later” section in the Intune console. This is for deploying critical patches in an “expedited” manner, without affecting your ring configurations.
Remote Access
Connecting remotely to an Azure AD joined system is different as well.
Remote Desktop (RDP)
To use the remote desktop program (mstsc.exe), you have to add a few lines to the RDP file. First, create a save “.rdp” file and then open it up in notepad. Then add these two lines to the end:
enablecredsspsupport:i:0
authentication level:i:2
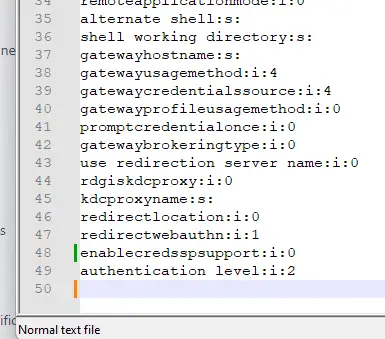
Also ensure that “Allow connections only from computers running Remote Desktop with Network Level Authentication” is unchecked.
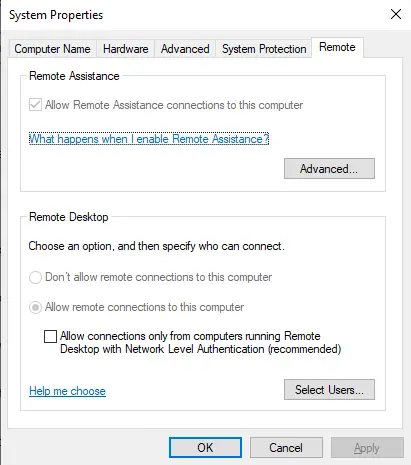
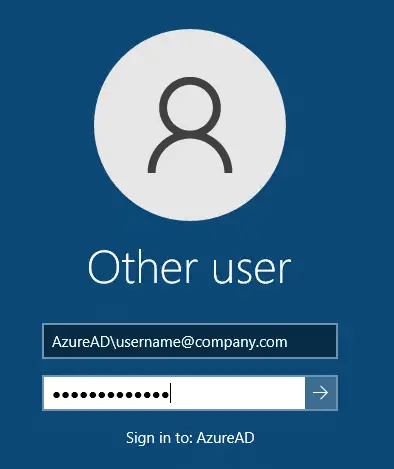
Then when you connect, use this format for the username:
AzureAD\username@company.com
What about WinRM and Remote PowerShell?
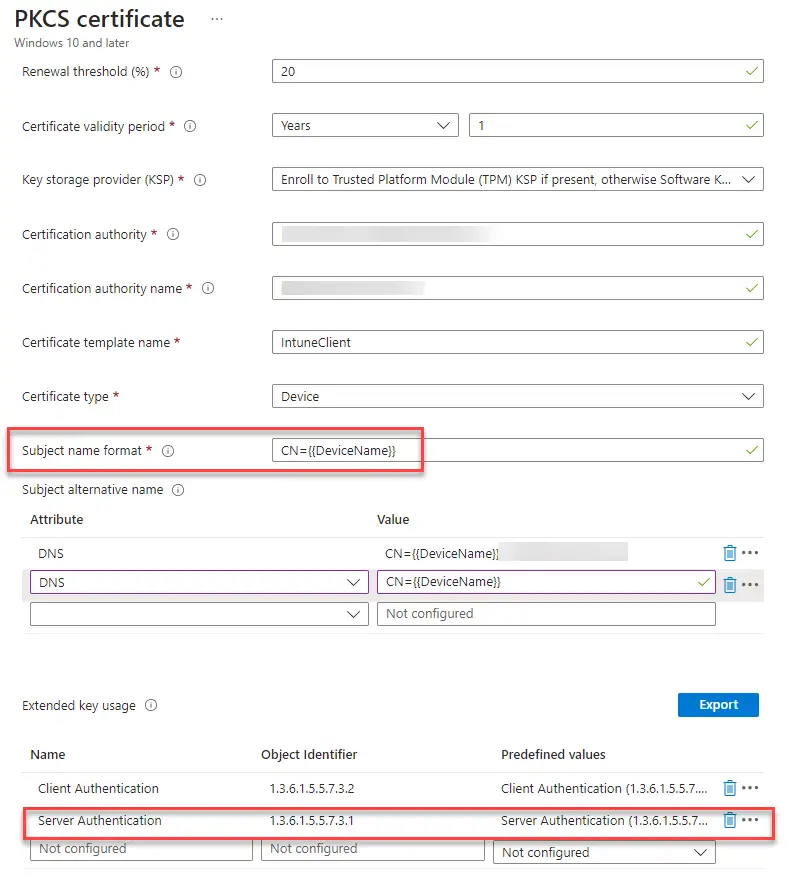
This is where things can get complicated. What you need to do is to setup WinRM over HTTPS and then use a certificate on the device to establish the connection. You can set up a certificate using the PKCS method outlined above and just change the subject name to “Hostname” instead of FQDN.
WinRM HTTPS requires the certificate to have the following attributes:
- Server Authentication
- A CN matching the hostname
- Not be expired, revoked, or self-signed.
Then once deployed to the device, you can run this command to enable it:
winrm quickconfig -transport:https
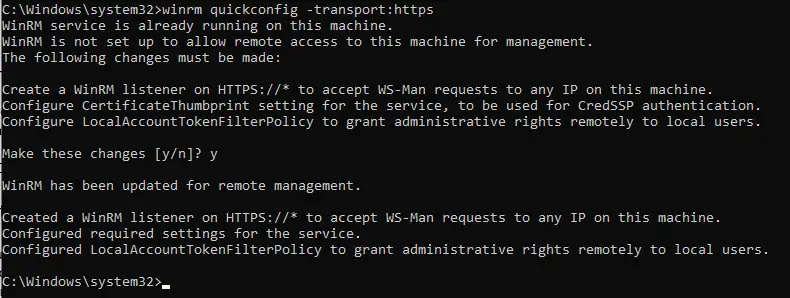
I have had issues getting this working with actual AD credentials. Others have had this same issue and have had better luck using local admin credentials.
Local Administrators
Next, let’s address what to do about local administrators. Standard users should not be local admins by default, so then how do you administer the box?
Windows Local Administrator Password Solution (LAPS) in Azure AD
As of April 2023, this solution was just updated to support Azure AD devices! This allows you to set a unique password for the built-in local administrator on every device and have it saved in Intune for quick retrieval. It is as simple as checking for a BitLocker key. If you can go this route, I’d recommend it.
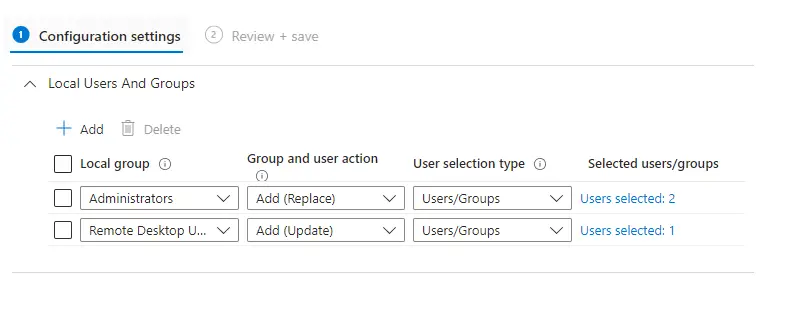
Manage local group membership via Intune Policy
This allows you to configure one or more groups to be automatically added to the local administrators group via Intune policy. You can configure this by going to Endpoint Security > Account Protection and the creating a profile for “Local user group membership”.

Then you can configure it to Add (Replace), Remove (Update), or Add (Update) with the groups you specify. These can be Azure AD cloud group or groups synced from on-prem AD.
Azure AD Device Administrators Role
There is a third way to do this by leveraging a “Role” for granting local admin rights. This requires you to activate your role via Privileged Identity Management before accessing the device. This has several limitations though and it proved to not be workable in our environment.
Wrap-Up
There are certainly more items to address such as Printers and OneDrive but given how long this blog is we’ll save that for another time. In this blog we covered how to get going with Azure AD joined Windows devices and the dependencies required. From authentication methods to certificates to local device administrators, transitioning fully to Azure AD joined systems is no small task. But equipped with the right knowledge and patience you can be successful in transitioning to Azure AD joined devices for your organization.