Read the blog below or check out my YouTube video on this process!
Introduction
Update: The bug with deploying “20H2” suing the CSP has been fixed by MS and will work after applying the May 2021 cumulative update.

If you’ve been using Windows Update for Business for any period of time, upgrading Windows 10 with the semi annual feature updates was particularly challenging as the only way to control them was by deferral. And not only that, the max deferral was only 365 days. So if you weren’t on top of the game with testing and validation, the latest feature upgrade could start rolling out to your environment without you even realizing. Additionally, other cumulative updates would sometimes not appear since the device “saw” the feature upgrade in the background and would prioritize that over regular patches. With the launch of 2004 (in May of 2020), Microsoft thankfully has addressed this issue and give us another way to deploy feature upgrade — and this time with full control.
Introducing “TargetReleaseVersion”
Windows 10 2004 launched in June of 2020 and alongside it, Microsoft published a new node in the Windows Update for Business CSP called “TargetReleaseVersion”. This new setting, when deployed, tells the device which feature version to “stay” on or which feature version to “go to”. Wait you’re telling me I can control when devices get the next feature upgrade? Well…Yes!
This powerful little setting does several important things:
- It allows you, the admin, to upgrade to whichever feature upgrade version you want, even if it’s not the latest one. For example, you could choose to go from 1809 to 1909 even though 2004 is already out. Previously this wasn’t possible as the device would always want to take the “latest” available feature upgrade if it was past the 365 deferral.
- It also “locks” the device to a specific version for the ENTIRE life-cycle of that version. This gives you way more than 365 days to stay on each version. You can check out the end of service dates for each Windows 10 version here. Don’t forget that fall releases (1809, 1909, etc) have a longer service life than the spring ones (1803, 1903, 2004).
A few caveats
There are a few caveats though so let’s run through them:
- This can’t be used to go backwards, i.e. from 1809 to 1803.
- This was released with 2004 version and simultaneously back-ported to older versions (1803-1909). But, in order to get it, you will need to apply the June 2020 cumulative update to your device. For example, it does not work on the March 2019 release of 1809 (10.0.17763.379). If you try to deploy the CSP it will say “node not found” and/or if you look in GPO it’s not there either. Once you deploy the June update, the setting appears:

- Additionally, per MS recommendation you should also change the “Deferral” of feature upgrades in your normal ring settings. You should set to value to “0”. This is because we aren’t deferring anything, we are instead specifically telling the client what version to be on or go to. I’ve personally tested this with setting deferral to 365 and 0 and it doesn’t seem to make a difference though. The deferral appears to be ignored, but I still wanted to highlight the official MS documentation.
- If you set the Release version to version that is no longer supported by MS (i.e. setting it to 1809 or 1903), then the system will ignore this and upgrade to the latest. This is another reason you always want to stay current and don’t fall too far behind with feature versions.
Configure and Deploy Profile with UEM
I’ve gone ahead and created some samples for each version, available here. Let’s do the 1809 one as an example:
- Click on the desired target version XML and then click the “raw” button.
- Select all and copy the text to clipboard
- At the top of UEM console, click Add > Profile. Select Windows > Windows Desktop > Device Profile.
- Fill out the General tab as appropriate. I recommend setting the profile to “optional” while you test. Assign a Smart Group as well.
- On the left side of the window at the bottom click on Custom Settings and then Configure.
- Paste the copied data from the sample xml files into the “Install Settings” section. Optionally you can configure the “Remove Settings”. Some customers paste the same data into both sections so that on un-erollment or un-installation of the profile, the settings persist. Leave “Make Commands Atomic” unchecked.
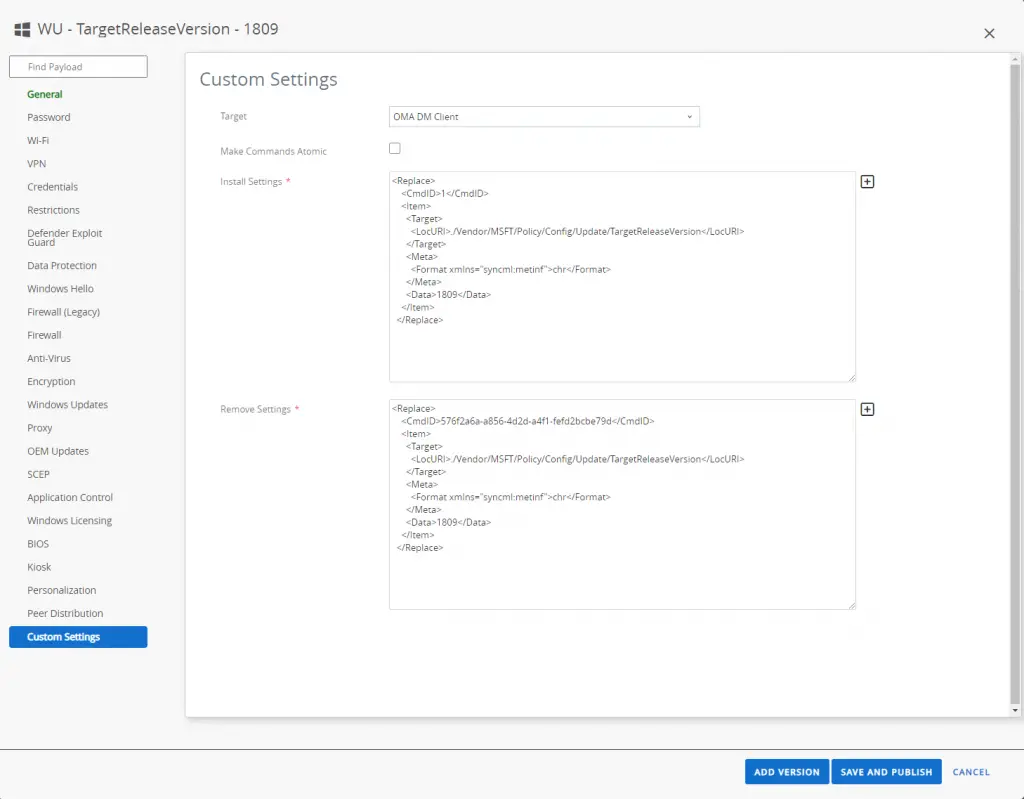
- Click Save and Publish
- Go to device details > Profile tab. Find the profile and install it on the device.
- It should show green as successfully installed. You can check on the device to see the values applied by going to HKEY_LOCAL_MACHINE\SOFTWARE\Microsoft\PolicyManager\current\device\Update

Expected Behavior
After this is deployed, the device will stay on this version until you change the setting or it reaches end of service. Once you are ready to upgrade the first wave of test devices, you’ll go through this flow:
- In UEM under Profile list view, select the Profile and click Manage > Copy at the top.

- Change the value in between the “Data” nodes to be the version you want.

- Assign to your first wave of devices. Once they get the profile, the next time the device checks for Windows Update it will then move to that version.
- Add more assignment groups over time until you get everyone upgraded. Easy! No need to “approve” or “assign” the specific Windows update feature version in the UEM console.
Other Ways to Deploy
May 2021 Update: There was a bug in the CSP that prevented you from setting it to any non-numerical value like 20H2. Microsoft has finally fixed this issue! All you have to do is deploy the May cumulative of 2021 update to systems 1809 and newer and the CSP will work fine with “20H2” as the value. With that said, here are a few other ways to deploy if you don’t or can’t use the CSP.
Deploy via GPO
If your machines are still domain joined, you can deploy this value with traditional group policy. The GPO will configure the registry keys under this node: HKEY_LOCAL_MACHINE\SOFTWARE\Policies\Microsoft\WindowsUpdate

You’ll need to ensure you have the Windows 10 ADMX templates (preferably updated to the latest version) installed on your domain controllers. Create a new GPO and edit it.
Expand Computer Configuration > Policies > Administrative Templates > Windows Components > Windows Update > Windows Update for Business.
Edit “Select the Target Feature Update Version”, Enable it, and type in “20H2”
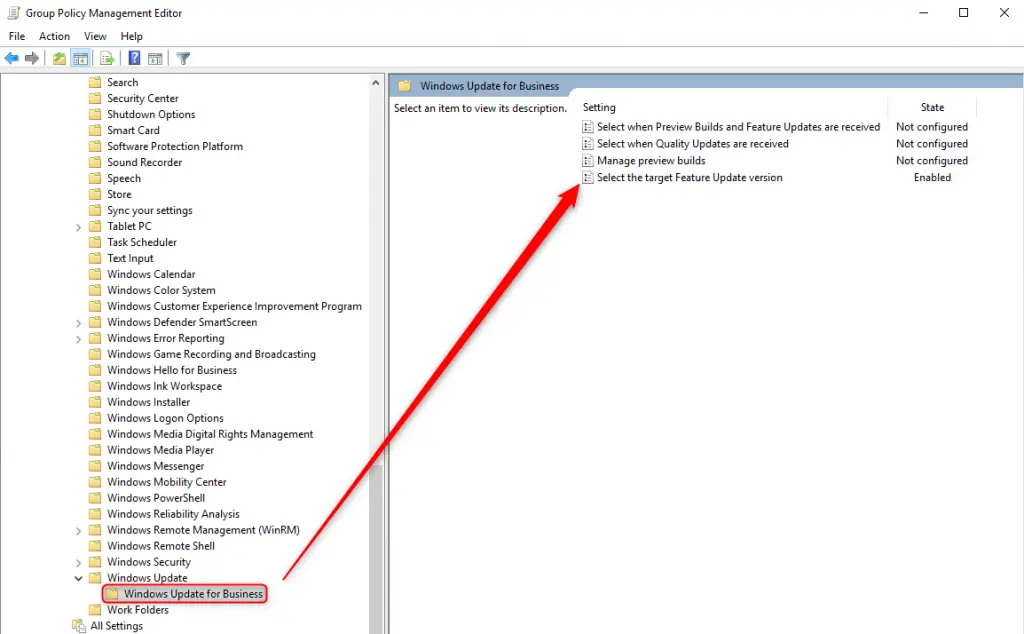

Close GPO editor and then ensure it is linked properly and the device is in the correct OU.
Deploy via Sensor
Another way of doing it is by configuring that same registry key, but instead of using GPO we can use Workspace ONE sensors. This has the benefit of being able to deploy to any Windows 10 device regardless of domain join status and it doesn’t require connectivity to the domain controller.
Open up Workspace ONE console and browse to Sensors. Depending on your version of the console, Sensors may be located in different places.
Devices > Sensors
OR
Devices > Provisioning > Custom Attributes > Sensors
Add a new Sensor, and name it (lowercase)

Configure the following:
Language: Powershell
Execution Context: System
Execution Architecture: Auto
Response Data Type: String
Code:
$path = "HKLM:\SOFTWARE\Policies\Microsoft\Windows\WindowsUpdate"
If(!(test-path $path))
{
    New-Item $path -Force
}
New-ItemProperty -Path $path -Name "TargetReleaseVersionInfo" -PropertyType String -Value "20H2" -Force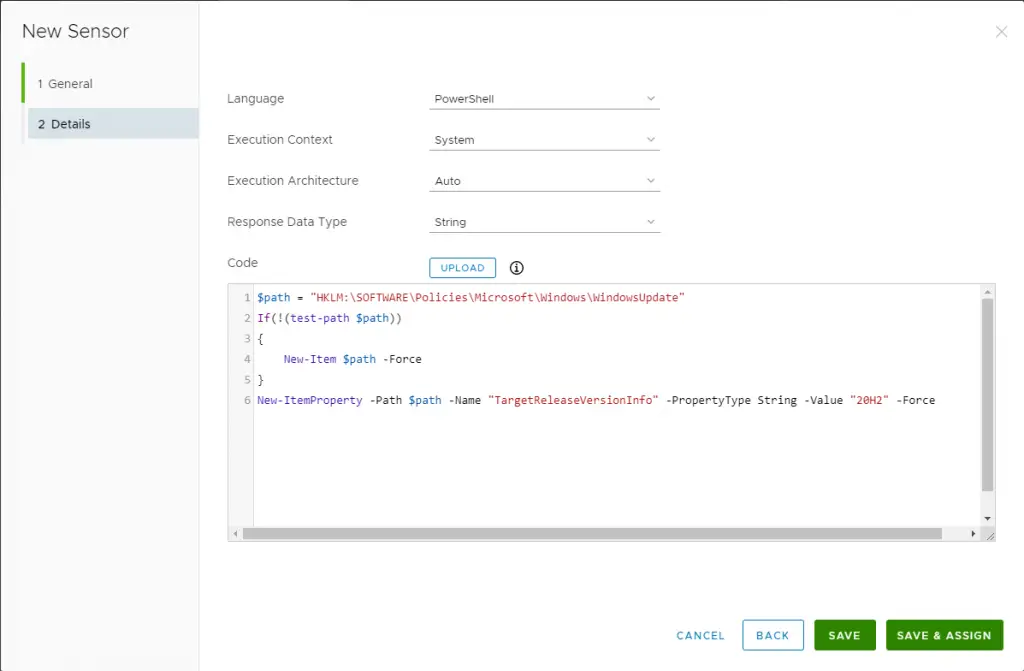
Save and Assign to your Smart Groups. Under Trigger Type, set it as desired but I normally set it to “Schedule”

Any devices that get this sensor will have this registry key applied. It will also re-apply every time the Hub sync (every 6 hours by default).
Deploy via Registry
You can deploy registry changes via a custom settings profile as well. If you’d like to do that here are the steps. The benefit of this is that it is a bit easier to assign to your devices and it can remove the setting easily as well. Thanks to Shuler MeHaffey for the tip! Note that this in fact sets the same registry setting as what GPO sets as well.
Create a Windows 10 device profile and click on custom settings. Ensure you select “Workspace ONE Intelligent Hub” from the dropdown.
Install settings:
<wap-provisioningdoc id="4ee19c79-6a7a-4727-91db-c1c55025deca" name="customprofile">
	<characteristic type="com.airwatch.winrt.registryoperation" uuid="cd83e639-24cd-4108-954e-f2ab3263fe5e">
		<parm RegistryPath="HKLM\SOFTWARE\Policies\Microsoft\Windows\WindowsUpdate" Action="Replace">
			<Value Name="TargetReleaseVersionInfo" Data="20H2" Type="String" />
		</parm>
	</characteristic>
</wap-provisioningdoc>
Remove Settings:
<wap-provisioningdoc id="788ae22e-c563-4afe-8b80-2d0f4b9fb8a8" name="customprofile">
	<characteristic type="com.airwatch.winrt.registryoperation" uuid="9803d4fc-21d8-4e97-aca2-5c2d19e3b7e8">
		<parm RegistryPath="HKLM\SOFTWARE\Policies\Microsoft\Windows\WindowsUpdate" Action="Remove">
			<Value Name="TargetReleaseVersionInfo" Data="" Type="String" />
		</parm>
	</characteristic>
</wap-provisioningdoc>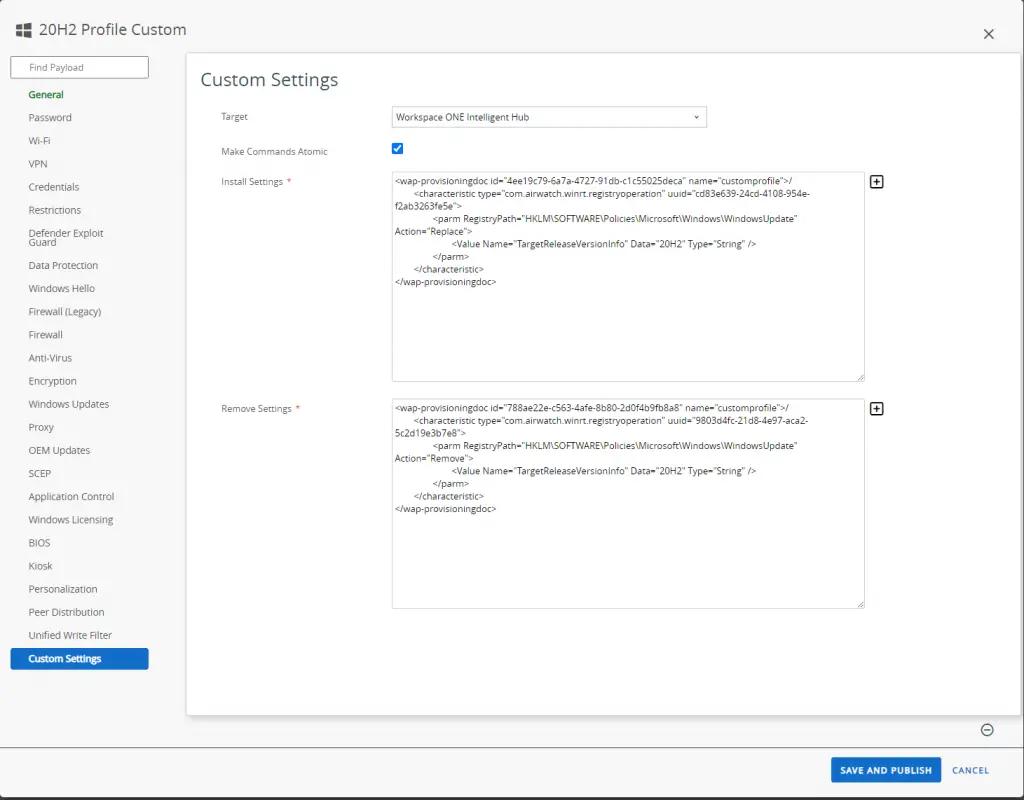
Conclusion
The TargetReleaseVersion setting in Windows Update for Business gives you full control over how and when to upgrade your clients. You can configure this setting via the MDM CSP, traditional GPO, or via a registry key,. You can use Workspace ONE to deploy this to your client or another management tool such as Microsoft Endpoint Manager.

How do you account for the data value (in your case “1909”) being deleted the next time the Windows Update payload Profile is applied?
Hey Ken. So this is an unfortunate aspect of the “GUI” profile. I’d recommend building custom XML profiles for each ring using the new “ConfigureDeadline” CSP. I have some examples here: https://github.com/vmware-samples/euc-samples/tree/master/Windows-Samples/Custom%20Settings/Windows%20Update%20for%20Business.
The CSP doesn’t seem to work with 20H2, regardless of entering in 2009 or 20H2 in the data field.
This does not work for the 20H2 version (yet). This is the first version to be alphanumeric, but MDM is still looking for all numerical values. Microsoft is aware of this issue and will be fixing this in a cumulative update soon. I’d recommend just holding off on going to this version until they patch this CSP. If you need to get on it early for dev or test devices, then you’ll need to remove this CSP altogether and instead use deferrals and set them to zero. I’ve updated the blog accordingly as well.
@ken – I’ve updated the blog with some ways to deploy 20H2 value until MS fixes the CSP.
@Brooks any solution for 20H2? as mentioned profile failed with “The parameter is incorrect” error.
This does not work for the 20H2 version (yet). This is the first version to be alphanumeric, but MDM is still looking for all numerical values. Microsoft is aware of this issue and will be fixing this in a cumulative update soon. I’d recommend just holding off on going to this version until they patch this CSP. If you need to get on it early for dev or test devices, then you’ll need to remove this CSP altogether and instead use deferrals and set them to zero.
@Hari – I’ve updated the blog with some ways to deploy 20H2 value until MS fixes the CSP.
Thanks Brooks, really appreciate your help!!
Thank you! Glad it helped.
Hi Brooks,
I just watched https://www.youtube.com/watch?v=CWSkz9Wdocg “TAM Lab 093 – Workspace ONE – Managing Updates for Windows 10” and I stumble upon an interesting point.
About TargetReleaseVersion, they seem to say that, in addition to “TargetReleaseVersion” Key, we need to add also TargetReleaseVersion_ProviderSet.
However, cannot find any official information about this.
Any Clues on your side ?
Many thanks
In my testing, that extra one is not required. I’ve seen it work just fine without it.
I setup a CSP for 20H2 before I read that it didn’t work, but it appears to have worked. Does that mean MS patched it? Can you confirm?
Yes! MS fixed it in the May 2021 cumulative update. I just put out a video on it as well: https://youtu.be/PfeA09zBEro
Great! Thanks for all the great info you provide – can’t tell you how much you’ve helped me.
Thanks David for the kind words.
Hi Brooks, big fan of your blog. I do have a question. I managed to get the new TargetReleaseVersion to 20H2 after the cumulative update. However the machines are not getting the update. Is there anything else I can check from my side? I see they have Feature update to Windows 10 (business editions), version 20H2, en-us x64 as approved in updates.
(I asked the same question on youtube but I thought I might get more traction here. Sorry for the double post)
Thanks Joshua – I replied on youtube. But for anyone seeing it here it’s probably because the system has compatibility issues with the update. It could be free space, drivers, or other software issues. I’d run the setupdiag tool that MS has – https://docs.microsoft.com/en-us/windows/deployment/upgrade/setupdiag. If that doesn’t reveal anything, check out this blog: https://www.asquaredozen.com/2020/07/26/demystifying-windows-10-feature-update-blocks/
Thanks Brooks, the extra info is very much appreciated. I found out my issue, basically I approved the feature update of the previous month but it was already outdated. It seems the feature upgrade in July is a different one and needs to be approved so it’s available on the devices running 1909. It’s working now thank you.
Ah good to know. Yes, “approving” can cause odd issues like this. I recommend that customers move away from admin approval of patches as it doesn’t always work as intended.
Good day everyone!
I’m here to seek your assistance on how to add a new key name in Windows 10 registry followed by some value under the key (folder). I have an xml script but unfortunately WSP1 is throwing an error while publishing to the client machine. Appreciate someone’s immediate assistance. Thanks in advance.
The End devices which are enrolled to the workspaceone are missing cumulative updates in between for few months and suddenly the latest cumulative update is applied to the device which supersedes the previous months cumulative updates which is expected.
But here the ask is that why cumulative update for few months in between were not received by the end device even though workspaceone end will only manage approval of the updates on the end devices via windows update profile.
Is it the end device responsible to directly download the available updates from the Microsoft Update server or is there something being blocked from workspaceone end which is causing the cumulative updates not available for few months in between?
Please do correct me if not correct ..
Hi Brooks,
I was able to implement the Update/TargetReleaseVersion policy.
However I need to move on now asap with Windows 11 testing.
There seem to be a new policy callsd Update/TargetProductVersion as described here https://docs.microsoft.com/en-us/windows/client-management/mdm/policy-csp-update#update-TargetProductVersion
and here: https://docs.microsoft.com/en-us/windows/whats-new/windows-11-prepare#cloud-based-solutions
I created a custom CSP similar to the TargetReleaseVersion and writing “Windows 11” in the Data field. But the policy constantly fails to apply. The target machines are on Win10 21H1 with latest patch level.
What do you think am I doing wrong?
Here the CSP xml:
23771dd0-33db-49e1-aac4-38d3ee740f52
./Vendor/MSFT/Policy/Config/Update/TargetProductVersion
chr
Windows 11
Matthias – I’m seeing the same thing. Not sure what’s going on here. It may be a MS bug as they have previously had bugs with these CSPs. I’ll keep testing.
Your link to the samples is dead.
https://github.com/vmware-samples/euc-samples/tree/master/Windows-Samples/Custom%20Settings/Windows%20Update%20for%20Business.
Do you have a new location for these samples ?
Thanks Tim! Yes, they re-organized the Github repo and it broke a lot of my links. It’s updated now.
Hello Mr.Brooks,
I appreciate your efforts, but i have a question regards how can we delete the value of TargetReleaseVersionInfo when using sensor in UEM after upgrading targeted devices, because i think in future these devices wont take new update Couse of this value, also if you can suggest a code to upgrade to win 11 using sensor in UEM with many thanks.
BR
Apologies on the delayed response, I just saw this come through now. If I were you I wouldn’t use a sensor. The TargetReleaseVersion ensures every system upgrades to that version and so you can simply deploy a new profile to a subset of systems with a newer version (like 21H2) and they will upgrade to that. Then keep adding more and more groups to the profile deployment. For upgrading to Windows 11, you’ll have to use this CSP as well: ./Vendor/MSFT/Policy/Config/Update/ProductVersion
https://docs.microsoft.com/en-us/windows/client-management/mdm/policy-csp-update#update-productversion
Hi,
Is it possible to set the default value of a registry key with the “Deploy via Registry” method ?
I tried @, default or empty value nothinh is working 🙁
Thank you