
With the massive Crowdstrike outage this week, we looked for a way to automate fixing virtual machines in our environment. Since our VMs were not BitLocker encrypted, this enabled us to use WinPE exported as an ISO to enable a zero-touch fix. Here’s how we did it:
Pre-Reqs
- The target host needs to be able to boot ISOs and not be encrypted. It will still technically work if the system is BitLocker encrypted but it requires adding the BitLocker tools into WinPE and having the recovery key. This adds a lot of complexity and goes beyond the scope of this article.
- Windows 11 and WinPE ADKs
- Bonus: VMware CLI
Download and Install ADK
You’ll need to download and install the Windows ADK and WinPE ADK tools for this to work. Here is some code that will do it for you or use the links to download manually and click through the GUI.
#Initializing Variables
$WinPE_amd64 = "C:\WinPE_amd64"
$source = "C:\WinPE_amd64\boot.wim"
$mountpath = "$WinPE_amd64\Mount"
$downloads = "$home\Downloads"

#Download and Installing ADK
Invoke-WebRequest "https://go.microsoft.com/fwlink/?linkid=2196127" -OutFile "$downloads\adksetup.exe"
start-process -FilePath "$downloads\adksetup.exe" -ArgumentList " /features OptionId.DeploymentTools" -Wait

#Download and Install Win11 22H2 WinPE ADK (Backwards compatible with win10)- https://go.microsoft.com/fwlink/?linkid=2196224
Invoke-WebRequest "https://go.microsoft.com/fwlink/?linkid=2196224" -OutFile "$downloads\adkwinpesetup.exe"
start-process -FilePath "$downloads\adkwinpesetup.exe" -ArgumentList "/quiet /features OptionId.WindowsPreinstallationEnvironment" -Wait
Next, we need to setup and install the WinPE working folders. Additionally, you can update the boot.wim file here with the latest security patches and UEFI signed files. I opted not to do this given the short time frame and the limited use of this WinPE environment.
#Setup WinPE folders
$env = "C:\Program Files (x86)\Windows Kits\10\Assessment and Deployment Kit\Deployment Tools\DandISetEnv.bat"
cmd.exe /c """$env"" && copype amd64 $WinPE_amd64"
Then we need to mount the WinPE.wim file and modify our startnet.cmd file to automatically delete the problematic Crowdstrike files.
#Mount Dism and Create Startnet.cmd
Dism /Mount-Image /ImageFile:$source /index:1  /MountDir:$mountpath
'wpeinit' | out-file "$mountpath\windows\system32\startnet.cmd" -Force -Encoding ASCII
$(@('@for %%a in (C D E F G H) do @if exist %%a:\Windows\System32\drivers\CrowdStrike\ set WINDIR=%%a')) | out-file "$mountpath\windows\system32\startnet.cmd" -Force -Encoding ASCII -Append
'del %WINDIR%:\Windows\System32\drivers\CrowdStrike\C-00000291*.sys' | out-file "$mountpath\windows\system32\startnet.cmd" -Append -Encoding ASCII

#Add key components
$packagepath = "C:\Program Files (x86)\Windows Kits\10\Assessment and Deployment Kit\Windows Preinstallation Environment\amd64\WinPE_OCs"
Dism /Add-Package /Image:"$mountpath" /PackagePath:"$packagepath\WinPE-WMI.cab"
Dism /Add-Package /Image:"$mountpath" /PackagePath:"$packagepath\en-us\WinPE-WMI_en-us.cab"
Dism /Add-Package /Image:"$mountpath" /PackagePath:"$packagepath\WinPE-NetFX.cab"
Dism /Add-Package /Image:"$mountpath" /PackagePath:"$packagepath\en-us\WinPE-NetFX_en-us.cab"
Dism /Add-Package /Image:"$mountpath" /PackagePath:"$packagepath\WinPE-Scripting.cab"
Dism /Add-Package /Image:"$mountpath" /PackagePath:"$packagepath\en-us\WinPE-Scripting_en-us.cab"
Dism /Add-Package /Image:"$mountpath" /PackagePath:"$packagepath\WinPE-PowerShell.cab"
Dism /Add-Package /Image:"$mountpath" /PackagePath:"$packagepath\en-us\WinPE-PowerShell_en-us.cab"
Dism /Add-Package /Image:"$mountpath" /PackagePath:"$packagepath\WinPE-StorageWMI.cab"
Dism /Add-Package /Image:"$mountpath" /PackagePath:"$packagepath\en-us\WinPE-StorageWMI_en-us.cab"
Dism /Add-Package /Image:"$mountpath" /PackagePath:"$packagepath\WinPE-DismCmdlets.cab"
Dism /Add-Package /Image:"$mountpath" /PackagePath:"$packagepath\en-us\WinPE-DismCmdlets_en-us.cab"

#Save and Unmount Image
Dism /Unmount-Image /MountDir:$mountpath /commit
After you save and unmount the image, the final step is making the ISO file. By default, ISO files when booted in Windows will throw a prompt saying “Press any key to boot…”. This obviously doesn’t work well for automation, so we’ll want to remove that.
#make it no prompt
$ADKPath = (Get-ItemProperty -Path "HKLM:\Software\WOW6432Node\Microsoft\Windows Kits\Installed Roots").KitsRoot10 + "Assessment and Deployment Kit\Deployment Tools"
$oscdimg = $ADKPath + "\amd64\Oscdimg\oscdimg.exe"
$etfsboot = $ADKPath + "\amd64\Oscdimg\etfsboot.com"
$efisys_noprompt = $ADKPath + "\amd64\Oscdimg\efisys_noprompt.bin"
$parameters = "-bootdata:2#p0,e,b""$etfsboot""#pEF,e,b""$efisys_noprompt"" -u1 -udfver102 ""$WinPE_amd64\media"" ""$WinPE_amd64\crowdstrike_noprompt.iso"""
$ProcessingResult = Start-Process -FilePath $oscdimg -ArgumentList $parameters -Wait -NoNewWindow -PassThru
Then simply mount to your VM and ensure that you select it as your boot option.

And then it should boot and find the file and delete it!
For the full script, see my Github post.
Bonus – VMware CLI
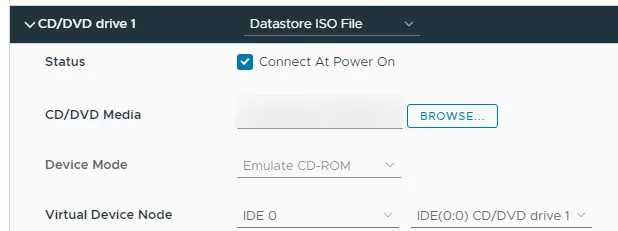
In VMware environments, you’ll want to upload this ISO to a datastore that VMs have access to. Then edit the VM and attach CD/DVD.
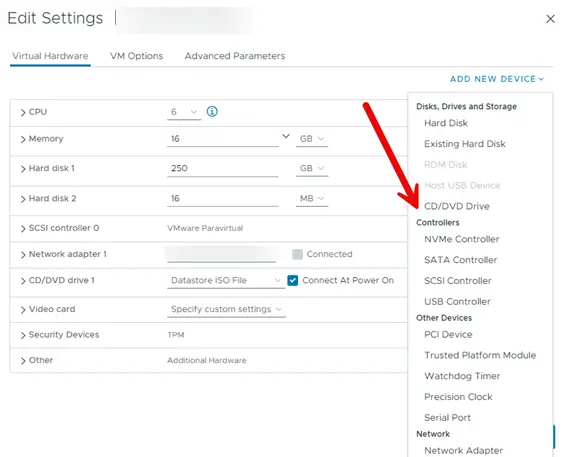
Choose Datastore ISO file and select it.
Also, you can use these PowerCLI commands as a basic starting point for automating adding a new drive, modifying the boot order, booting to DVD, and then powering on the VM.
Credit to Nick Richardson for adding this part.
New-CDDrive -VM $vm_to_fix -IsoPath $iso_file -StartConnected:$true

$vm = Get-VM -Name $vm_to_fix
$spec = New-Object -TypeName VMware.Vim.VirtualMachineConfigSpec
$spec.BootOptions = $vm.ExtensionData.Config.BootOptions
$cd = New-Object -TypeName VMware.Vim.VirtualMachineBootOptionsBootableCdromDevice
$spec.BootOptions.BootOrder = $cd
$vm.ExtensionData.ReconfigVM($spec)

Start-VM $vm_to_fix
I’d also recommend checking out William Lam’s blog for more commands for useful VMware automations on this.