Intro
As you move toward more modern deployment methods and get away from traditional imaging, there still comes a time when you as an IT admin need to cleanly install Windows 10 on a device. This could be due to hard drive failure, SSD upgrade, or the OS is too far corrupted to do a full PC reset. Not only that, using a third-party tool such as Rufus to make a Windows ISO bootable to a USB drive can often not work due to varying hardware support for NTFS UEFI booting. The UEFI standard is most commonly implemented with FAT32 support. The downside is that the Win10 media can’t fit onto FAT32 because of the install.wim file is over 4GB. The process I’ll document here will enable a simple way to create a zero-touch USB key for installing Windows 10 that supports UEFI (and legacy) booting on the widest range of hardware.
The absolute best method is deploying this completely from the cloud. If you are interested in that, check out my OSDCloud Video here!
Pre-reqs:
- 8 GB or larger USB key. I recommend using a fast drive such as Sandisk Extreme or an external SSD via USB 3.0
- Windows 10 or 11 Setup media downloaded from MS Volume license site or MSDN
- Laptop running a supported Windows 10 or 11 version
Main Script
Go to the Github repo and download the “Create-Zero-Touch-Media.ps1” script. For those unfamiliar with downloading a script from Github, click on the script and then “raw” and then right-click the page and “save as”.
Once downloadde, right click and then “Run with Powershell” (this will selfe-levate and run “as administrator”).
Before continuing with the script, ensure you have downloaded the appropriate Windows media from MS Volume License site, MSDN, or used the MediaCreationTool to create an ISO (I touch more on this tool at the end)
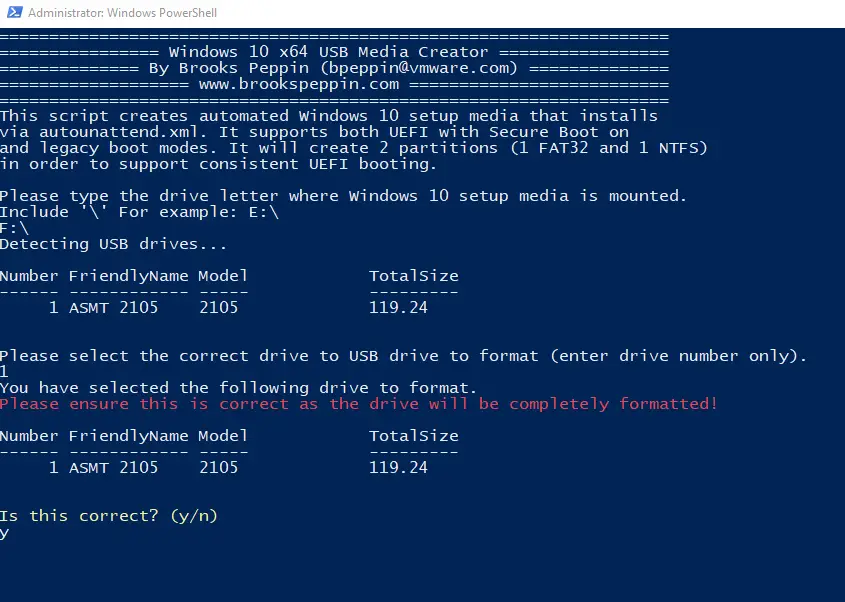
Right click the ISO and mount it with explorer so that it gets a drive letter assigned. In my case in will be “F:\”

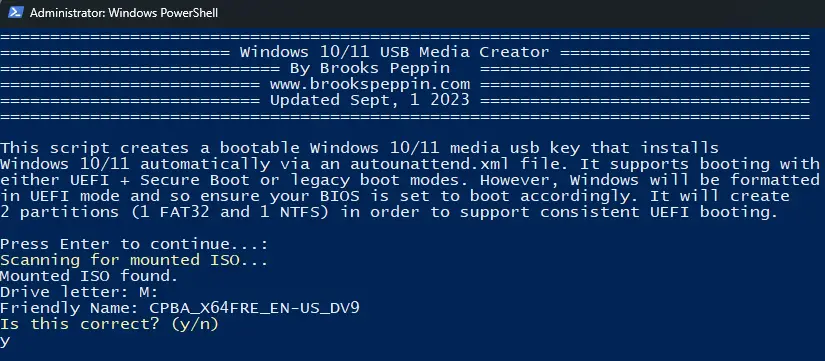
At the beginning of the script, press enter to continue.
It will scan for any mounted USB drives. Confirm the mounted drive is correct.
Plug in your USB drive. The script will search for available USB drives and present you a list.
Select the drive number of the one you want (It will probably be drive 1 as drive 0 is your internal disk). Press enter.
It will ask you to double check you have selected the correct drive as it will wipe out the whole thing. If correct, hit “y”.
The script will then wipe the USB key and do the following:
- The first partition will be a 500 MB FAT32 partition that holds all boot files from windows setup media
- The second partition will be the remaining space on the drive formatted as NTFS.
- This partition will only have the Sources folder which contains the install.wim file. FAT32 doesn’t support files sizes over 4 GB so we needed to make this partition NTFS formatted. It also gives much faster transfer speeds so Windows 10 installs very quickly.
Once the files are copied, it will prompt you to copy the Autounattend.xml file into the root of the “USB-BOOT” partition. Type Y and then enter.

This will enable Windows Setup to be fully automated and zero-touch. If you don’t include this file you’ll need to manually click through the Windows setup wizard. More on this file later.
After this, it will prompt you which image index you want to apply. Most ISOs contain several different SKUs. Select the image index number that matches the SKU you’d like to install.
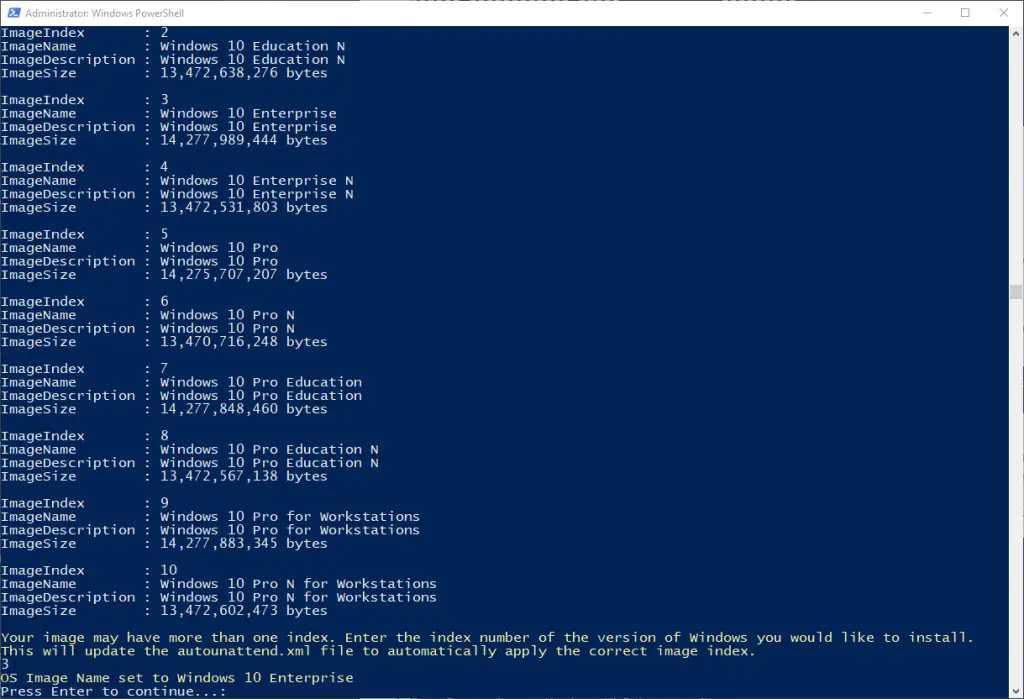
This will update the “value” node under the <ImageInstall> section of the autounattend.xml file on the USB_BOOT partition.
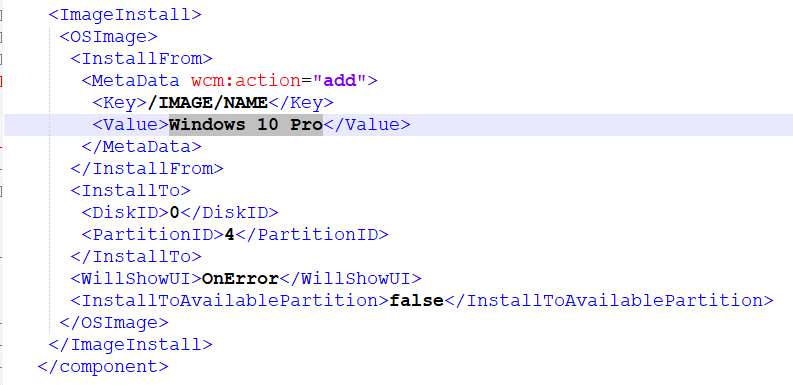
Autounattend.xml
We use a file called “autounattend.xml” to automate the Windows setup process. Windows setup will process this file if it resides at the root of the USB key. It acts like an unattend file for the WinPE setup process including formatting the disks, applying the correct SKU, and language. The one I include in this process is for GPT/UEFI as I am assuming you are going to be formatting it that way (yes, yes you definitely want to do this). But you can update it with MBR/Legacy boot mode. See MS documentation for some steps on how to do that as well as other things you can add to this file.
Let’s take a quick look at this file and what it is doing:
- Formatting Disk 0 in GPT format (edit the file to see each partition size)
- Modifies those partitions to have the correct format and ID (in the case of recovery partition)
- Set Language as English
- Sets Operating System SKU (based on the name of the OS image being applied).
We do add one tiny additional file (called ei.cfg) to tell windows to go ahead and format without Windows 10 product key. The script you ran above automatically creates it for you in the Sources folder on the NTFS formatted partition. If you neglect to include this file, then Windows 10 Setup will complain about an invalid product key and error out.
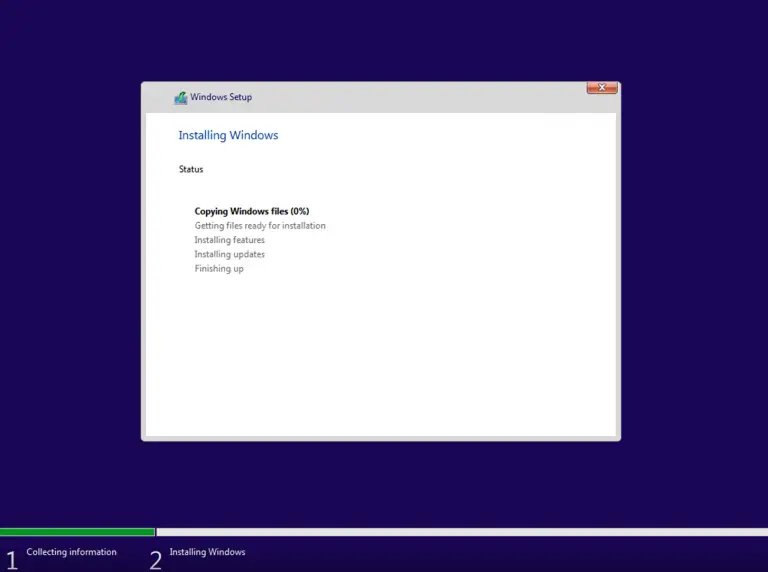
And you’re done! Simply plug into any laptop (or VM) that is correctly set to boot EFI mode and boot to the USB drive (F12 on Dell machines, ESC on VMs, other devices might be different) and watch Windows automatically install. On fast USB 3.0 media applying to a newer SSD laptop, I’ve seen install times as fast as 9 min! Here’s a quick video of this in action on a VM:
Microsoft Media Creator
One note on Microsoft’s tool. This tool does a similar thing as my script, but it has some limitations:
- Each time you run it, it fully downloads the media from the internet. This makes it a much longer process if you are needing to re-do the process or set up multiple drives
- It is only the latest version of Windows.
- On the upside, the install.wim is compressed to under 4GB so it can fit on FAT32 partitions and thus allow you to have only 1 partition on the key (as opposed to 2 with my process)
Really looking great, unfortunately I tried it today and got this error copying the some of the files, and it stops. I was running PS as admin.
Add-Content : Access to the path ‘G:\sources\ei.cfg’ is denied.
At C:\Users\Moudy.Abdelrahman\Downloads\AirWatch-samples-master\Windows-Samples\Tools & Utilities\Windows 10 Automated Setup Media\Create-Win10-Media.ps1:90 char:1
+ Add-Content -Path $usb_source\sources\ei.cfg -Value “[CHANNEL]”
+ ~~~~~~~~~~~~~~~~~~~~~~~~~~~~~~~~~~~~~~~~~~~~~~~~~~~~~~~~~~~~~~~
+ CategoryInfo : PermissionDenied: (G:\sources\ei.cfg:String) [Add-Content], UnauthorizedAccessException
+ FullyQualifiedErrorId : GetContentWriterUnauthorizedAccessError,Microsoft.PowerShell.Commands.AddContentCommand
Add-Content : Access to the path ‘G:\sources\ei.cfg’ is denied.
At C:\Users\Moudy.Abdelrahman\Downloads\AirWatch-samples-master\Windows-Samples\Tools & Utilities\Windows 10 Automated Setup Media\Create-Win10-Media.ps1:91 char:1
+ Add-Content -Path $usb_source\sources\ei.cfg -Value “Retail”
+ ~~~~~~~~~~~~~~~~~~~~~~~~~~~~~~~~~~~~~~~~~~~~~~~~~~~~~~~~~~~~
+ CategoryInfo : PermissionDenied: (G:\sources\ei.cfg:String) [Add-Content], UnauthorizedAccessException
+ FullyQualifiedErrorId : GetContentWriterUnauthorizedAccessError,Microsoft.PowerShell.Commands.AddContentCommand
Hi Moudy,
Good catch. I’ve fixed the issue and re-uploaded it to github. Let me know if you still have issues.
Brooks
Thanks for the quick reply, I have tried the new copy on git but failing in removing a file. I got another question as well, I can use my custom answer file it wouldn’t be an issue, or do I have to use the one provided in the zipped file?
Remove-Item : Cannot find path ‘G:\sources\ei.cfg’ because it does not exist.
At C:\Users\Mahmoud\Downloads\Compressed\AirWatch-samples-master\Windows-Samples\Tools & Utilities\Windows 10
Automated Setup Media\Create-Win10-Media.ps1:91 char:1
+ Remove-Item $usb_source\sources\ei.cfg -Force
+ ~~~~~~~~~~~~~~~~~~~~~~~~~~~~~~~~~~~~~~~~~~~~~
+ CategoryInfo : ObjectNotFound: (G:\sources\ei.cfg:String) [Remove-Item], ItemNotFoundException
+ FullyQualifiedErrorId : PathNotFound,Microsoft.PowerShell.Commands.RemoveItemCommand
A quick update……………..
Even-though the copying failed with error above but it still worked and I was able to successfully install Windows 10 1809 via the USB drive. Awesome work Brooks, really great stuff. Thanks for sharing the knowledge.
the code has multiple errors with Ampersands
The ampersand (&) character is not allowed. The & operator is reserved for future use; wrap an ampersand in double quotation marks
(“&”) to pass it as part of a string.
At C:\WinVMWareRepo\Create-Win10-Media.ps1:171 char:190
+ … ata-ga-click=”(Logged out) Header, go to Features”>Features <span cla …
+
Nevermind, i saved as from Github but needed to pull it down using the Raw button.
ok glad that worked!
Script can find mounted ISO Downloaded from VLSC.
Scanning for mounted ISO…
Mounted ISO not found. Please mount a Windows 10 ISO and then type the drive letter where it is mounted.
Include ‘\’. For example: E:\
Even after I type disk path script can’t find any distribution and can’t copy nothing from that location
I tried to execute power shell command manually:
Get-DiskImage -DevicePath \\.\CDROM0
Get-DiskImage : The specified disk is not a virtual disk.
At line:1 char:1
+ Get-DiskImage -DevicePath \\.\CDROM0
+ ~~~~~~~~~~~~~~~~~~~~~~~~~~~~~~~~~~~~
+ CategoryInfo : NotSpecified: (MSFT_DiskImage:ROOT/Microsoft/…/MSFT_DiskImage) [Get-DiskImage], CimExc
eption
+ FullyQualifiedErrorId : HRESULT 0xc03a0015,Get-DiskImage
Are you tying the letter of your mounted ISO or you usb key? At this step, you should be typing the letter of the mounted ISO. I have seen issues related to this if the device you are working on has multiple CD/DVD drives or a disk put into the built in DVD drive. Can you check that?
Thanks for putting the script together….
One note on using the Microsoft Media Creator ISO (W10 v1903), the script throws the following error(s):
Getting Windows Image information…
Get-WindowsImage : The system cannot find the file specified.
At C:\temp\Create-Win10-Media.ps1:148 char:15
+ $ISO_image = Get-WindowsImage -ImagePath $ISO\sources\install.wim
+ ~~~~~~~~~~~~~~~~~~~~~~~~~~~~~~~~~~~~~~~~~~~~~~~~~~~~
+ CategoryInfo : NotSpecified: (:) [Get-WindowsImage], COMException
+ FullyQualifiedErrorId : Microsoft.Dism.Commands.GetWindowsImageCommand
Cannot index into a null array.
At C:\temp\Create-Win10-Media.ps1:150 char:6
+ if (!($ISO_image.Imageindex[0] -eq “1”))
+ ~~~~~~~~~~~~~~~~~~~~~~~~~~~~~~~~~~~
+ CategoryInfo : InvalidOperation: (:) [], RuntimeException
+ FullyQualifiedErrorId : NullArray
~~~~
There isn’t a install.wim in the sources directory. There is a install.esd file.
Doing a “dism /Get-WimInfo /WimFile:install.esd” on that returns a number of different image SKUs.
My workaround was to change install.wim to install.esd at lines 148 & 153.
I’m looking forward to trying your “How to Provision Windows 10 with an Encrypted PPKG” solution, it should help my organisation speed up it’s deployment of WS1.
Thanks Dale. Yes, when using MS’s Media ISO creator they do put the .wim in .esd format. All of MS’s ISO directly downloaded from MSDN or Volume Licensing should have everything in .wim format. I’ll work to include handling this exception in a future version.
Awesome post.
Hi Brooks….Hoping to get this working. Below is the error I have run into. Any suggestions? Thanks…..
2020/10/23 15:51:19 ERROR 2 (0x00000002) Accessing Source Directory C:\WINDOWS\system32\E\
The system cannot find the file specified.
2020/10/23 15:51:19 ERROR 123 (0x0000007B) Accessing Source Directory C:\WINDOWS\system32\E I :\sources\
The filename, directory name, or volume label syntax is incorrect.
Copying sources directory to USB-Source (NTFS) partition
2020/10/23 15:51:19 ERROR 123 (0x0000007B) Accessing Source Directory C:\WINDOWS\system32\E I :\sources\
The filename, directory name, or volume label syntax is incorrect.
Add-Content : Could not find a part of the path ‘F:\sources\ei.cfg’.
At C:\Users\coreyking\Desktop\Create-Win10-Media.ps1:131 char:1
+ Add-Content -Path $usb_source\sources\ei.cfg -Value “[CHANNEL]” -Forc …
+ ~~~~~~~~~~~~~~~~~~~~~~~~~~~~~~~~~~~~~~~~~~~~~~~~~~~~~~~~~~~~~~~~~~~~~
+ CategoryInfo : ObjectNotFound: (F:\sources\ei.cfg:String) [Add-Content], Dire
ctoryNotFoundException
+ FullyQualifiedErrorId : GetContentWriterDirectoryNotFoundError,Microsoft.PowerShell.Co
mmands.AddContentCommand
Add-Content : Could not find a part of the path ‘F:\sources\ei.cfg’.
At C:\Users\coreyking\Desktop\Create-Win10-Media.ps1:132 char:1
+ Add-Content -Path $usb_source\sources\ei.cfg -Value “Retail” -Force
+ ~~~~~~~~~~~~~~~~~~~~~~~~~~~~~~~~~~~~~~~~~~~~~~~~~~~~~~~~~~~~~~~~~~~
+ CategoryInfo : ObjectNotFound: (F:\sources\ei.cfg:String) [Add-Content], Dire
ctoryNotFoundException
+ FullyQualifiedErrorId : GetContentWriterDirectoryNotFoundError,Microsoft.PowerShell.Co
mmands.AddContentCommand
Would you like to add the autounattend.xml to the USB to enable zero-touch install? (EFI systems only)
(y/n)
Was able to solve this, with another Windows 10 ISO
Corey – What ISO were you using that wasn’t working and which one worked?
Brooks, It worked once I downloaded an ISO from the MS volume licensing site. I can also import my PPKG file successfully during the Windows setup. The only thing I am having a problem with is auto enrollment when using the PPKG. It fails and I am still trying to figure out exactly why. I can use the staging user I have created and manually enroll by installing the Hub no problem. The same problem exists with enrollment if I take that PPKG and import it to an existing Windows installation. It just won’t auto enroll. Key things I can check? Thank You
Glad it worked using that ISO. Are you using the encrypted ppkg or the non-encrypted one? You’ll want to use the encrypted one as detailed in my video here: https://techzone.vmware.com/blog/how-provision-windows-10-encrypted-ppkg
Hi,
Good effort, i m creating a similar tool, and solved all the problems, my free tool can boot on Secureboot, use the ESD and WIM Windows ISO,
he can create a bootable for UEFI or Bios machine
and also create an iso from folder,
pls test it or member for community,
all your feedback is welcome,
Links https://github.com/dakhama-mehdi/B-B-ISO
I tried to run the script but i get tons of errors 🙁
At C:\Users\Marshal\Desktop\Create-Win10-Media.ps1:168 char:21
+ Sign up
+ ~
The ampersand (&) character is not allowed. The & operator is reserved for future use; wrap an ampersand in double
quotation marks (“&”) to pass it as part of a string.
At C:\Users\Marshal\Desktop\Create-Win10-Media.ps1:195 char:190
+ … ata-ga-click=”(Logged out) Header, go to Features”>Features <span cla …
+ ~
The '→Customer stories <span cla …
+ ~
The '→Security <span cla …
+ ~
The '→Explore GitHub <span cla …
+ ~
The '→Learn & con …
+ ~
The ampersand (&) character is not allowed. The & operator is reserved for future use; wrap an ampersand in double
quotation marks (“&”) to pass it as part of a string.
Not all parse errors were reported. Correct the reported errors and try again.
+ CategoryInfo : ParserError: (:) [], ParseException
+ FullyQualifiedErrorId : AmpersandNotAllowed
Appreciate your help.
Sam – What ISO are you using and where is it from (MSDN, volume site, or MS iso creator)?
Hi Brooks, I am following your tutorial but as I understand your script will install the English Windows 10 version, what exactly do I have to change in order for the USB to install Windows 10 in German and with a German keyboard layout? And what username & password does it use, can I change it? I probably have to edit the “autounattend.xml” file don’t I? Greetings from Germany!
So the only language settings in the autounattend.xml is for WinPE (the last component named Microsoft-Windows-International-Core-WinPE). You could probably delete that whole node from the XML and it will just default to whatever language the Media has. MS should have all the languages for Win10 media available for download. So just download the German media and it should default to german.
cool. is it possible to have the XML delete all existing partitions and then begin a default setup on the empty space?
I’d like to achieve the same result as when you do it manually, deleting all partitions and then clicking next on the remaining single block of free space
The autounattend.xml file that is on Github (and the same one the script grabs and puts on the USB key) should already wipe the disk clean. It has this node addedtrue . Does it not work?
Hi Brooks, i really appreciate your work and its the one single solution on whole word wide.
i have a problem.
i successfully installed the windows on my Tablet by following your post and it worked. but my installation stuck on account information like putting name organization and passwords because its a Tablet (Lenovo Thinkpad 10) so the touch is not working at the moment due to drivers. i dont have attachable keyboard. i tried with other autounattend fles generated with tools but no one works except your auto file.
so can you pls give me a new Auto file that can fill the all other required things and complete the installation. ( i have usb mouse that work with it but i have no keyboard. also i tried to open Ease of access but its not opening anything )
Also is there any other solution for tablet user, like adding Touch Drivers to windows iso that get installed with windows installation. ?
Thanks a lot
Hi,
Any advice on the following error please?
Cannot set “Value” because only strings can be used as values to set XmlNode properties.
At D:\downloads\Create-Win10-Media.ps1:172 char:2
+ $xml.unattend.settings.component.imageinstall.osimage.installfrom …
+ ~~~~~~~~~~~~~~~~~~~~~~~~~~~~~~~~~~~~~~~~~~~~~~~~~~~~~~~~~~~~~~~~~
+ CategoryInfo : NotSpecified: (:) [], SetValueException
+ FullyQualifiedErrorId : XmlNodeSetShouldBeAString
Thank You
I found that using the latest ISO from MS (jan 2025, win11 24H2) to build the zero touch usb, installation failed. I get a GUI box during install that just says ” Installation failed”.
Creating the zero touch usb seemed to work ok, and I’ve had no issues with previous versions of windows 11.