In this blog post, I will outline how to forcefully but elegantly upgrade remote systems to Windows 10 using SCCM task sequences. I will be using 3 task sequences working together to accomplish this. This process can also be used for clients on the LAN as well as for win10 feature upgrades. The main benefits of this process are as follows:
– All content gets pre-downloaded silently in the background
– Win10 assessment is run silently before hand and sends email based on pass/fail
– If it passes, a reg key will be created with which an SCCM compliance rule can be queried. Systems with the reg key can get automatically placed into a “Win10 Ready” collection.
– The real upgrade Task Sequence can be deployed manually or automatically to systems in the “Win10 Ready” collection
– A nice window will popup on the real upgrade TS which allows users to defer the upgrade up to 5 times before it will run automatically
– Model specific drivers are pre-downloaded as well
Pre-Reqs
– Clients must be on a reliable VPN connection in order for this to work well. We have an “always on VPN” that connects so remote clients are always on the VPN unless the user manually disconnects.
– Because this is a lot of content going over your VPN, be mindful of the bandwidth impact. We use Adaptiva for content distribution and it takes care of all of the bandwidth management automatically for us so there is no load placed on our VPN gateways.
– While you CAN include the MBR2GPT process to this, I would recommend against it. This is simply because if there are any issues you’re gonna get a system that won’t boot. Troubleshooting that remotely is a huge pain and a poor experience. Just flip them to UEFI once they visit a real office.
Downloads
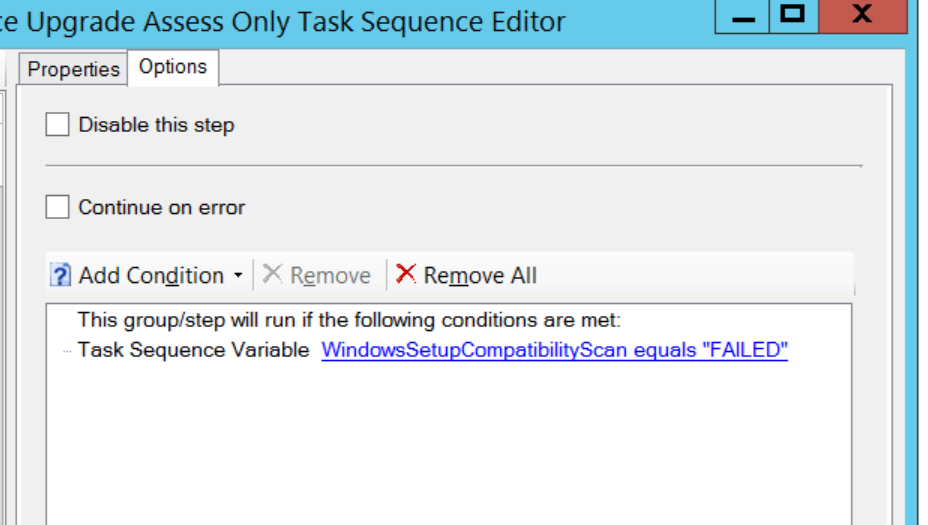
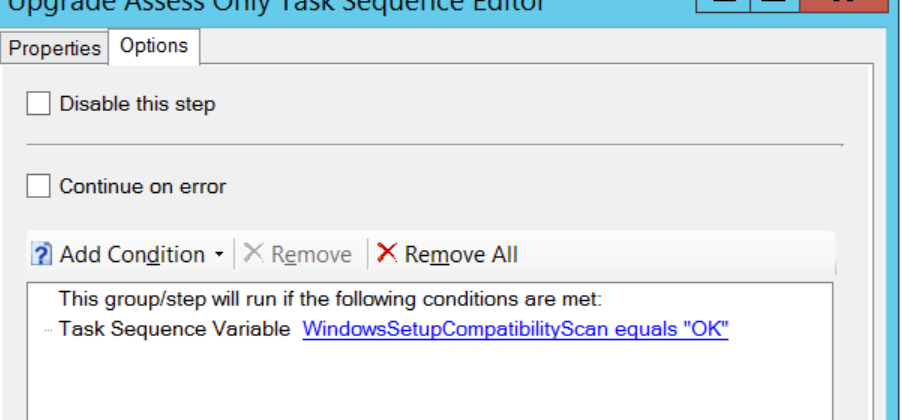
1 – Setup Windows 10 “Assess Only” Task Sequence
The purpose of this first task sequence is to prepare the system for Windows 10 by running any pre-upgrade checks, the Windows 10 assessment, and downloading all of the content of your task sequence ahead of time. Because of this, you’ll want to make sure everything is added to this task sequence (only exception being drivers). This task sequence will be run silently so don’t include anything that has a popup using serviceui.exe.
In my task sequence I run all of my prep stuff such as upgrading mcafee, clearing out some locations that fill up the hard disk, enabling Adaptiva OneSite, etc. After that, I run the “Upgrade Operating System” step with the “Perform Windows Setup compatibility scan without starting upgrade”. I ensure this step is configured to “Continue on Error”. I’m using version 1607 still as I’ve actually had a lot more issues with going straight to 1703 (more driver incompatibilities, blue screens, and boot issues).

Task Sequence 1 – In-place upgrade assessment only
After the Windows 10 compatibility assessment runs, it will output a task sequence variable with the resulting hex code. I then run a script that processes this value and translates it for you so you don’t have to go look it up. It then emails the results whether pass or fail and attaches the logs. I took this from
Niall Brady and just made a few tweaks to it (like changing it from a popup to just send an email since this will be deployed silently as well as tweaked some of the verbiage).
Create a “run powershell Script” step and call this script:
The script does the following:
– Creates a custom task sequence variable called “WindowsSetupCompatibilityScan” and sets it to either “OK” or “FAILED”
– Creates a log called WindowsSetupCompatScan.log and processes known error codes and outputs with easier to understand text. For example, if the hex code error is C1900208, it will output in the log “Incompatible apps or drivers”. This makes troubleshooting why the assessment failed so much easier
– OPTIONAL: Sends email and attaches the WindowsSetupCompatScan.log. The body of the email includes the link to the full log server so that you can just click on it and it takes you straight to your logs.

Windows 10 Ready sample email
|

Windows 10 Ready failure email
|
I will then use the ”WindowsSetupCompatibilityScan” variable created from the script in the next two “Set Task Sequence Variable” steps in order to create a corresponding log path to my central log server. So first I set “Win10LogPath” variable to be “Win10UpgradeNotReady” if “WindowsSetupCompatibilityScan” = FAILED. And I set “Win10LogPath” variable to be “Win10UpgradeReady” if “WindowsSetupCompatibilityScan” = “OK”.
|
I then create a section called “Copy Logs” that will copy the relevant win10 and sccm logs to the central server using the “Win10LogPath” variable in the path.
|

Mapping drive letter to log UNC path
|
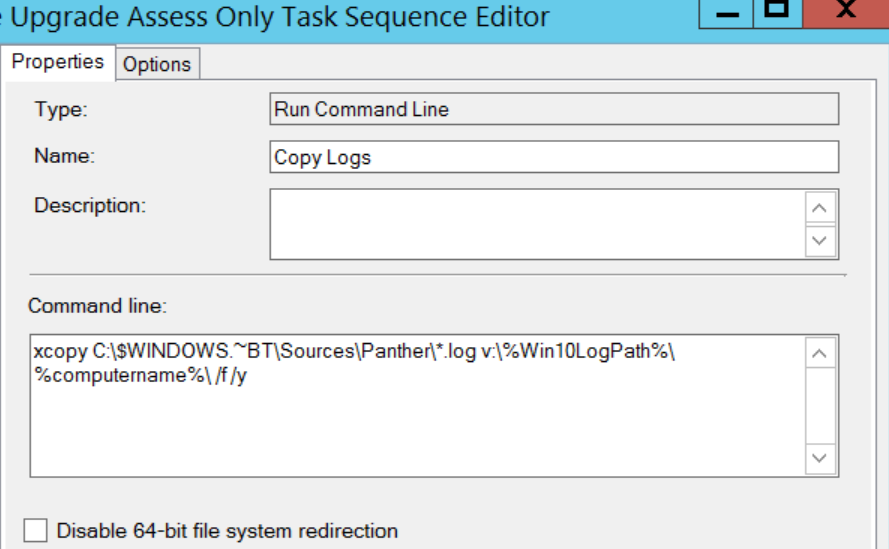
Copying two log files in panther folder from upgrade task sequence
|

Copying Compatdata xmls so you can see what app it failed on
|
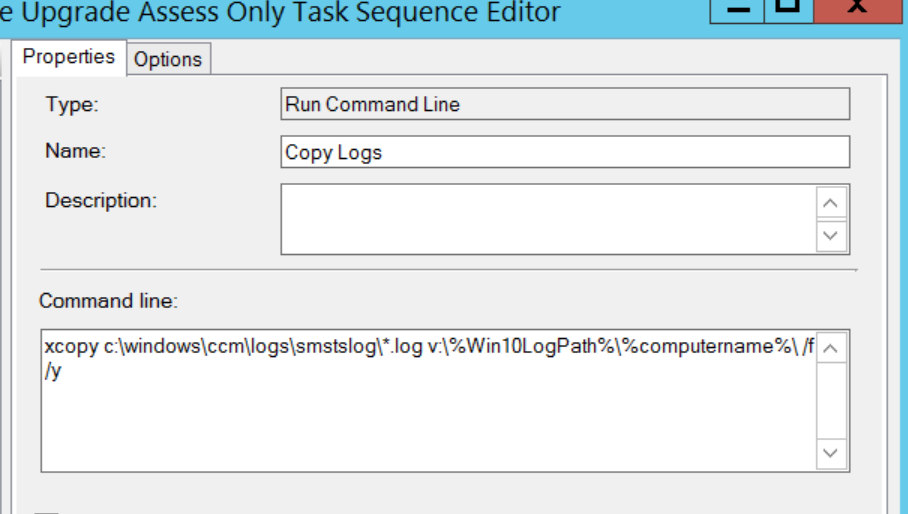
Copying smsts log file
|

Copying WindowsSetupCompatScan.log file generated from script
|
You might have also noticed I have a lot of disabled task sequence steps at the very end of the task sequence. I have added in all of the steps and content that is on the full upgrade task sequence so that the content is referenced and downloaded ahead of time. This task sequence will be deployed with the “Download all content before running the task sequence” setting (which I’ll show later).
2 – Setup Driver download Task sequence
Simply create a task sequence that contains each driver model with appropriate WMI Query
You will use the “Download Package Content” task sequence step and set the custom path to C:\Drivers.
Make sure you have the correct WMI query. Here is an example for a Dell Latitude E7450.
Unlike Task Sequence 1 (Win 10 Assessment), this will NOT be deployed with the “Download all content before running the task sequence” setting but rather the “Download content as needed when running the task sequence”. This will ensure it runs and evaluates the wmi statement on each step and will only copy the drivers for that particular model to C:\Drivers. If you did the “download all content” setting, it would download every single model’s drivers into the ccmcache folder and fill up the hard drive with unnecessary data.
3 – Setup compliance rule to check for registry key
The WindowsSetupCompatibilityScript_noprompt.ps1 creates a reg key (REG_AZ) called “Win10UpgradeReady” and sets it to “Yes” if it passes the assessment. In my environment, I’m setting it to be HKEY_LOCAL_MACHINE\SOFTWARE\VMware_IT\Win10UpgradeReady.
Create a simple configuration item with a powershell script to detect the presence of this key.
$PATH = “HKLM:\Software\VMware_IT”
$val = Get-ItemProperty -Path $PATH -Name “Win10UpgradeReady” -ErrorAction SilentlyContinue
if ($val.Win10UpgradeReady -eq “Yes”)
{
Write-Host “Compliant”
}
else
{
Write-Host “Not-Compliant”
}

Configure detection script
|

Create compliance rule to equal “Compliant”
|
After you create the compliance item and associated baseline, deploy it to a test collection. On the deployment, right click and click “Create New Collection–> Compliant”. Name it “Win10 Upgrade Ready”. This will automatically add compliant systems to this collection. I recommend you configure “Incremental updates”. I configure a full refresh just to be sure its updated, but this is not required.
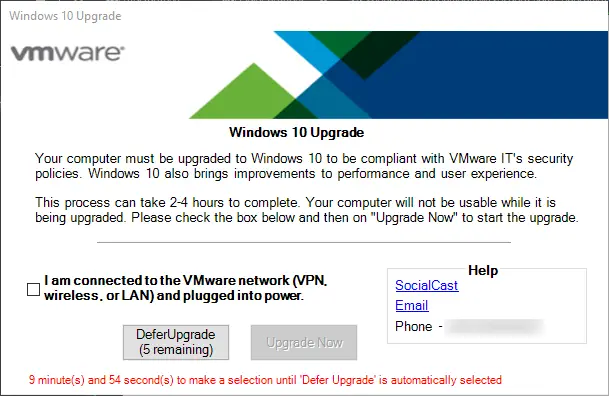
4 – Setup real Win10 Upgrade TS with deferral popup
A huge thanks to Niall Brady for his
blog post about this. I just converted it to powershell and added some additional components like automatic countdown and adjusted the popup window a bit. This was created in Powershell Studio so I HIGHLY recommend you purchase it if you haven’t yet. I’ll walk through how to modify it. The basics of this script is that it runs before the task sequence runs and lets the user know the upgrade is required. They can choose to upgrade now or defer the upgrade (I’ve set it to 5). Each time the window pops up the defer counter will reduce by one until its at zero at which point they will be forced to upgrade.
Download the files (from top of post) and open the Win10Prompt.psproj file in powershell studio

In Startup.pss I have included an if statement to not run the popup if the system is already on windows 10

Update the text of the GUI by clicking on each item and then updating the “Text” field in properties.

Click on the “Script” tab of MainForm.psf and Update the items in yellow accordingly
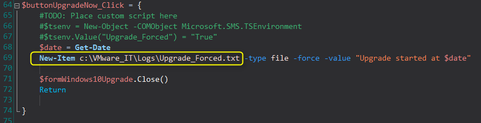
Update the text file location in $buttonUpgradeNow_Click Event section. This file will be used later in the real task sequence.

Update or remove these sections as needed.

Finally, update the banner.png file bye clicking on the Picture and clicking “choose image”.
Now that you have updated the file, run it and ensure the reg keys get created successful, the defer countdown works and all of the text is correct.
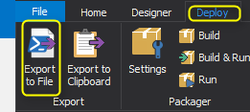
Then click on the Deploy tab and then “Export to file”. Take this file and create a standard SCCM package but ensure on the “Data Access” tab you check the box “Copy the content in this package to a package share on distribution points.”
Create a standard program and use this as Command line:
%WINDIR%\sysnative\WindowsPowerShell\v1.0\powershell.exe -NoProfile -ExecutionPolicy bypass -windowstyle hidden -file .\Win10UpgradePrompt_home.ps1
(update with your filename you exported in previous step)
Under Environment tab, ensure the program is configured to only run when a user is logged on.
Everything else can be default. Distribute to your DPs.
Now go to your real Windows 10 upgrade task sequence and right click –> properties.
Click on “Advanced” tab and select your upgrade prompt package and program. Configure it to “Always run this program first”.
Click OK and now edit your task sequence.
Add a “Set Task Sequence Variable” to be Upgrade_Forced = True
Click on options and add these conditions:
Now create a new folder (“Parent Group) and nest ALL remaining task sequence items inside of it. Configure the condition to only run if UpgradeForced variable = true.
Essential what this is doing is checking the variable which is only created in the previous step if the user clicks on “upgrade now”. If they don’t the task sequence will just skip the whole sequence.
Then add a run command line step to remove the Upgrade_Forced.txt file so that the deployment doesn’t run again after upgrade.
cmd.exe /c echo Y | del c:\VMware_it\Logs\Upgrade_Forced.txt
5 – Create and understand collections and deployments
Now that we have our task sequences created, we can move onto setting up the deployments. For this we will be using two collections. First, setup a collection called “Deploy Win10 Assessment and Driver Cache”. This will have the Win10 assessment task sequence, the driver cache task sequence, and Win10 Ready compliance baseline deployed to it. Setup the deployments as follows:
“Remote User In-Place Upgrade Assess Only
- Deployment Settings: Install, Required
- Scheduling: Occurs every day at 12pm. Rerun if failed.
- User Experience: Allow users to run the program independently of assignments. Uncheck “Show Task Sequence progress” so that this is silent.
- Distribution Points: “Download all content locally before starting task sequence”
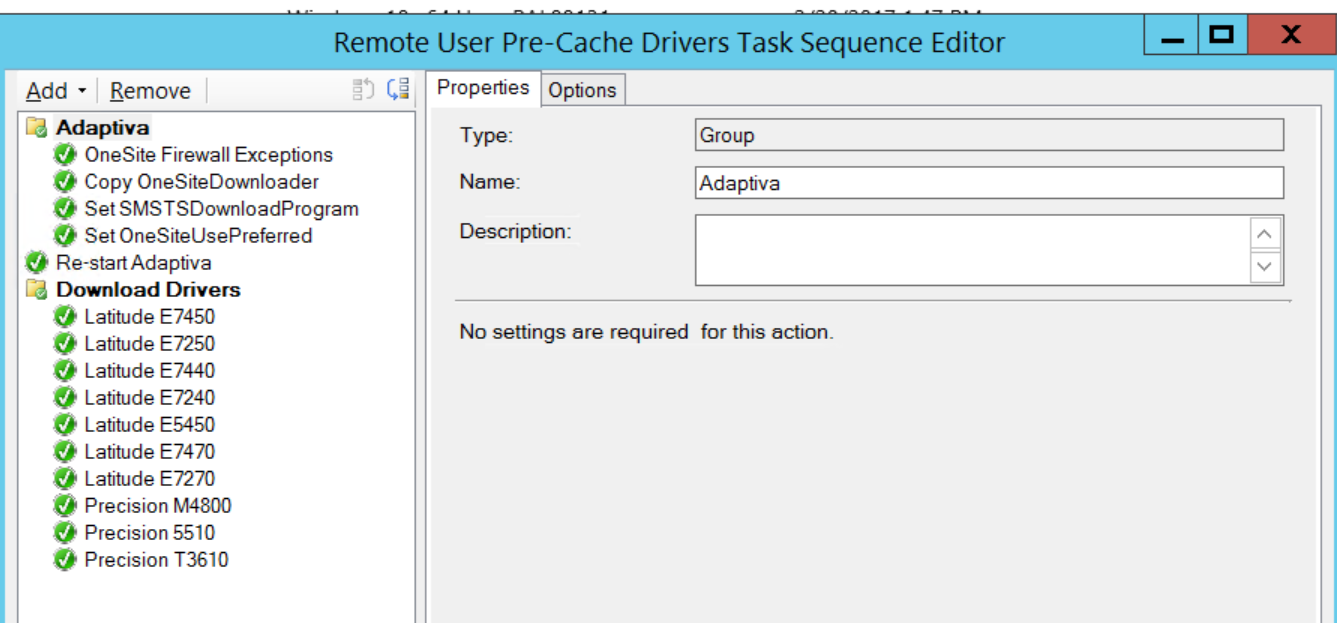
Next we have the “Remote User Pre-Cache Drivers” Task sequence. Deploy the same as the Win10 assessment task sequence but changing the content download behavior:
- Distribution Points: Download content locally when needed by the Task Sequence. This will ensure only the model specific drivers will get downloaded.
Don’t forget to deploy the Win10 Upgrade Ready compliance baseline to this collection as well. At the end your “Deploy Win10 Assessment and Driver cache” collection should look like this:
Next, create a new collection called “Required Deployment of Home Office Win10 Upgrade”. This collection gets the main Win10 Upgrade sent to it. Deploy that task sequence with the following settings:
- Deployment Settings: Install, Required
- Scheduling: Occurs every day at 5pm. Always re-run program.This is so that the Upgrade popup keeps popping up until the run out of deferrals. We will exclude Win10 systems from this collection so that once the system is upgraded and SCCM updates the collection, the deployment will no longer be sent to the client.
- User Experience: Allow users to run the program independently of assignments. Show Task Sequence progress.
- Distribution Points: Download all content locally before starting task sequence
In the membership tab of this collection, ensure you exclude Windows 10 systems (assuming you already have a collection for this) AND include the “Win10 Upgrade collection”. Also use incremental updates and I’d recommend a full update just for safe measure. Exclude any other groups here too.
6 – Enroll into AirWatch
We’re using this in-place upgrade sequence to get all of our systems to Windows 10 as fast as possible. Many systems are not quite ready for hardware refresh so we leveraged SCCM task sequences to automate this upgrade process. Once they are on Windows 10 we can now manage them with modern management tools like AirWatch. Follow one of my other guides for steps on how to silently enroll these systems automatically.


Hi,
Like your post..:) And like the TS steps, so my question is is it possible for you to make the TS download able to.
Best regards
Henrik
Hi Henrik,
First off i would like to say, i think this is amazing. Currently implementing this in my own environment.
I just have one question in relation to the drivers.
Do you have the driver packages added to your DP? (Data Access tab >> Copy the content in this package to a package share on distribution point).
Would be interested to find out that all 🙂
Again, great work.
Scott
Hey Scott – Thanks for the kind works. Regarding driver packages, you don’t need to explicitly copy them to a package share on DP but you do need to “distribute” them. You’ll create a task sequence to pre-download drivers ahead of time with the settings “Distribution Points: Download content locally when needed by the Task Sequence. This will ensure only the model specific drivers will get downloaded.” This will pre-stage the correct drivers on the client. This may not be required anymore by more recent versions of SCCM as I think Task Sequences now support dynamic content downloading (i.e. it will only download content the client needs at runtime).
FYI i meant to say Brooks Peppin lol
I have linked my twitter profile for a better way to contact me 🙂