Updated 4/15/20
VMware Workspace ONE supports many ways of deploying Office 365 on Windows 10, but it can often be confusing on which one is best. I’ve tried to summarize the Pros and Cons in a table.
| Method | Pros | Cons |
| Office CSP | – You don’t have to bother with downloading content or passing the configuration.xml to setup.exe – It’s simply a profile in WS1 Console – It will automatically install the “latest” version of Office whenever the profile runs (if your config is set to that) – Fast! Installs download and install very quickly | – The profile requires you to serialize the Office configuration xml and then create a “custom settings” profile in WS1. The UI just isn’t that great – You can lose some version control and app install metrics that are normally available in Software Distribution – Can’t display in the Hub catalog for self service – P2P is limited to Delivery Optimization (DO) and doesn’t leverage BranchCache or Adaptiva. |
| Light Office Install via Software Distribution (uses Microsoft’s CDN) | – You don’t really manage the content as the Office will download bits as needed during the install – Very quick and easy to config and upload to console – Can be made available in hub catalog – Fast! Installs download and install very quickly | – Not really a con, but this will use Microsoft’s CDN network instead of Akamai – P2P is limited to Delivery Optimization (DO) and doesn’t leverage BranchCache or Adaptiva. – Cannot use with Dell Factory Provisioning |
| Full Office Install via Software Distribution (uses WS1’s CDN, Akamai) | – Gives you full control of the content and how it’s installed on client. – Can leverage our CDN integration with Akamai as well as P2P solutions such as BranchCache or Adaptiva – Can be made available in hub catalog – Can use with Dell Factory Provisioning | – Takes time to download the full content first, zip up everything, and then upload to our console – Duplicate content remains on the client and takes up space (zip and extracted zip both persist in the sfd cache) |
I personally like the “Light Office Install” approach the best as you get better metrics, an easier to deal with UI, and ability to put into the catalog but without having to download the “Full” content every time you want to make an update. However, it does put a bigger strain on your network since all of the install bits are coming over the internet during install.
Build your Office XML
Every method will require you to have an XML configured as this tells Office what and how to install. It defines what apps are included or excluded, which architecture to use (i.e. 32 bit or 64), and what Office update channel it’s on and how it updates. Here’s how to create it:
Go to the Office Customization tool website.
Configure the Office package per your organization’s requirements. A couple of tips on this:
- You’ll want to make one XML for the core Office install and then separate ones for Visio and Project.
- Make sure that OneDrive(Groove) is not selected as this is the “old” Onedrive for Business client. The OneDrive Desktop is the current and recommended version by MS.
- Adding numerous languages can dramatically increase the size of the overall install
- If you are upgrading from the “MSI” version (i.e. the volume edition of Office 2016), then you can include this section to remove the MSI versions:

- Under Licensing and Activation, generally you’ll want this set to “User based” as office install counts are based on user installs in your Office 365 portal. However for shared devices or virtual desktops, you may want to use “Shared Computer” licensing.
Once you’re happy with your config, click “Export”.
Here is a sample config file (Configuration.xml) that installs 64 bit Office ProPlus on the “Monthly” update channel with the en-us language. It also excludes the legacy OneDrive For Business app, has Full display level and updates are enabled.
<Configuration ID="9b0b05c4-2c13-42b1-abbd-88867f74c9d9">
  <Add OfficeClientEdition="64" Channel="Monthly">
    <Product ID="O365ProPlusRetail">
      <Language ID="en-us" />
      <ExcludeApp ID="Groove" />
    </Product>
  </Add>
  <Property Name="SharedComputerLicensing" Value="0" />
  <Property Name="PinIconsToTaskbar" Value="FALSE" />
  <Property Name="SCLCacheOverride" Value="0" />
  <Property Name="AUTOACTIVATE" Value="0" />
  <Property Name="FORCEAPPSHUTDOWN" Value="FALSE" />
  <Property Name="DeviceBasedLicensing" Value="0" />
  <Updates Enabled="TRUE" />
  <RemoveMSI />
  <AppSettings>
    <Setup Name="Company" Value="VMware, Inc." />
  </AppSettings>
  <Display Level="Full" AcceptEULA="TRUE" />
  <Logging Level="Standard" Path="%TEMP%" />
</Configuration>
Additionally, it’s good to create an “uninstall.xml” file that can be used to fully uninstall office. This technically is optional, but I’d still recommend doing it. To create an uninstall.xml, use this format. You’ll notice is has <Remove></Remove> nodes instead of <Add> in the configuration.xml file. Just make sure the “Product ID” matches for both. Add <Property Name=”FORCEAPPSHUTDOWN” Value=”True” /> if you want it to force quit any open Office apps when attempting to uninstall. You can also reference this MS page for more details.
<Configuration>
    <Remove>
        <Product ID="O365ProPlusRetail">
            <Language ID="en-us"/>
        </Product>
    </Remove>
	<Display Level="None" AcceptEULA="TRUE"/>
	<Property Name="FORCEAPPSHUTDOWN" Value="True" />
</Configuration>
Save this file as uninstall.xml.
Deploy with Office CSP
This method leverages a built-in CSP specifically made for Office installs. Workspace ONE doesn’t have a dedicated UI for this type of profile so we’ll need to create it as a custom settings profile. And in order to do that, we’ll also need to serialize the Configuration.xml file. Go to this free web page and copy/paste your XML in the top box to get the serialized output.
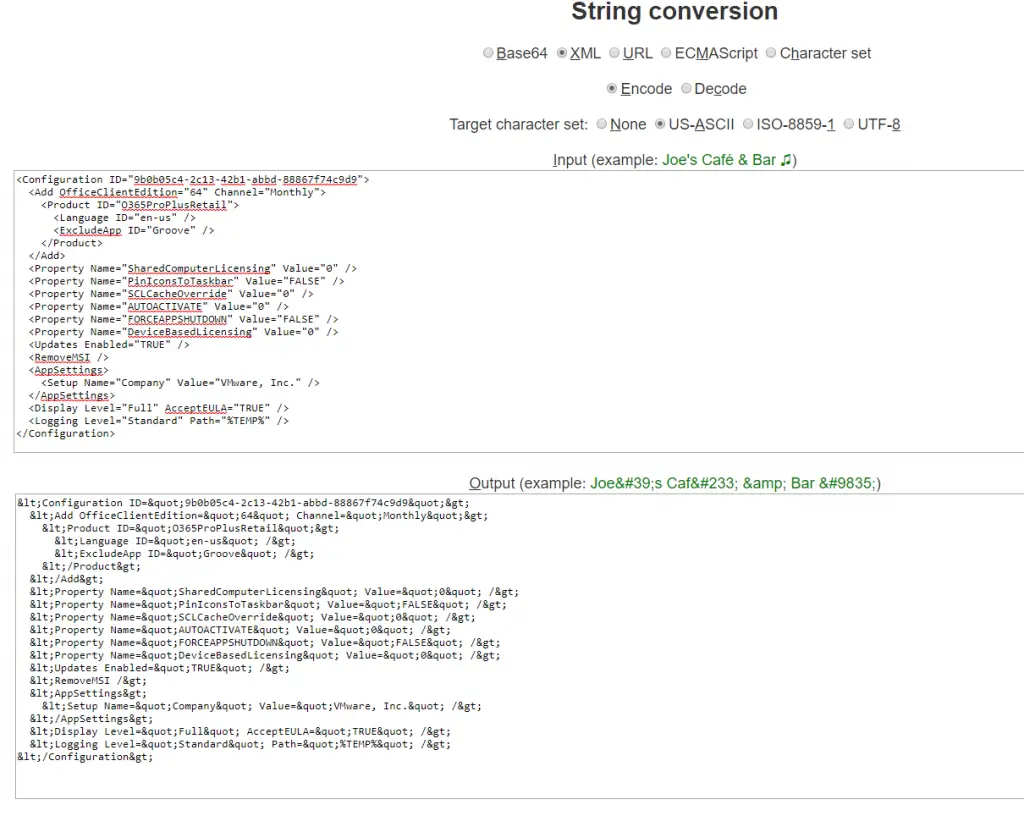
This “serialized” xml (in the bottom section) essentially is what goes in between the “<data>” nodes of the custom settings profile. We’ll walk through this next.
Build Profile
Create a new profile by clicking Add > Profile from the top of the console (ensure you are at the right Organizational Group!)

Select Windows > Windows Desktop
Picking “Device” Profile will make the install fully silent. Picking “User” profile while having Display Level=”Full” in the xml is supposed to make the install visible to the end user, but I haven’t been successful at seeing it yet. If you figure out to a way to make this work, let me know!
Fill out the “General” tab according to your preference. I recommend making this profile “Optional” assignment type.
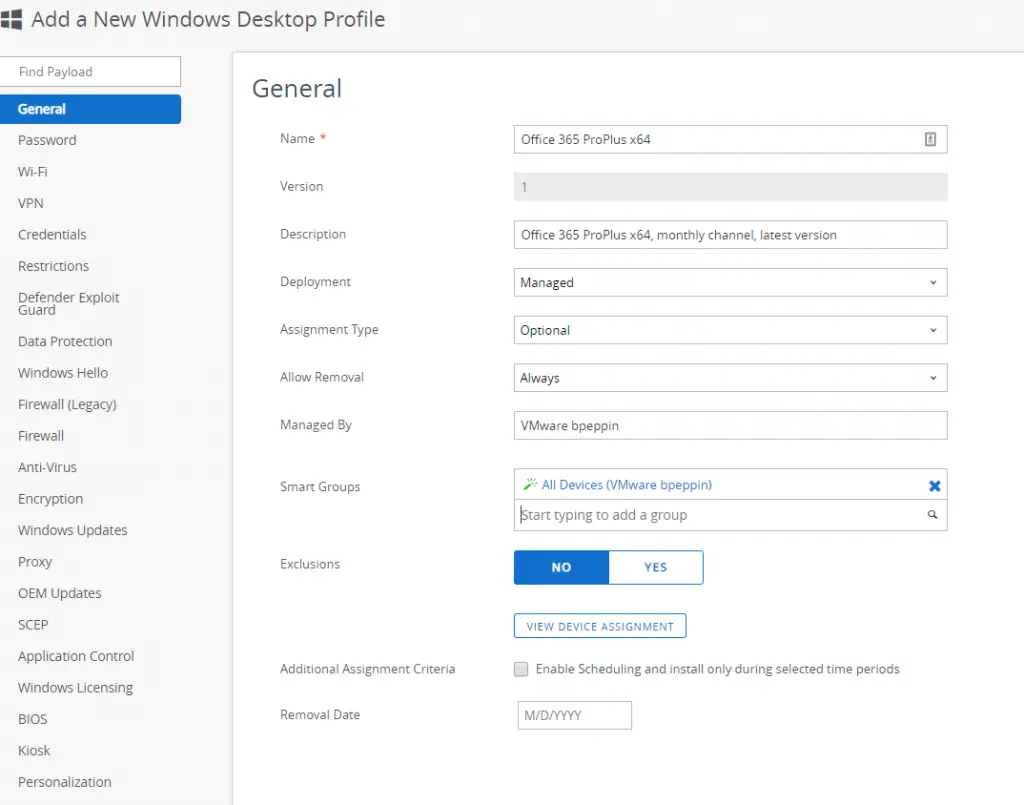
Click on Custom Settings at the bottom of left hand pane and then “Configure”
Copy and paste this basic structure:
<Exec>
<CmdID>1</CmdID>
<Item>
<Target>
<LocURI>./Vendor/MSFT/Office/Installation/0AA79349-F334-4859-96E8-B4AB43E9FEA0/install</LocURI>
</Target>
<Meta>
<Format xmlns="syncml:metinf">chr</Format>
</Meta>
<Data>[put your serialized xml here]</Data>
</Item>
</Exec>
Then copy and paste the serialized xml data from Configuration.xml in between the <Data></Data> nodes (and of course removing the “[put your serialized xml here]” text )
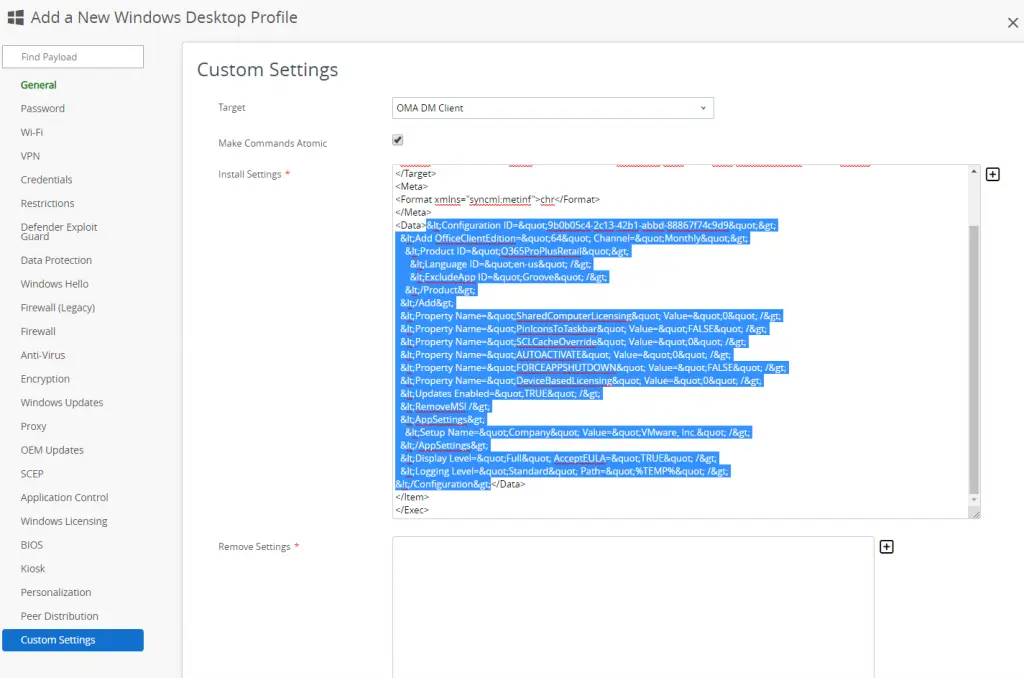
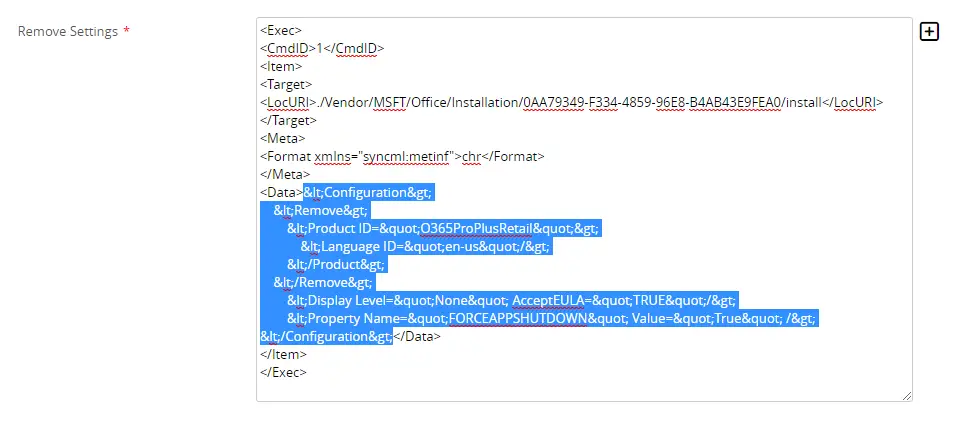
For the “Remove Settings” area, take your uninstall.xml and serialize it as well
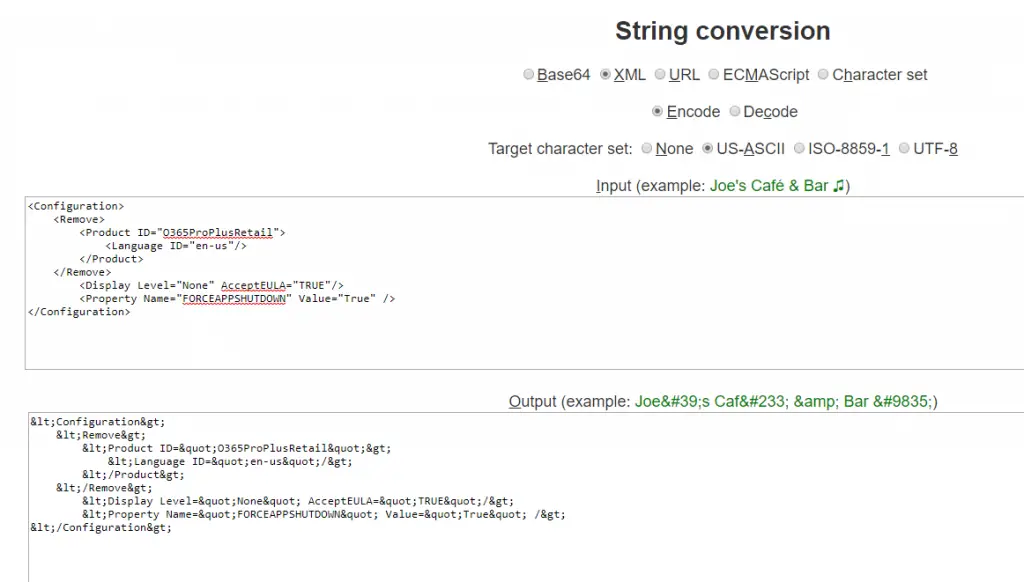
Add it in the exactly the same way as you did for the install section by putting your serialized text in between the <Data></Data> nodes.
Here is it added to my profile:
Go ahead and “Save and Publish” this profile
Go to a device in the console and click on “Profiles” tab. Then find the Office 365 ProPlus x64 profile, select it, and click “Install”.

If we pop over to the device you should start to see the install happening in task manager. The install should complete within a few minutes. It’s a surprisingly fast install! Note that this is a device level install and there will be no UI for the end user to see.
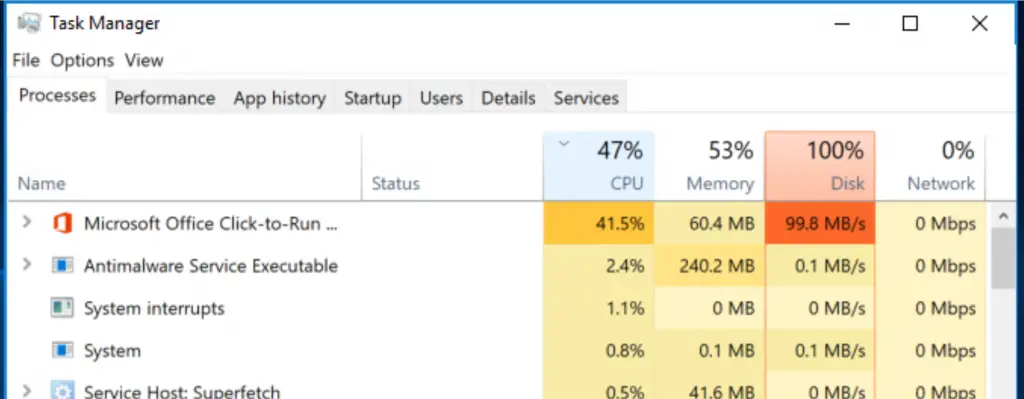

To uninstall, click the same profile and click “Remove”. The profile will be removed and Office will be uninstalled.

Create “Online” Office package
This is essentially the same thing as using the CSP, but you deploy it as an “app” instead of profile. This gives you the benefits of Software Distribution, such as better reporting, availability in the Catalog, and integration with Workspace ONE Intelligence. Note that this process still uses the Microsoft CDN to download the Office bits during the install. Let’s walk through how to package this up.
First, download and run the Office Deployment Tool. Select the folder where you want the extracted files to go. I usually put them in C:\Office.

This will put a few sample xml files as well as setup.exe. Setup.exe is the main file we need.

Create a new folder (or use this one) and put setup.exe along with your previously created configuration.xml and uninstall.xml files.:

Select those files, right click, and click Send To > Compressed Folder (zip)

If you want to pre-download all of the office bits to make a full offline installer then read the next section. Otherwise, just down to the Create and Deploy your Office 365 App in Workspace One section.
Create “Offline” Office package
This process pre-downloads the full Office content before zipping. Choose this method if you want to fully leverage the Akamai CDN (as opposed to MS’s) and also want to use it for Dell Provisioning for Workspace ONE (which requires offline install).
Load up an elevated CMD window and then change directory to C:\Office. Run the following command: setup.exe /download configuration.xml.

This will then cause all of the files to download into a subfolder (also called Office). If you right-click it and click Properties it should be 2GB+ in size.

If you want to make a batch file where you can re-do this again later one you can use this code.
@echo off
pushd %~dp0
echo Downloading Office 365 Pro Plus Retail x64 source files
setup.exe /download configuration.xml
Select those files, right click, and click Send To > Compressed Folder (zip). Make sure you select files and THEN add to zip. Don’t select parent folder and send to zip as you’ll create a sub-folder underneath.

Since Office will install the version that is downloaded, this will be something that you are going to need to keep up to date over time. Using the “Online” installer will always ensure the client installs the latest version, assuming you configured your XML that way.
Create and Deploy your Office 365 App in Workspace One
Go to Apps & Books in the Workspace ONE console and click Add Application.

Select your zipped office file (either the “online” or “offline”). Note that the offline installer will take a long time to upload since it’s over 2GB in size.
Change the name of the app to be something useful like “Office 365 ProPlus x64 (Online)”. I also like to put my name in “Change log” area along with the date so that other admins know who made this app and when.
Go to the Files tab, scroll to the bottom and for the “Uninstall Command” fill in: setup.exe /configure uninstall.xml

A couple of important notes regarding this “Uninstall Command” section before we move on. Workspace ONE has full lifecycle management and automatically removes managed applications in some cases. The main ways this happens are on smart group removal, app retirement, or enterprise wipe/unenrollment. To find more about this you can check out my other blog. While this field is a “required” field, it can be configured to have a “dummy” value so that Office never gets uninstalled.
Next, go to “Deployment Options” tab. In the “How to Install” section, select Device or User depending on what you want. Selecting User WILL show the install UI if you have it configured in the XML. If you don’t care about that simply select “Device”.
For “Install Command”, put setup.exe /configure configuration.xml. Adjust other fields as necessary.

Under “Identify Application By”, select “Defining Criteria” and click “Add”. Usually I keep things simple and just put “File exists”, “C:\Program Files\Microsoft Office\root\Office16\OUTLOOK.EXE”

Note that if you deploy 32bit Office to 64bit Windows, then you’d want to put: C:\Program Files (x86)\Microsoft Office\root\Office16\OUTLOOK.EXE
If you want it to look pretty in the console and the catalog, find a cool png logo and add it on the Images tab > Icon.

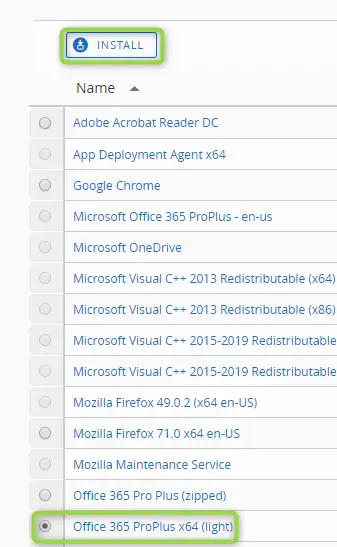
Save and Assign to your Assignment Groups. Go to a device > Apps tab and find Office 365 ProPlus x64 (light).
Click radio button and then “Install”
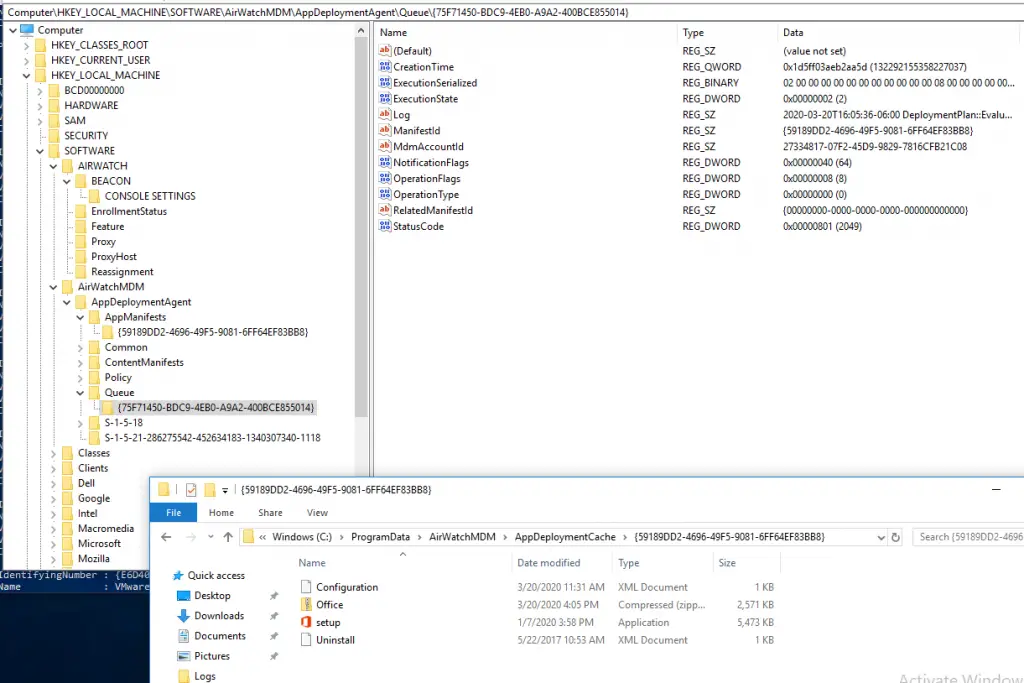
On the client, I can load up the registry and look at the Software Distribution queue to see that it is in progress. Additionally, I can look at the AppDeploymentCache folder and can see the app successfully exported the zip.
Loading Task Manager I can see the app is installing

Other Tidbits
- Don’t forget you can make xmls for Project and Visio installs and repeat the processes above to create those deployments.
- If this is your first time deploying Office, it’s always a good idea to test out the install manually first on a VM with display level set to Full. This will show you the install progress and an errors that may popup. If it doesn’t deploy manually, it won’t deploy via one of the above methods.
- Office does need a minimum free disk space to install so if you are getting weird failures, check free disk space (needs minimum 4GB of free space).
- You can’t mix and match architecture types. You can’t have the core Office install be 32 bit and attempt to deploy 64bit Visio (and vice versa).
- This page has some more useful info on troubleshooting any install failures
- If you are curious on what is the difference between Office 365 ProPlus and Office 2019, you can check out this MS page
Summary
I’ve highlight 3 of the best ways to deploy Office 365 Pro Plus with Workspace ONE. You can use the Office CSP which enables you to simply deploy the configuration without having to fuss with files or content. The “light” Office installer method is is simple to configure and gives you the benefits of being a managed App in the console, but still requires an internet connection during client install. The “full” Office installer method requires you to pre-download all of the files ahead of time and then upload as a zip to Workspace ONE. Since this can be installed fully offline, it can be exported as PPKG and sent to Dell in the factory as part of the Dell Provisioning for Workspace ONE services. There is lots of flexibility here so choose the method that works best for you!
The embedded screenshots are not uploading to the website. could you please investigate. Thanks
Photos should be fixed! It also gave me the opportunity to update the article with the latest information.
Why would you do CSP instead of just zipping the setup.exe and configuration.xml like you do with SCCM and deploying it.
I don’t see much value in using CSP over the standard ODT method.
The CSP method is just one of the methods I detail. Main benefit I guess is that you don’t have to mess with any content at all, it’s just the config. Zipping up the content and deploying it is method #2 I discuss.
Hey Brooks,
Are there any good troubleshooting steps? We get the profile to install but the apps dont come down. These machines are co managed and then clean – meaning just enrolled in UEM
Thanks I am a mother and very busy! This helped me alot!
Dear Brooks,
Really, really cool guide. Helped me a lot during preparation of the wsONE App and the golden image for factory provisioning. Thanks for sharing this.
Keep up the good work!
Thank you! Glad it helped.
Hello! Do you use Twitter? I’d like to follow you if that would be ok.
I’m definitely enjoying your blog and look forward to new posts.
Yes! @brookspeppin is my handle.
Thanks for the update Brooks
When I initially commented I clicked the “Notify me when new comments are added” checkbox and
now each time a comment is added I get several e-mails with the same comment.
Is there any way you can remove people from that service?
Thank you!
Hi Casino – see if this post helps you: https://wordpress.com/forums/topic/how-to-remove-someone-from-notify-me-when-new-comments-are-added-service/
Hi Brooks, thanks for this post it’s been very helpful. I have one additional question, What is the proper way to deploy O365 feature updates to Windows 10 devices via Workspace ONE?
Brooks, your guide was super helpful. Thank you for posting this!
Dear Brooks,
Your guide is always helpful to things simpler and clean.
Really appreciate your work.
I have question regarding Office Deployment. How can I be sure that the office products are updated automatically as an Update rolled out?
How Office updates is set when you build the configuration file. The default is that Office just reaches out to Microsoft Update and self-updates automatically when each patch is released. And then depending on the channel you are on, it will update to the next major version. Trying to “granularly” control the updates is not something you can do via WS1 very easily (there isn’t a CSP for it).