
Johan, Mikael, Jordan and several others have built an awesome open source extension for MDT that enables imaging over the internet via HTTP/HTTPS. Even if you adopt modern management and modern deployment technologies like Autopilot, there are still times where you need a good bare metal process. This solution gives you a modern way to do it and enables remote re-imaging scenarios which are even more important in today’s environment. Johan and Donna have great blogs on this so you should check those out. I’ll just be adding more detail (especially around the cert part) and screenshots for those who like or need it.
Create Azure VM
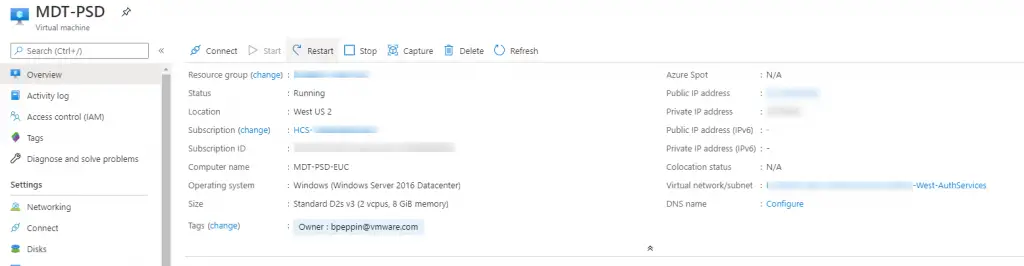
- Setup a VM in Azure that has a network connected to the internet. You can configure Azure VMs all sorts of ways, but here is my config:
- VM Type: Standard D2s v3 (2 vcpus, 8 GiB memory
- OS: Server 2016 Datacenter
- Networking: Allow RDP and HTTPS inbound
- Disk: 128 GB Premium SSD (Premium is probably not required but I have it available so why not? 🙂 )
- After the VM is successfully built, click the “Connect” button to download an RDP file
- RDP into the VM
Prep Work
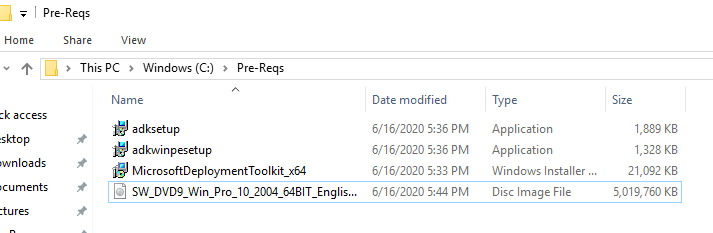
We’ll need to download pre-reqs in order for the hydration script to automatically install and configure everything for you (Full steps are here)
- MDT – Download MDT
- ADK – Download ADK (I’m using the latest, version 2004)
- ADK for WinPE – Download ADKPE (I’m using the latest, version 2004)
- Windows 10 OS ISO – MSDN or Volume License Servicing Center (VLSC)
I put all of these in a folder on the C: drive called “Pre-Reqs”
Install PSD
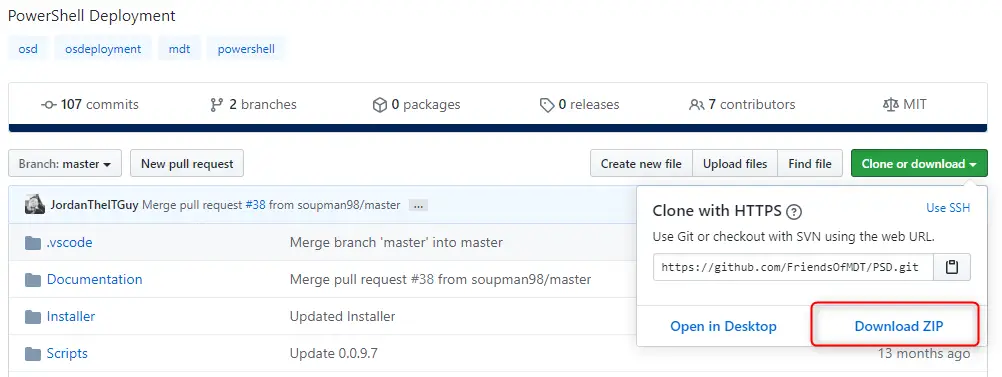
- Download the zip from Github and extract.
- Launch PowerShell window as administrator
- Browse to the extracted folder and navigate to the “tools” folder (note I’m using a pre-release version of this so the version on Github may differ)
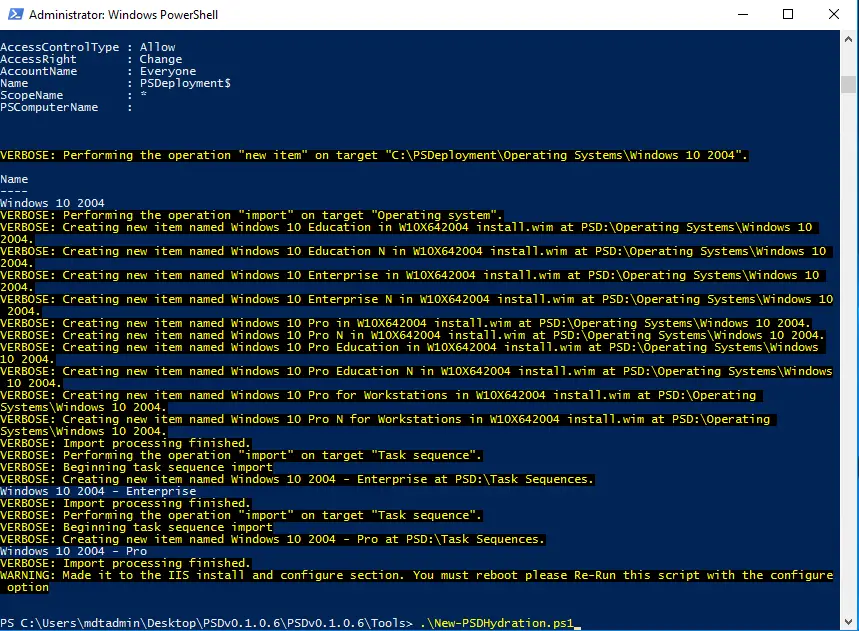
- Run the script .\New-PSDHydration.ps1

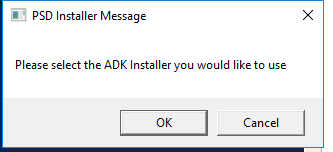
- When prompted for ADK, select the adksetup.exe file you downloaded
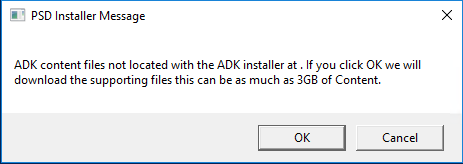
- I did not pre-download the content files, so click OK for the script to do it for you
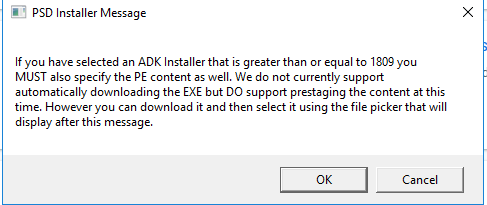
- You will get prompted to select the WinPE installer. Click ok and select adkwinpesetup.exe
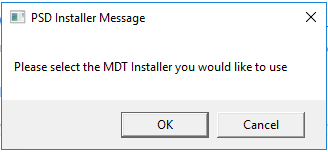
- When prompted, select the MDT installer (MicrosoftDeploymentToolkit_x64.msi)
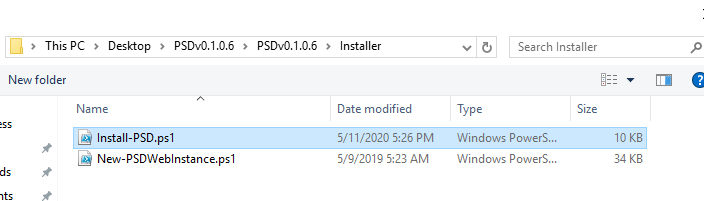
- And finally, select the PSDK installer script (Install-PSD.ps1) in the “Installer” folder of the PSD download.
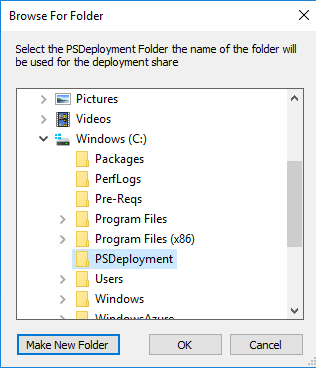
- I created a new folder that will be used for the Deployment Share and selected it when prompted:
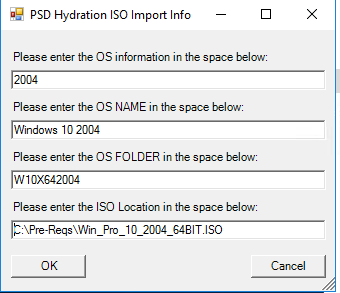
- Next, complete the OS info:
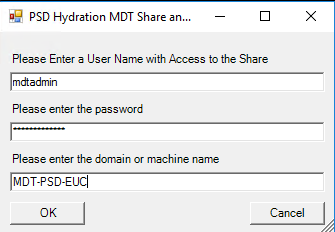
- Enter an user with access to the share
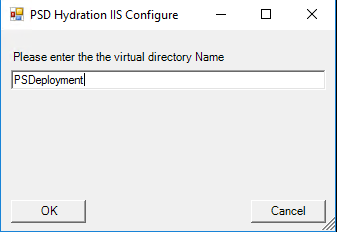
- Enter IIS website info. I changed mine to match the name of my deployment share
- Then the script will download the necessary bits:
And import the OS

- Once completed it will show this message:
- Go ahead and reboot the server
- When it comes back up you’ll need to re-run the script again. You may have noticed that the previous step said to “re-run this script with the configure option”. This is actually in reference to a different script the main hydration script calls (New-PSDWebInstance.ps1). That’s ok, you can still run the main New-PSHydration.ps1 script after the reboot to complete the config.

In my case it flashed a separate window, did some stuff, and then closed. When I look at the log I can see “Completed the IIS Configuration review the webinstance log for details. “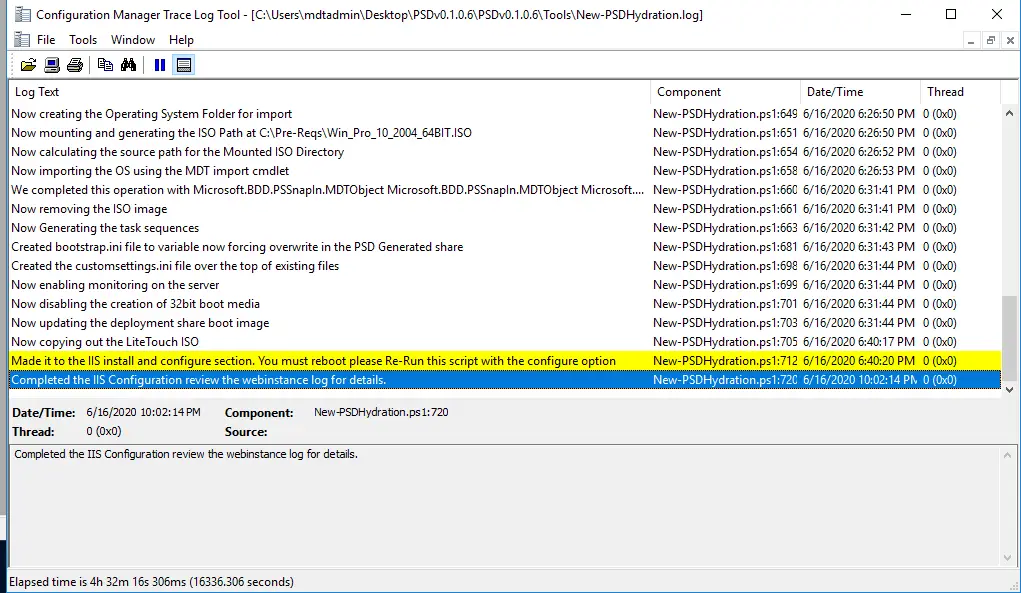
Note: If for some reason you need to only run the New-PSDWWebInstance.ps1 which configures and sets up IIS for you, you can always run it manually:
First Time: New-PSDWWebInstance.ps1 -Install
2nd time (after reboot): .\New-PSDWebInstance.Ps1 -Configure -PSvirtualDirectory “nameofIISwebsite” -psDeploymentFolder “pathToDeploymentShare”. For example:
.\New-PSDWebInstance.Ps1 -Configure -PSvirtualDirectory “PSDeployment” -psDeploymentFolder “C:\PSDeployment” - Hydration and setup is complete. Now we can move onto the Deployment Workbench and starting building our task sequences.
Post Install Configurations
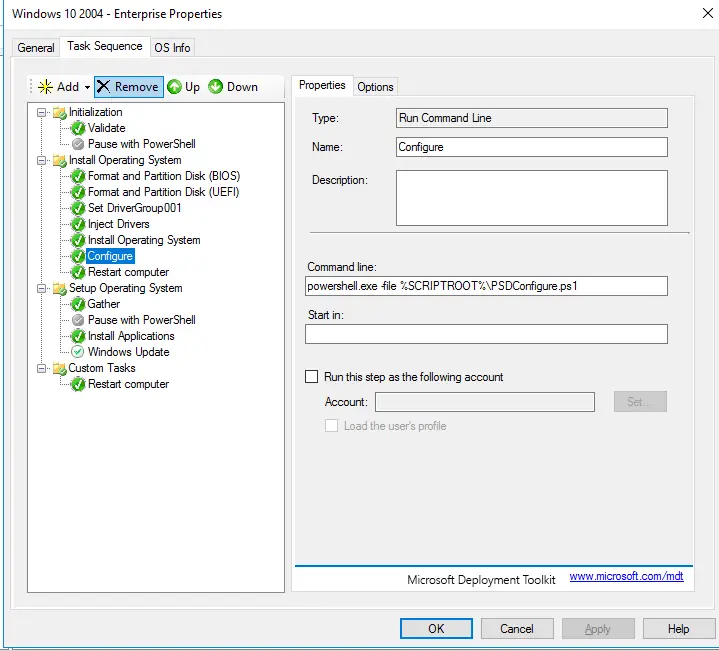
- First, go ahead and launch the Deployment Workbench. You can see that your Deployment Share has been created, your Windows 10 media imported, and task sequences automatically created. Yay!
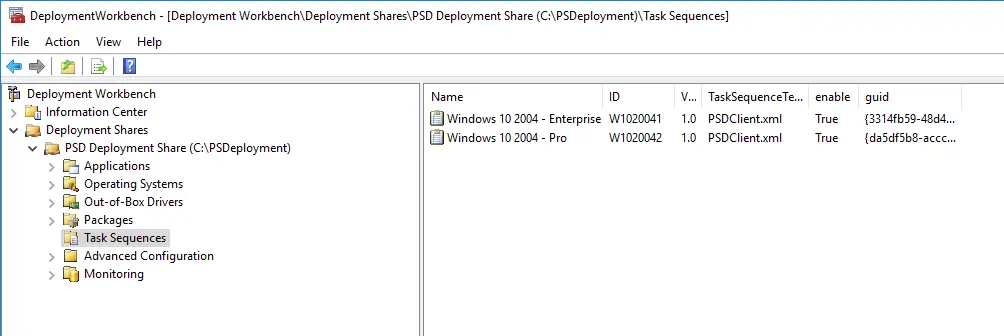
- Let’s open up the Windows 10 2004 Enterprise Task Sequence. You’ll notice right away that they look a bit different than the normal MDT task sequences. These have been updated to use the new powershell versions of the vbscripts that are in stock MDT. For example, if you click on the “configure” task, you’ll see that it is calling the PSDConfigure.ps1 file. And not only that, but many of the redundant or unnecessary steps that go in a normal MDT task sequence have been removed so this is a way cleaner TS.
Configure HTTPS
Configuring HTTPS is a crucial part in ensuring all traffic is properly secured. The good news is that it’s not too difficult to setup. In my case, my organization had a wildcard cert setup for one of our lab environments (*.euccafe.com). This cert was exported with the private key as well as intermediate and root trust certs. Note that you can use “Self-signed” certs for this as well, but you’ll still need to register the public FQDN to point to this server. Johan has steps on how to use the self-signed cert. If you need a free public cert, you can get one from letsenrypt.org just keep in mind these expire every 90 days and you’ll need to make sure to renew before they expire. These steps will outline a public cert method. So let’s walk through the steps:
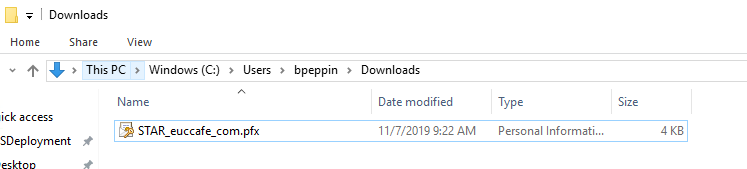
- Get cert and copy to the VM. This cert was in the .pfx format.
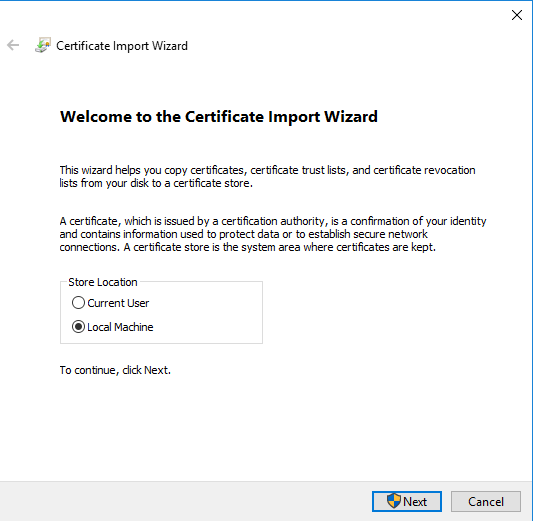
- Double click the cert and follow the wizard. Select “Local Machine” as the store location. Next.
- Verify the file name and path
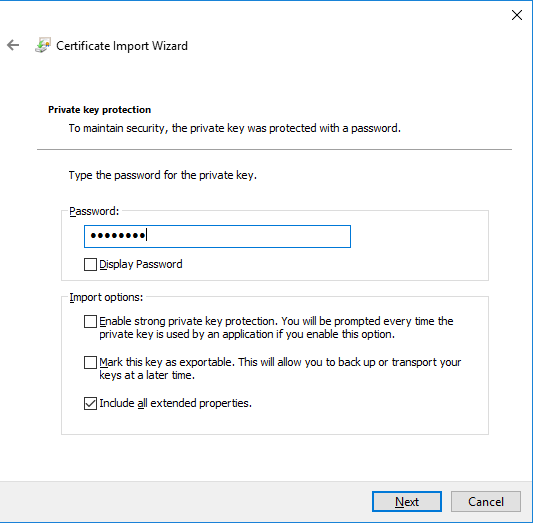
- Type in the password (if you have one). Leave the “Mark this key as exportable” unchecked. Next.
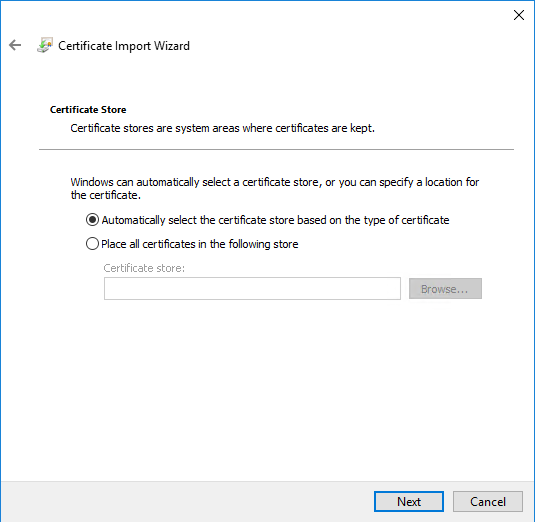
- Select “Automatically select the certificate store based on the type of certificate”. Next and then finish.
- This will import the cert.
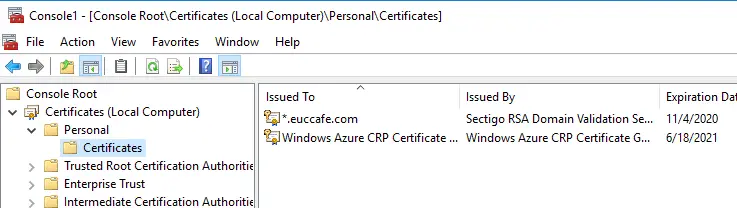
- Load up MMC and add the Certficiate snap-in to view certificates for the local computer. In my case, I can see that my *.euccafe.com cert is installed in the personal store of the computer. I also verified the Trusted Root and Intermediate Root certs where there as well.
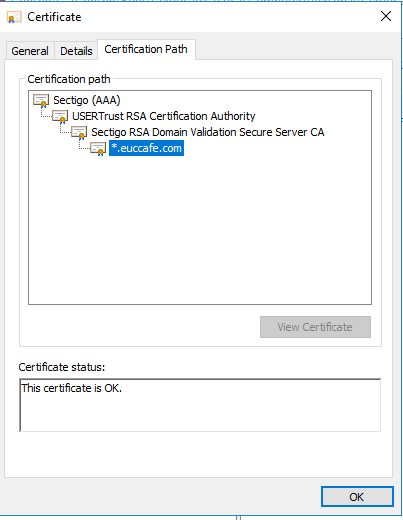
- You can double click that cert, then click on “Certification Path” to verify that it has the proper chain of trust.
Add cert binding to IIS
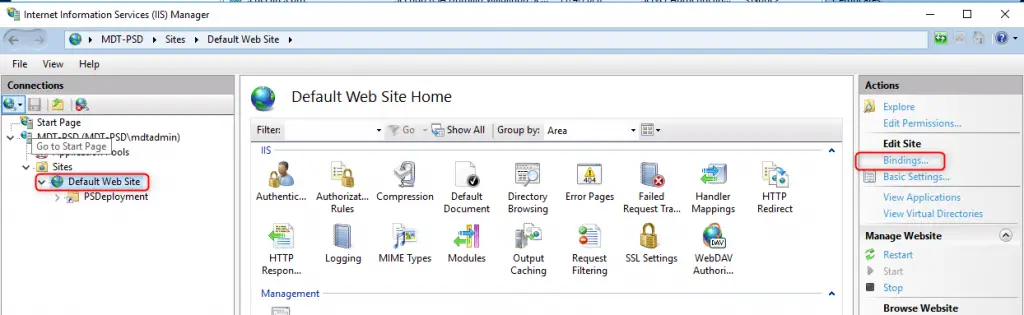
- Now that we have installed the cert on the system, we need to add the bindings to IIS.
- Load up IIS Manager and expand the Sites folder so that you can click on “Default Web Site. Once there, click on “Bindings on the right side.”
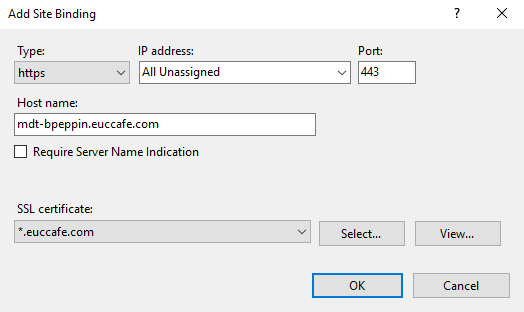
- Click Add
- Select https from the dropdown under Type
- Configure the hostname you’d like. This can literally be anything you want and does not need to match the hostname of your VM or the name of the deployment share. In my case my VM is called MDT-PSD and my Deployment Share is “PSDeployment”, but I wanted my external DNS hostname to be mdt-bpeppin.euccafe.com. You’ll just need to ensure your DNS is pointing this hostname to the public IP of your server (I’ll talk more on this later).
- Under SSL certificate, the cert you installed should be in the list. Select it and click ok.
- Close the Bindings page.
- Click on “Restart” on the right hand side to restart IIS.
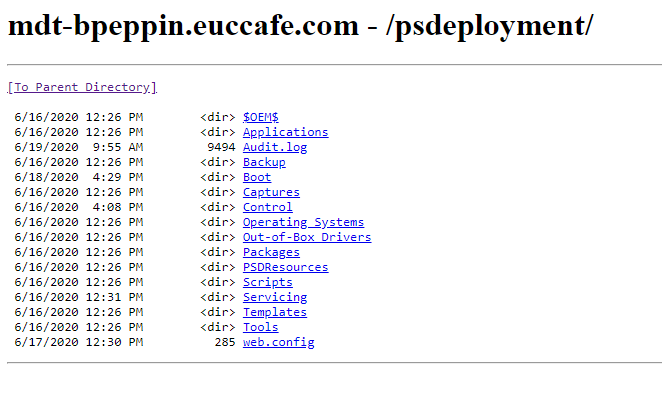
- Click on your website under “Browse Website” to ensure you can get to it. You should see a prompt for username/password.
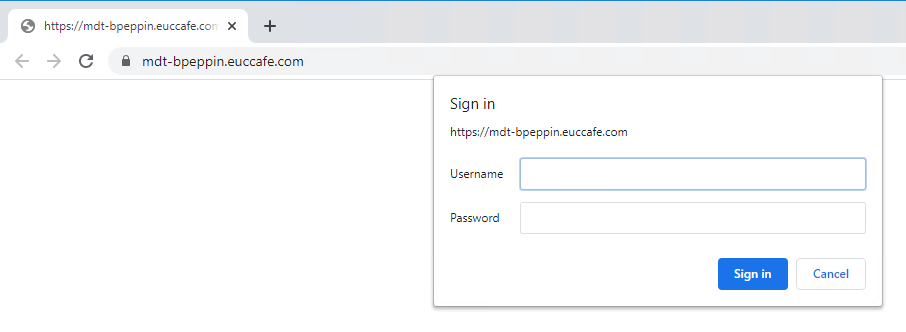
- After entering creds (ones with access to your Deployment Share), it should load:
NOTE: You may need to configure your local hosts file (in C:\windows\system32\drivers\etc) to include the IP address of your server if you haven’t configured external DNS yet.
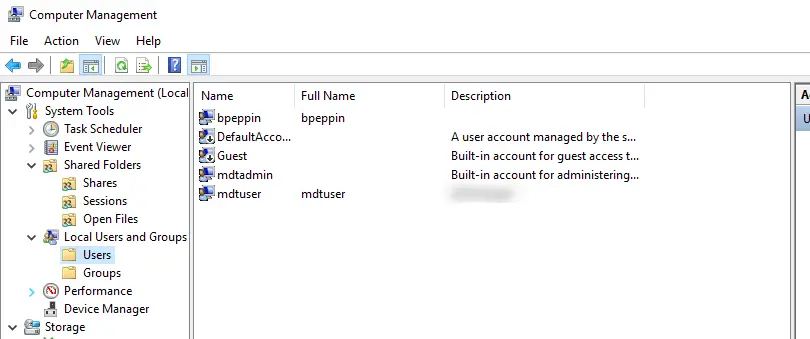
Configure Read Only MDT User
We need to configure a read only (least privelage) user account on our MDT server so that it does not have modify writes to our share. In my case, I’ve just created a local account called “mdtuser” and created a random password.
Next we need to add this to our boot media.
- Load up Deployment Workbench and right click on the share and the properties
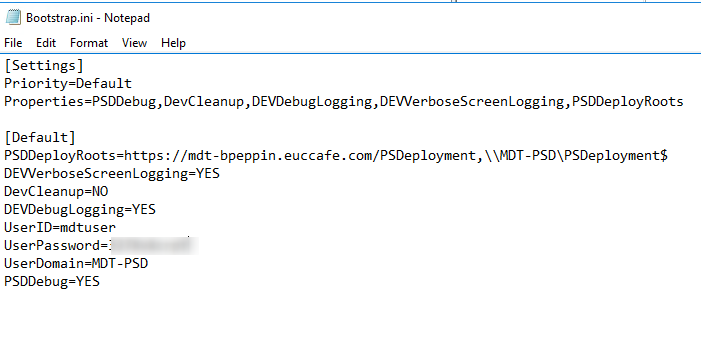
- Click on Rules then “Edit Bootstrap.ini” in the bottom right
- Add the username and password under UserID and UserDomain. Also, while we’re here make sure the PSDeployRoots has your https URL instead of just http.
- Save and close
- The hydration kit already created the following security permissions on the deployment share:
- System – Full Control
- Users – Read and Execute
- Administrators – Full Control
- The share permissions itself gives everyone access. You can look at the very end of the Install-PSD.ps1 script to see the commands run to set these permissions.
Your local mdt user (non-admin) should already have permission to read the share. - Load a web browser again and verify you can login with the new account you just created.
Update Boot Media with Certificate
Now we need to add the root certificate to the boot image so that WinPE trusts the cert that is presented when doing a connection to the server. In order to do this we’ll be using the “Extra Files” feature for the boot media. We’ll create the extra files folder first and then export the cert.
- Load up the Certificates MMC for the Local Computer.
- Navigate to Trust Root Certificate Authorities and find the root CA from your cert. In my case it is “USERTrust RSA Certification Authority”
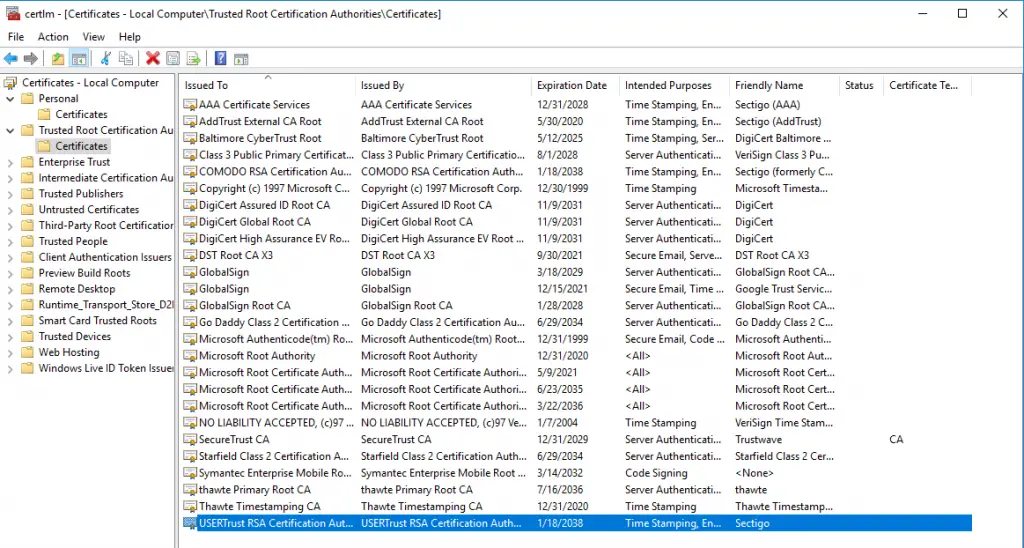
- Right click it and select All Tasks > Export

- Click Next.
- Under file format, leave default (DER encoded)
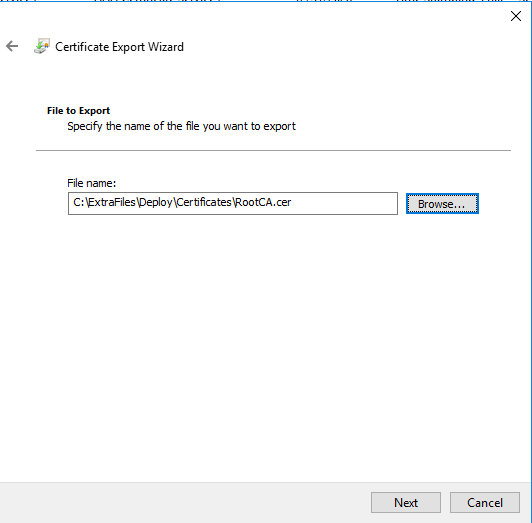
- For file name, click browse. We’ll be using the “Extra Files” feature for the boot media to add the certificate. So create a new folder that has “Deploy\Certificates” structure there. It has to be this exact structure because the PSD startup script searches that location for any certs there and automatically adds them if found (thanks Mikael N!). In my case, I create the following path: C:\ExtraFiles\Deploy\Certificates.
- Name the file whatever you’d like and click Save.
- Click next and Finish to complete the wizard. Now we need to configure MDT to add this folder to the the boot media.
- Go back to the properties of the deployment share and click on Windows PE.
- Select “x64” as your platform
- Under extra files, add the directory there (everything before the Deploy\Certificates part)
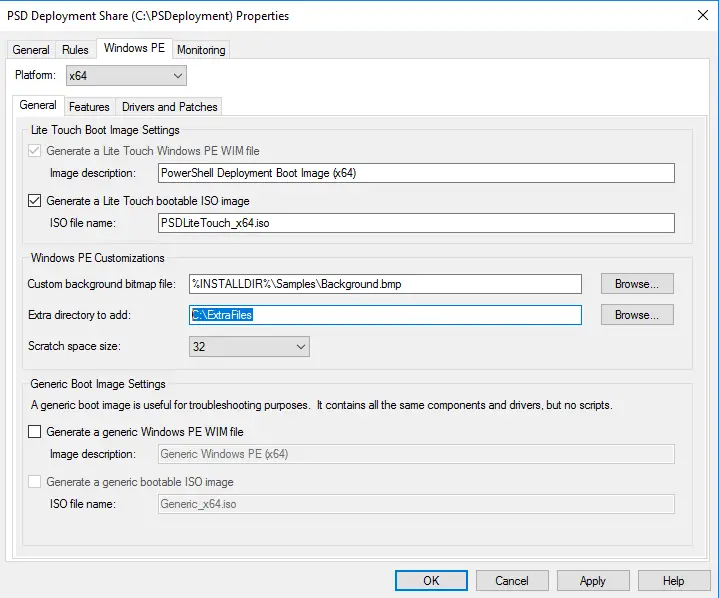
- Click Apply to save.
- You can configure additional boot settings such as background image, drivers, etc. In my environment I also disabled Monitoring since I hadn’t open up those ports to my Azure VM. I may do that later!
- Right click the Deployment Share and click “Update Deployment Share” to generate the boot media.
DNS
You’ll need to make sure that your FQDN of your PS Deployment Share has DNS properly configured. If you are doing this in a lab and you control your own DNS, this is super easy to do. If you want this to work on the internet you must configure the DNS with whomever manages your domain name. My org controls this domain and so I had someone register my FQDN to the public IP address of my Azure VM.
Download Boot Image and Image Away!
We’re finally here and can now test out the process end to end.
- Download the boot image iso file to your local system (in my case it’s saved under “C:\PSDeployment\Boot\PSDLiteTouch_x64.iso”).
- Create a new VM (Hyper-V or VMware workstation)
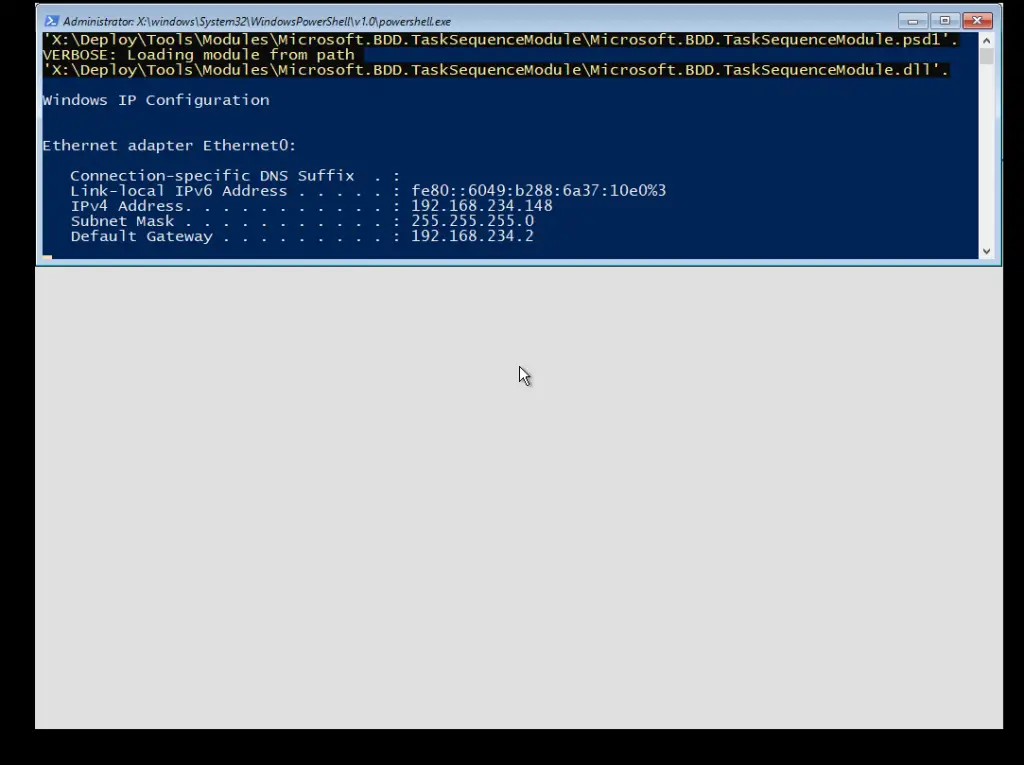
- Attach the PSDLiteTouch_x64.iso file and power on.
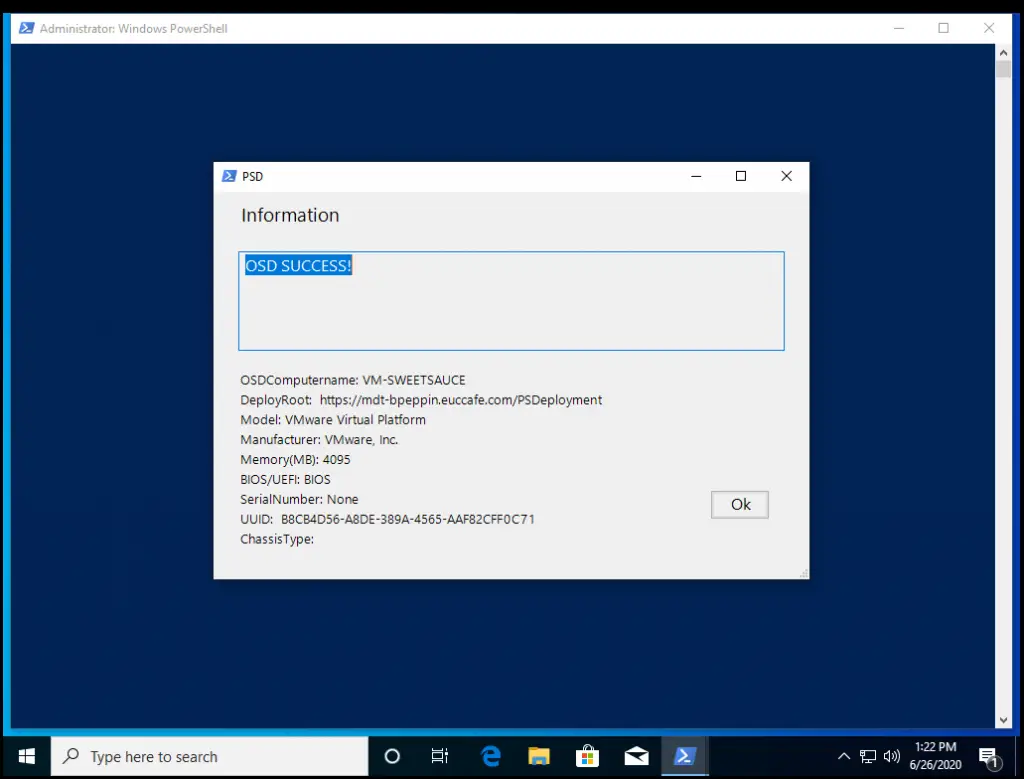
- The Powershell extensions load
- Then it connects to your https share and loads up a new menu screen .Success!
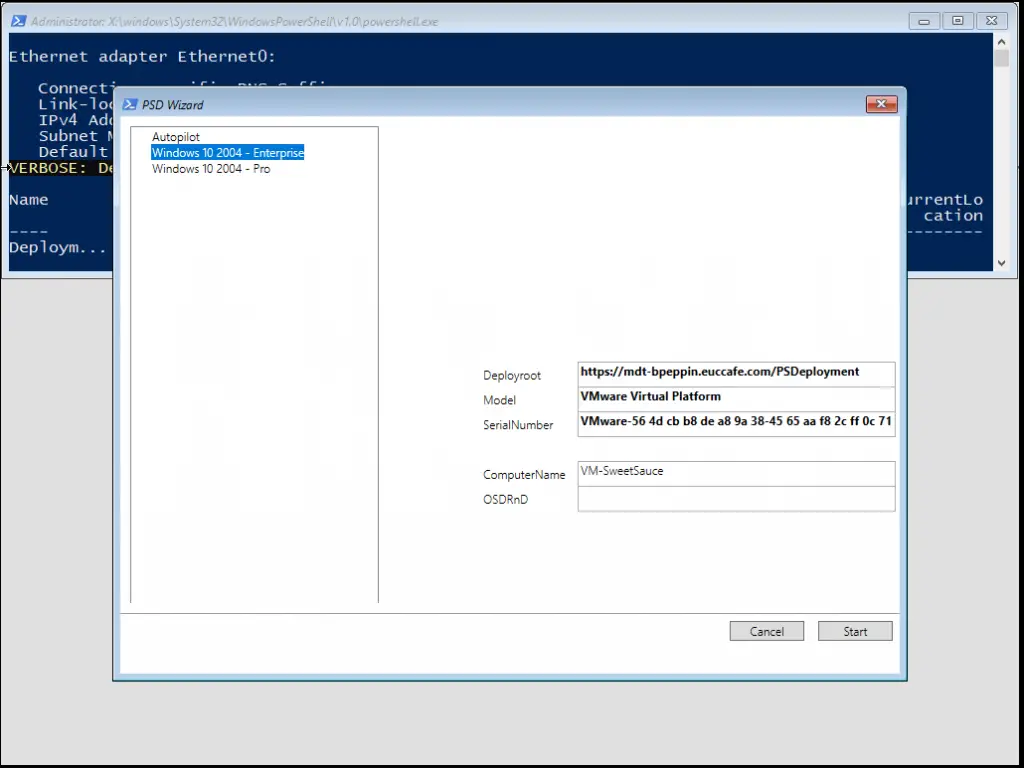
- Select your Task Sequence on the left, type a ComputerName and click Start
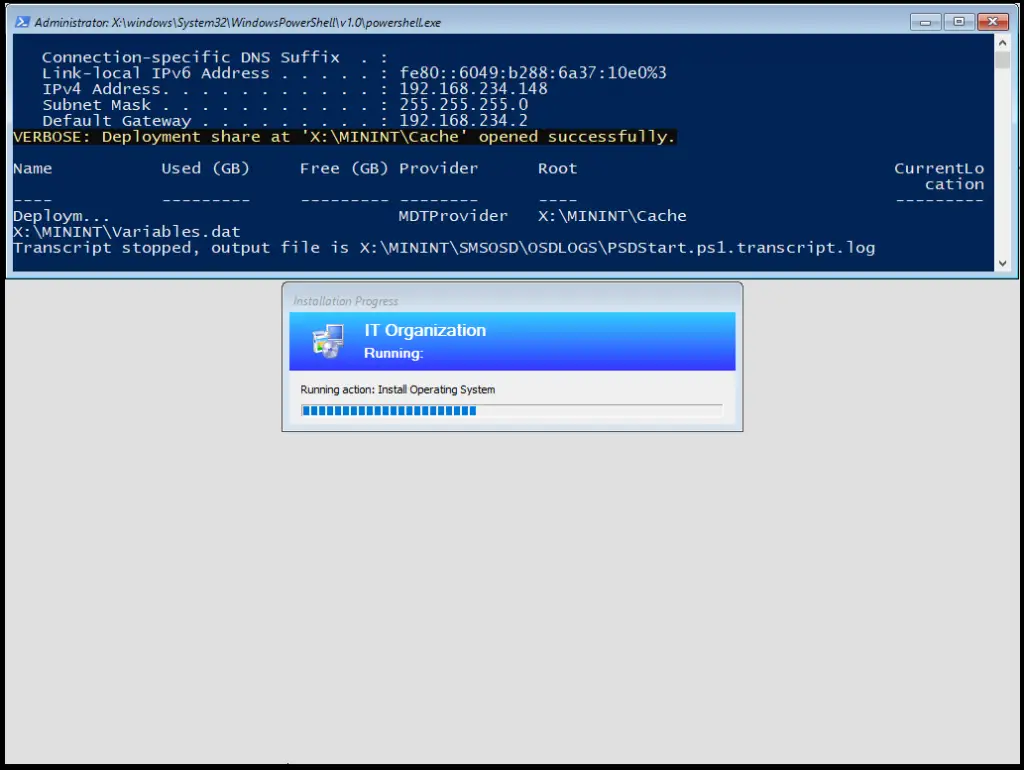
- Imaging begins over the internet! Sweet.
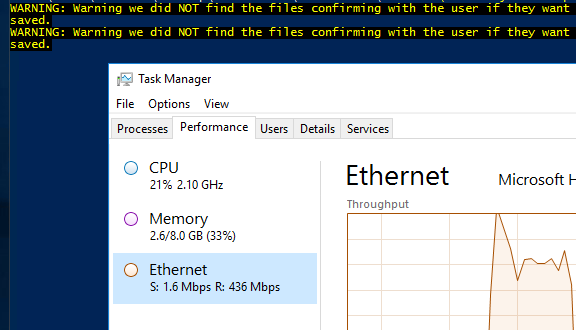
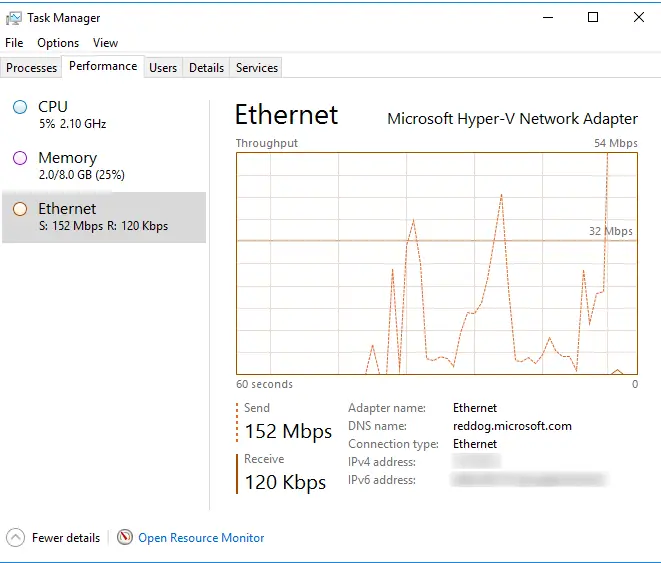
Speeds are pretty good from my Azure VM
And that’s it! The system will image, reboot, and continue the task sequence until complete.
Bonus Stuff
Peer to Peer
Once you get this working, you can explore leveraging P2P solutions like BranchCache (distributed or hosted mode) in order to save bandwidth (and cost) when deployments multiple times in the same location.
Wireless
If you want to add wifi support to MDt, you can check out my post here.
How about domain joining the machine ?
Thank you for this write-up. I was able to get everything set up but when I use the .ISO the MDT Task Sequence selection does not automatically come up, I have to manually run the start.ps1 script and the task sequence does not fully complete, Any suggestions?
Thank for your great works! I followed this tutorial and completed my own server for deploying over Internet. But your souces, it customized a lot nature function of MDT that I want to keep. Can you list me a procedure, that I can follow and do it my self? I know your code add more feature but I don’t need all off them, I just want to a simple version of mdt that can support deploying over http. I did install MDT and created IIS with webdav, but missing the way to connect these parts. Thank for your considers.
As I didn’t write the PSD extension to MDT, I wouldn’t be able to send you everything that changed. You should contact the owners on their Github page about this.
Brooks – Please disregard my last question. My issue turned out to be that I had Hyper-V VM set to use dynamic memory. After I turned that off it worked fine. Thanks again for this great post!!!
Hi Ant – I ran into this same problem. It looks to be an issue with prestart command file exiting out and the PE_Unattend.xml file not calling the appropriate synchronous commands. I ended up modifying the *\DeploymentShare\Templates\Unattend_PE_x64.xml file (you could do the same for the x86 if you are running x86 winPE).
1. Change line 25 to call PSDStart.ps1 instead of PSDPreStart.ps1 (Line should now read – powershell.exe -noprofile -windowstyle hidden -file X:\Deploy\Scripts\PSDStart.ps1)
2. Remove lines 27 – 31 and then save the file
3. Rebuild WinPE via the Update Deployment Share option.
I understand this method is not optimal and you lose the ability to run any of the prestart commands, but it did resolve the immediate issue.
Hi Brook, applications not installing from the TS, any help on how to do that
Configured as you mentioned and at the litetouchiso boot, this console window came and stuck there.
https://ibb.co/x5MJqyM
I have the same problem mentioned to UDAY KIRAN REDDY
Anyone could help me.
It got resolved for me once I assign a domain name instead of IP Address
Creating a step with powershell is not working. I just cloned your configure step and kept my powershell script in the Scripts folder of deployment share, but the script is not running during task sequence execution. Please suggest
Brooks – I’ve been using PSD/MDT for about a year now and it’s worked great until recently. It works fine on a HyperV VM, but when I run it on a physical machine it installed the OS and says it’s installing the apps, but at last reboot it comes back to booting from my USB stick. When I exit out and goto the newly installed OS, none of my apps are installed. I’ve checked smsts.log, but see nothing out of the ordinary. Any ideas?
Hey Carlton,
Regarding the booting back to USB on the physical – that is a BIOS boot setting. Do you have the USB set as first on the boot order list? If so, you definitely want Windows Boot Manager first. When booting to USB use the one time boot menu that each vendor offer. For example on Dell it’s F12.
Regarding the Apps not installing – not totally sure on that one. You’ve looked through all the logs in %WINDIR%\TEMP\DeploymentLogs? Bdd.log is the main log that all of the other logs roll up into.