There are many nodes in the Passport For Work CSP which configure and control Windows Hello for Business, however only a subset are available in the UI in Workspace ONE UEM. Here is how you can build a custom profile in order to access every node:
- Login to VMware Policy Builder
- Click on the appropriate version of Windows 10. In my case I’ll be using 2004 version.
- Search for the Passport for Work item in the list. Note: This list is not alphabetized so you may need to use your browser search to quickly find it

- Select it and click Configure (at the top)
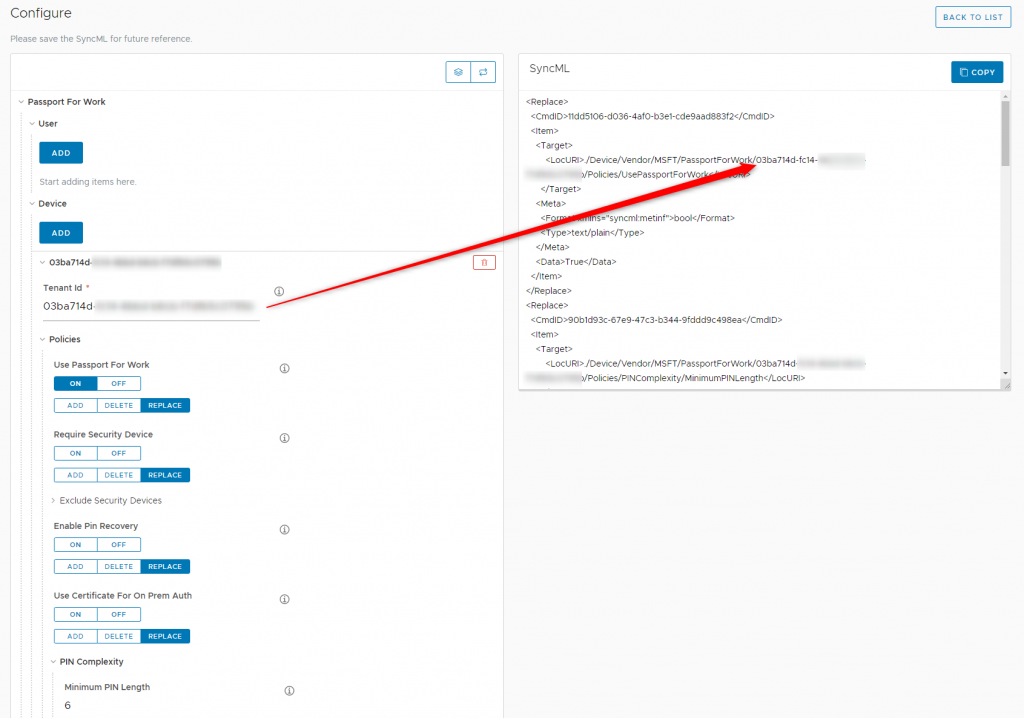
- Under “Device” click the “Add” button. Once you do a new section will appear asking for Tenant ID:

- You will need to enter your AAD Tenant ID. This can be found by logging into Azure Active Directory (portal.azure.com) > Select Azure Active Directory > Click Properties.

- Copy and paste that value into VMware policy builder.

- Then expand the “Policies” section and configure additional nodes as desired such as PIN complexity.
- You can see my example below. I set the following settings:
- Passport for Work: Enabled
- Minimum PIN length: 6
- Maximum PIN length: 10
- Require Uppercase: true (value of 1)
- Require lowercase: true (value of 1)
- PIN expiration (180 days)
<Replace>
  <CmdID>11dd5106-d036-4af0-b3e1-cde9aad883f2</CmdID>
  <Item>
    <Target>
        <LocURI>./Device/Vendor/MSFT/PassportForWork/[AAD ID Goes here]/Policies/UsePassportForWork</LocURI>
      </Target>
    <Meta>
      <Format xmlns="syncml:metinf">bool</Format>
      <Type>text/plain</Type>
    </Meta>
    <Data>True</Data>
  </Item>
</Replace>
<Replace>
  <CmdID>90b1d93c-67e9-47c3-b344-9fddd9c498ea</CmdID>
  <Item>
    <Target>
        <LocURI>./Device/Vendor/MSFT/PassportForWork/[AAD ID Goes here]/Policies/PINComplexity/MinimumPINLength</LocURI>
      </Target>
    <Meta>
      <Format xmlns="syncml:metinf">int</Format>
      <Type>text/plain</Type>
    </Meta>
    <Data>6</Data>
  </Item>
</Replace>
<Replace>
  <CmdID>e4215244-4225-42d6-985a-b34353e42cba</CmdID>
  <Item>
    <Target>
        <LocURI>./Device/Vendor/MSFT/PassportForWork/[AAD ID Goes here]/Policies/PINComplexity/MaximumPINLength</LocURI>
      </Target>
    <Meta>
      <Format xmlns="syncml:metinf">int</Format>
      <Type>text/plain</Type>
    </Meta>
    <Data>10</Data>
  </Item>
</Replace>
<Replace>
  <CmdID>a9dfed0b-9ca1-460b-bcea-ff76391e55a0</CmdID>
  <Item>
    <Target>
        <LocURI>./Device/Vendor/MSFT/PassportForWork/[AAD ID Goes here]/Policies/PINComplexity/UppercaseLetters</LocURI>
      </Target>
    <Meta>
      <Format xmlns="syncml:metinf">int</Format>
      <Type>text/plain</Type>
    </Meta>
    <Data>1</Data>
  </Item>
</Replace>
<Replace>
  <CmdID>14629c04-d9cd-4d8d-869b-fb18c2b2cfbd</CmdID>
  <Item>
    <Target>
        <LocURI>./Device/Vendor/MSFT/PassportForWork/[AAD ID Goes here]/Policies/PINComplexity/LowercaseLetters</LocURI>
      </Target>
    <Meta>
      <Format xmlns="syncml:metinf">int</Format>
      <Type>text/plain</Type>
    </Meta>
    <Data>1</Data>
  </Item>
</Replace>
<Replace>
  <CmdID>11b8906d-8094-4bec-baeb-38114bfdf208</CmdID>
  <Item>
    <Target>
        <LocURI>./Device/Vendor/MSFT/PassportForWork/[AAD ID Goes here]/Policies/PINComplexity/Expiration</LocURI>
      </Target>
    <Meta>
      <Format xmlns="syncml:metinf">int</Format>
      <Type>text/plain</Type>
    </Meta>
    <Data>180</Data>
  </Item>
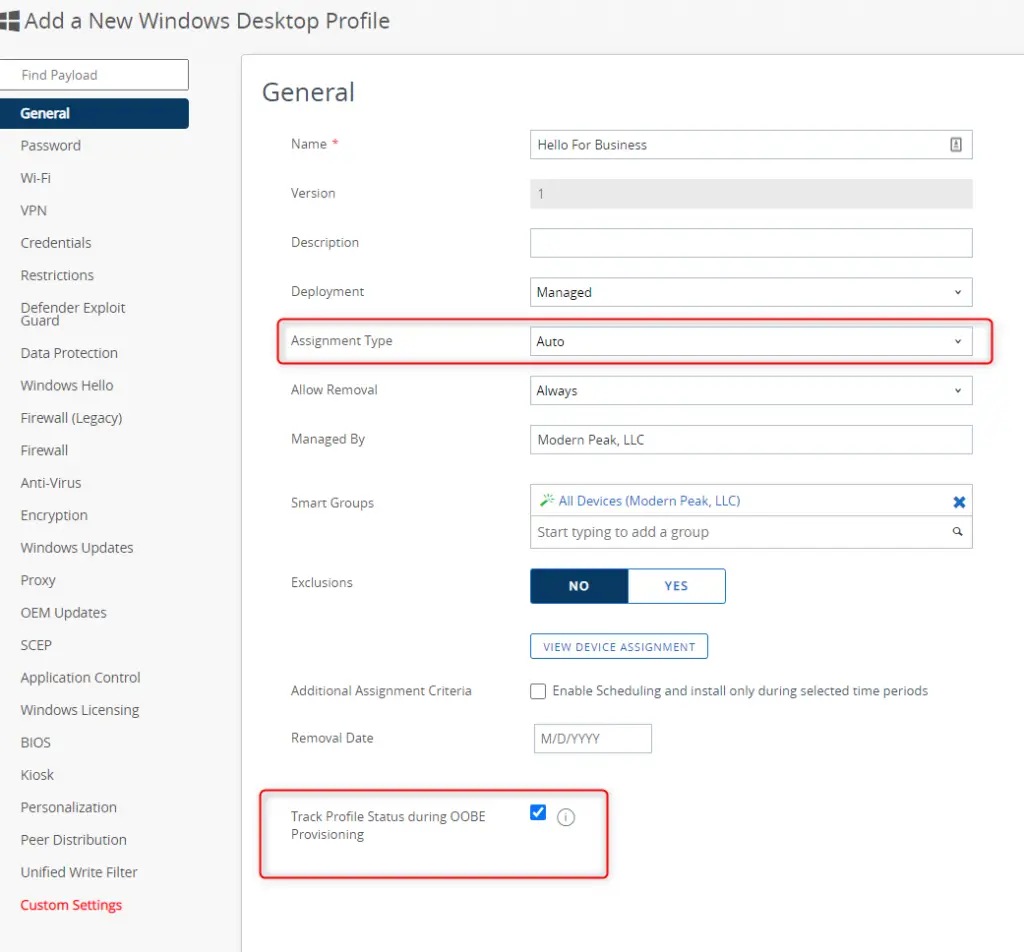
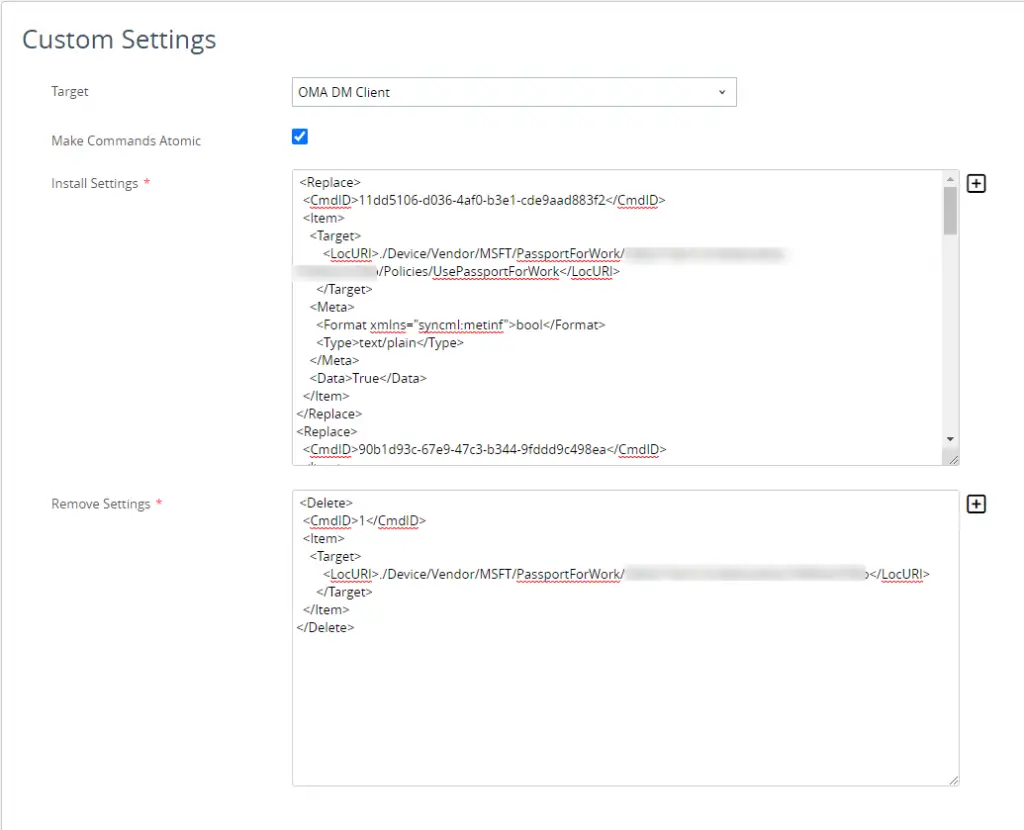
</Replace>- Next, copy the entire section to clipboard and create a “Custom Settings” profile for Windows 10 Device. There are 2 important settings you’ll need:
- Set to “Auto” Assignment Type so that it can be deployed automatically to devices during OOBE.
- Enable “Track Profile Status during OOBE provisioning”. This ensures that the profile is deployed and installed on the device BEFORE the client actually prompts for the PIN. This is very important so that you don’t have this come down after the initial PIN is set. If you don’t set this value and it does come down after, then the user will be prompted twice to configure the PIN.

- Then, under the custom settings area, paste in the XML data. You can use my “Delete” settings area if desired.

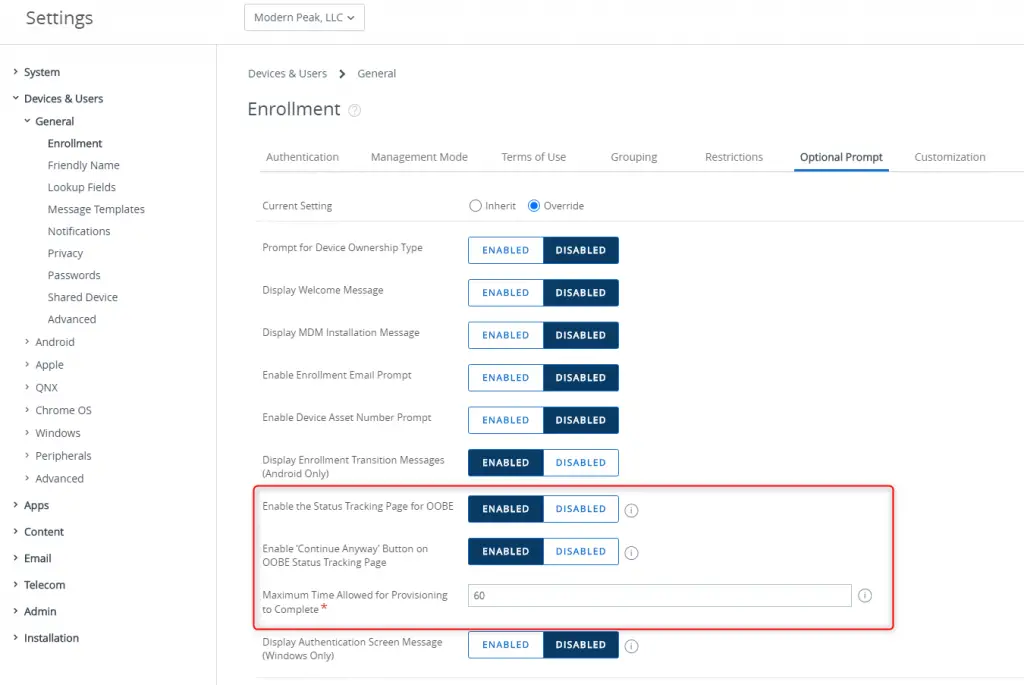
11. Additionally, don’t forget to enable the OOBE status tracking page under Settings > Devices & Users > General > Enrollment > Optional Prompt

And that’s it. When the user goes through OOBE, you should see a new status tracking page pop up after they have authenticated.

You can see that the requirements are updated with the ones that I configured in the profile.

And that’s it!