
Have you wondered how to control the Workspace ONE hub upgrade process so that it rolls out in a manner that you decide? Well, you’re not alone. Many customers I talk to want to manage the rollout of the new version of the Hub in their environment in order to mitigate problems that may arise. They may also have change control processes they need to abide by or blackout windows where no changes are allowed to be made on clients.
We have a few different ways of handling Hub upgrades and you will need to follow one of these ways to ensure things go smoothly. You can’t just simply deploy the new version of the AirwatchAgent.msi (Hub) and install it over top of the existing Hub. This can result in broken enrollments or unexpected restarts of the machines. The Hub has gotten better over years of dealing with those sad paths, but it’s still best practice to upgrade the Hub with the proper method.
Auto Upgrade
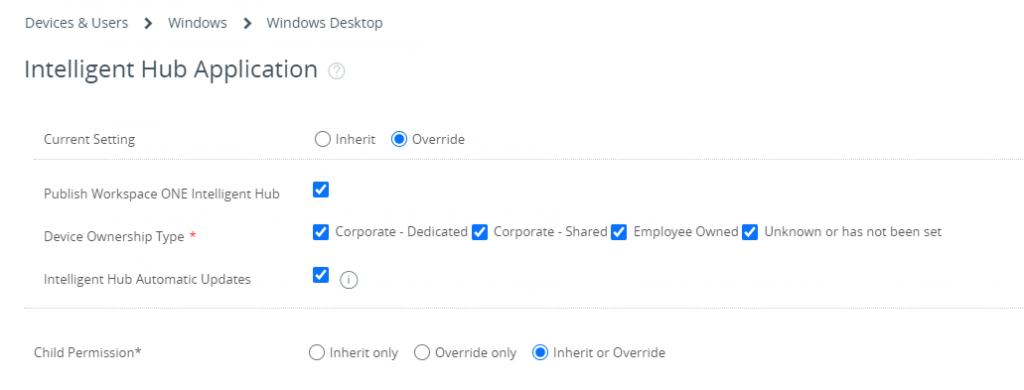
This is the easiest and most widely used way of upgrading the Hub. I know you’re here to learn how to control the upgrade, but in case you change your mind the configuration for this is under All Settings > Devices & Users > Windows Desktop > Intelligent Hub Application. Be sure to check the Intelligent Hub Automatic Updates checkbox. Note that is on a per-OG basis so you can have some OGs with this turned on.
Manual Upgrade
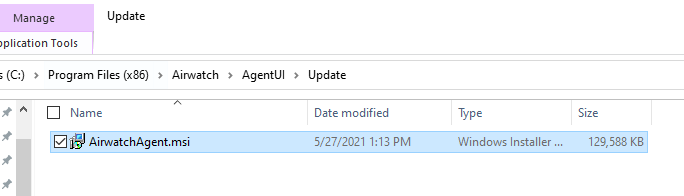
It’s important to know actually how the Hub upgrade process works before we get into the real methods of deploying this at scale. If you look in C:\Program Files (x86)\Airwatch\AgentUI, you will see an executable called AW.WinPC.Updater.exe (It may also be located in C:\Program Files (x86)\Airwatch\AgentUI\Resources). This exe will look for an AirwatchAgent.msi file located in the C:\Program Files (x86)\Airwatch\AgentUI\Update folder and then take care of upgrading itself to that version. It will stop services, upgrade files, clean up old files, and keep enrollment intact throughout the process (very important!). So to do this manually, all you need to do is:
- Copy a newer version of AirwatchAgent.msi to C:\Program Files (x86)\Airwatch\AgentUI\Update
- Right-click and run C:\Program Files (x86)\Airwatch\AgentUI\AW.WinPC.Updater.exe as administrator. Note: If this is still located under the Resources folder, copy it out into the main AgentUI folder and then run it.
After a short while, your agent will be on the newer version. Remember to query for an applications sample on the device in order to refresh application inventory. With this info in mind, let’s move onto the next method of deploying this at scale.
Software Distribution
The next best way to control the Intelligent Hub upgrade process is to use Software Distribution (SFD). You get benefits like peer-to-peer, CDN, and reporting but the only caveat is that you can’t just upload the MSI as an app and install it over top. I wrote a script that can handle the copying of the AirwatchAgent to the Update folder and then calling the AW.WinPC.Updater.exe as described above.
Download the Hub
- Grab the correct Hub version (AirwatchAgent.msi). There are a few ways to this:
- Download it from https://getwsone.com. This will download the latest GA build of the Hub so make sure it matches your console version.
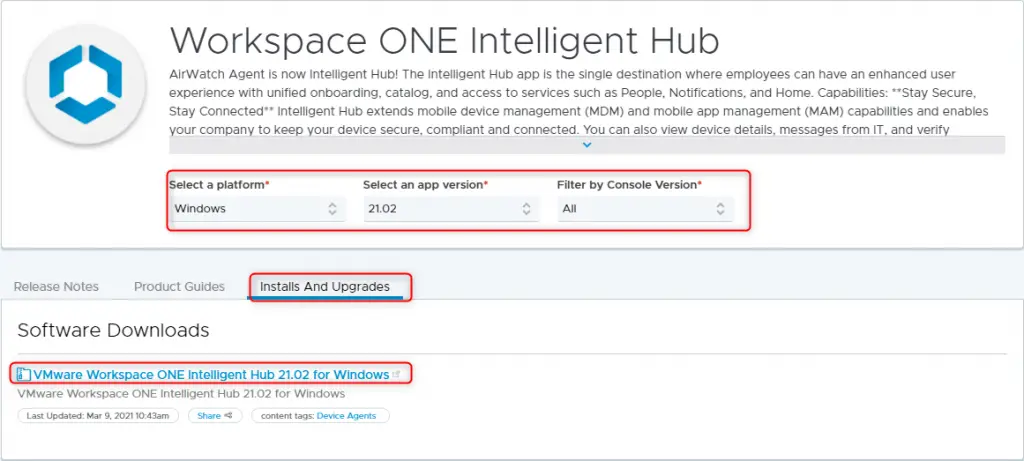
- If you want to pick a different version, go to My.WorkspaceONE and click Login in the top right. This link should take you directly to the Intelligent Hub page.
- Select Windows and the app version you need (i.e. 21.05). For console version select All.
- Click on the Installs and Upgrades tab and download the Hub
Find the App GUID
Now we need to find the correct product GUID of the MSI so that SFD can correctly detect that the new version is fully installed. To do this, grab a test machine and follow the steps outlined in the Manually Steps outlined above. Or you can simply install the Hub on a clean VM without doing enrollment.
- Once upgraded, launch an elevated PowerShell window.
- Copy and paste this command. This will get the App GUID of the Hub version that is installed (the new upgraded version if you did the previous steps correctly)
(Get-ItemProperty HKLM:\Software\wow6432node\Microsoft\Windows\CurrentVersion\Uninstall\* | where-Object {$_.DisplayName -like "Workspace ONE Intelligent Hub*" }).PSChildname
- Save this GUID – we’ll need it in a sec.
Create the Application
Now we can work on creating an application in Workspace ONE.
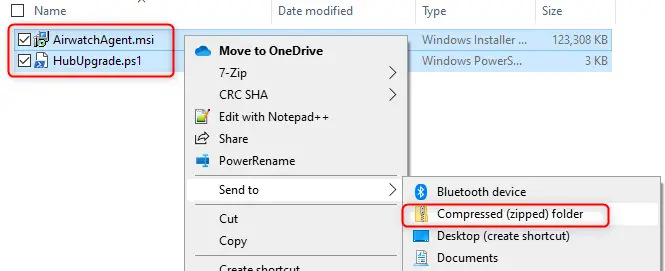
- Download the HubUpgrade.ps1 script from here.
- Put both it and the AirwatchAgent.msi file together in a folder by themselves.
- Select both files, right-click and click Send to > Compressed (zipped) folder.
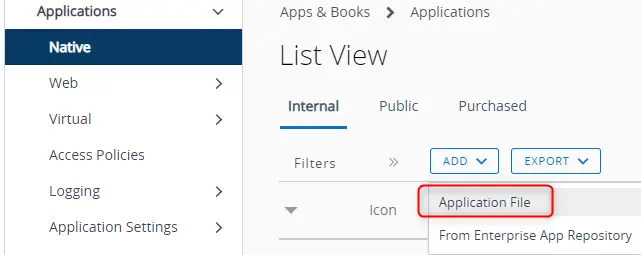
- Go to Workspace ONE UEM and create a new application by going to Apps & Books > Applications > Native > Internal. Then Add > Application File.
- Upload the zip file we just created. Once it’s done uploading click Continue. It should take you to the application configuration page.
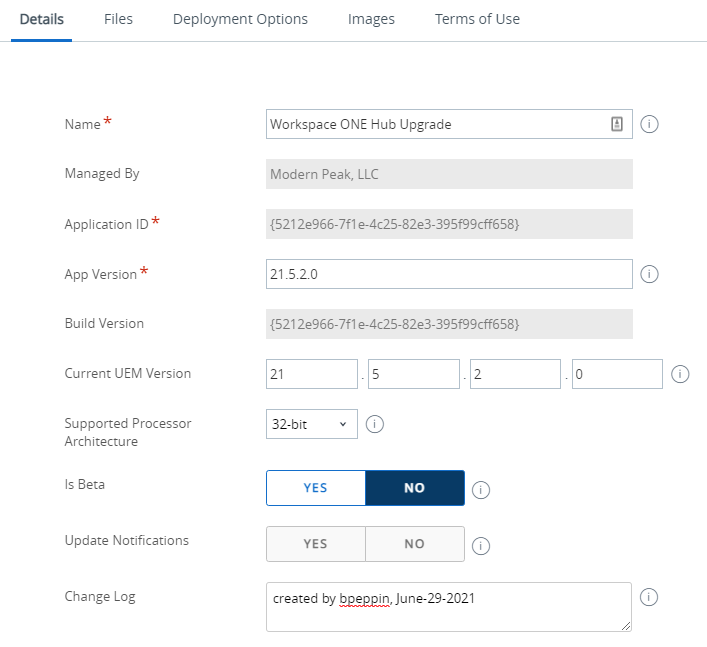
- Complete the Application configuration with these details:
- Details Tab
- Name: Workspace ONE Hub Upgrade
- App Version: Enter your version. (I.e. 21.5.2.0)
- Current UEM Version: Have this match the App Version.
- Change Log: I recommend a format like: “created by bpeppin, June-29-2021”
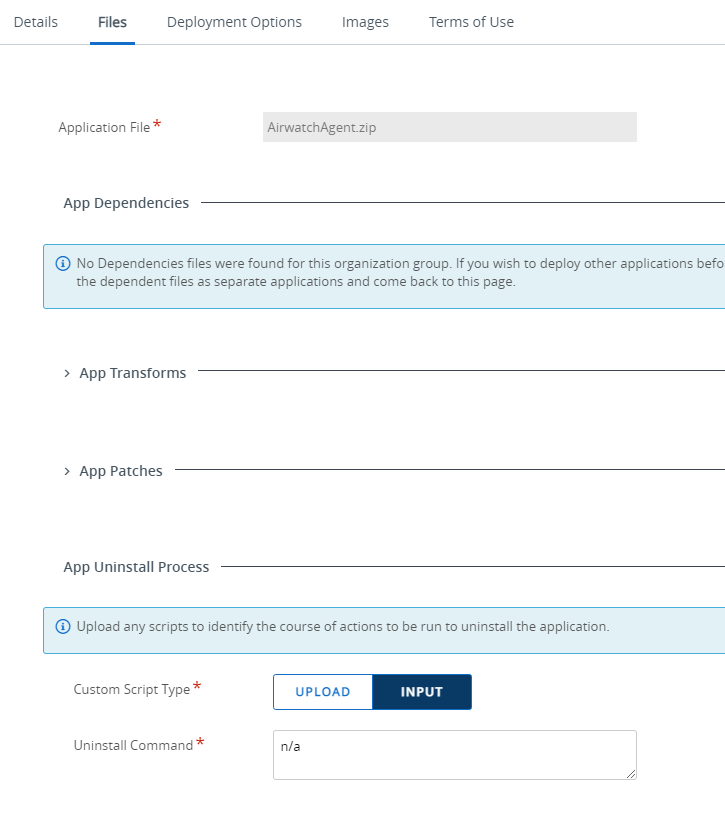
- Files Tab
- Uninstall Command: I recommend putting something like “n/a” because you don’t want the Hub uninstalling itself if assignments get removed.
- Deployment Options
- When To Install Section (optional). I normally leave default.
- Install Context: Device
- Install Command: powershell -executionpolicy bypass -file .\HubUpgrade.ps1
- Admin Privelages: Yes
- Device Restart: Do Not Restart
- Retry Count, Retry Interval, Install Timeout: Leave default.
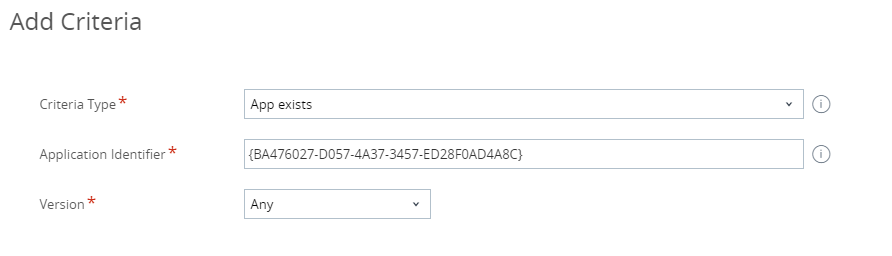
- When To Call Install Complete
- App Exists: Enter the GUID you gathered from earlier. It’s ok to include brackets.
- App Exists: Enter the GUID you gathered from earlier. It’s ok to include brackets.
- Click Add and we are just about done. You can optionally add a logo if you’d like under the Images tab.
- Click Save & Assign.
- Under Distribution, create a name and fill out the details. I recommend adding a smaller Assignment Group to test and then adding more and more groups as you go.
- For the App Delivery method, I like to keep it set to On Demand while I test and then flip it to Auto once it’s working well.
- Click Create, Save, and Publish.
Deploy to a Device
Now let’s deploy this to our test device.
- Find the device in UEM and go to the Apps tab.
- Select Workspace ONE Hub Upgrade and click Install

3. You may see a Toast message pop up on the device. If you want to remove this message and make it completely silent and edit the assignment. If you change the delivery method to Auto a new option will appear called Hide Notifications. Enable that to hide notifications.
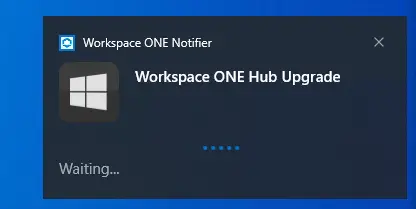
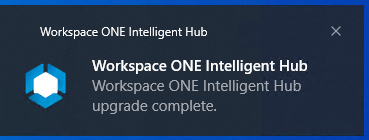
- After a minute or so, the Hub upgrade should complete.
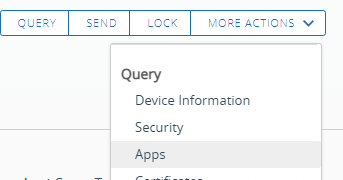
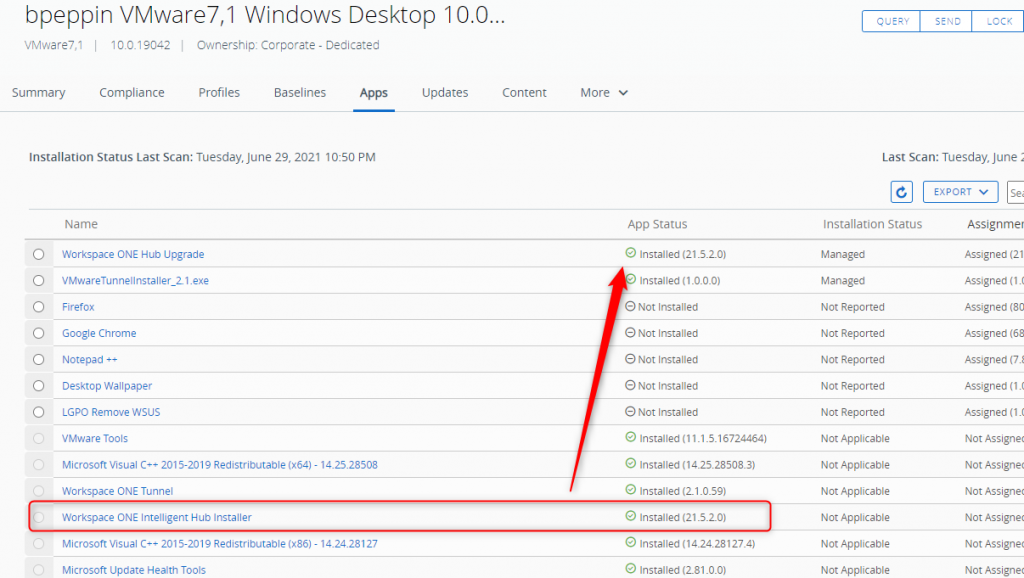
- If you refresh the Apps tab, you should see a green checkmark by the app we just installed. But if you look at the Workspace ONE Intelligent Hub Installer, which is the installed MSI as reported by application inventory, you’ll notice it is probably still on the older version. This won’t get updated until the next application sample completes. We can speed this up by clicking More Actions > Apps.
- Once the sample comes back, it should reflect the updated version. Yay!
Conclusion
Deploying a new version of the Workspace ONE Intelligent Hub shouldn’t be a difficult process. While I still recommend going with the Auto Upgrade process as it’s is 100% automated, I understand the need to have more control. Now you know how to properly upgrade the Workspace ONE Hub on Windows 10 in a controlled and supported way. As your test groups pass validation, keep adding more and more assignment groups in increasing size until you get to 100%. Rinse and repeat with each UEM Console upgrade and you’re in business.
Hi Brooks,
Great post! I’m having some issues with the update in my macOS devices, when the Hub App tries to update shows a message that another app in the device needs to be close before the update (The app is a Netskope agent) do yo know if there is a way to configure an exception in the hub update for not to close that app? I have the automated proccess activated dont know why shows that message.
Regards!
Thanks for the writeup!
Do you have any advice for dealing with multiple simultaneous hub installations? We have an issue where a botched GPO deployment resulted in hundreds of laptops running multiple versions of the Hub at once. The newest one will auto upgrade, but most other commands don’t process.
Support’s only suggestion was to go hand-uninstall and re-install the Hub on every machine. Of course, uninstalling triggers unenrollment, which then means we have to wait for all the apps and products to reprovision.
Apparently the Airwatch installer is not smart enough to consistently detect a previous installation and will happily install itself twice – or at least, 21.2.1 doesn’t get replaced by 21.5.3.
Hey Adam,
That is a bit odd and I haven’t personally seen that, but not terribly surprised it’s happening. I wrote a silent unenroll/re-enroll script that may be able to help you here. Give it a shot and let me know. It will search for any previously installed versions and remove them.
https://github.com/vmware-samples/euc-samples/tree/master/Windows-Samples/Product%20Provisioning/Workspace%20ONE%20Re-Enrollment
That’s excellent, thank you! I will give it a shot when we do our tests next week and let you know how it goes.
Lines 35 and 68 in the HubUpgrade script do not appear to be correct for use later in the script. Just an observation I could be incorrect.
Good catch! I fixed the script and uploaded it to Github. Check it out and let me know if there are still issues.
Doesn’t get replaced by 21.5.3 –
so can we create a script with this command (msiexec /i “C:\temp\AirwatchAgent.msi” /quiet) and we will make make zip with the agent and deploy.
can result in broken enrollments or unexpected restarts of the machines??
Akshay – That way of doing it is not supported and can result in broken enrollment or unexpected reboots. Be sure to use the methods I outlined in the blog for smooth and supported upgrades.
Good old Vmware have completely cocked up our agents, and come across this article… Why is there a fully supported way of handling this, (to stress not your fault…
We’ve been attempting to fix this issue
https://www.newsbreak.com/news/2364037679467/high-cpu-usage-post-upgrade-to-workspace-one-intelligent-hub-21-07
But having run the manual update to see if this works, it’s forcing a re-enrolment… Which is no good to us…
Odd. I’ll see if I can reproduce, but it definitely should not force a re-enrollment. The steps I outlined are the same way the Hub does a self-upgrade if you have auto-update turned on. Can you detail the steps you did so I can try to reproduce?
Where is the log file winding up when deploying with WS1?. It is not located in “C:\ProgramData\Airwatch\UnifiedAgent\Logs\HubUpgrade.log” It does seem to be deploying ok but would like to see the log. We fell victim to https://kb.vmware.com/s/article/85634. Lots of PC going to 100% utilization. So we are using your method to accelerate because the built-in auto deploy is extremely slow.
Which method did you use? If you used my script and the Software Distribution it should be saved in C:\ProgramData\Airwatch\UnifiedAgent\Logs\HubUpgrade.log as that is what the PowerShell script is coded to do. If that isn’t working then it could be a bug. If you use the “manual” method, the log would be “C:\ProgramData\Airwatch\UnifiedAgent\Logs\HubMSIUpdate.log”
worked out perfectly for me. Just a little hint, there is something missing in the write log function. That’s the reason it would not write logs in the folder specified in the $LogFilePath variable.
Just exchange this in line 26
$time + ‘…’ + $Message | Out-File -FilePath ($LogFilePath + “\” + $logfilename) -Append
Now a KB article: https://kb.omnissa.com/s/article/92111
Not sure the “Manual Upgrade” method works anymore. Just tried it and it seemed to work, and the user was still enrolled, but they were getting prompted on the client to log into the hub.